Creating and sharing YouTube Shorts on your iPad can be an exciting way to express your creativity and connect with a larger audience. With the rising popularity of short videos, YouTube has made it easier than ever to create engaging content right from your tablet. Whether you’re a seasoned content creator or just starting out, this guide will walk you through everything you need to know to kick off your journey into the world of
Getting Started with YouTube Shorts on iPad
Ready to dive into YouTube Shorts? Follow these simple steps to get started on your iPad!
- Update Your YouTube App: Before anything else, make sure you have the latest version of the YouTube app installed on your iPad. Go to the App Store, search for YouTube, and tap 'Update' if it's available.
- Open the App: Once updated, launch the YouTube app. If you don't have it yet, just download it from the App Store.
- Create a YouTube Account: If you don’t have a YouTube account, you’ll need one to upload content. Go to the app, tap on your profile icon, and follow the prompts to sign up.
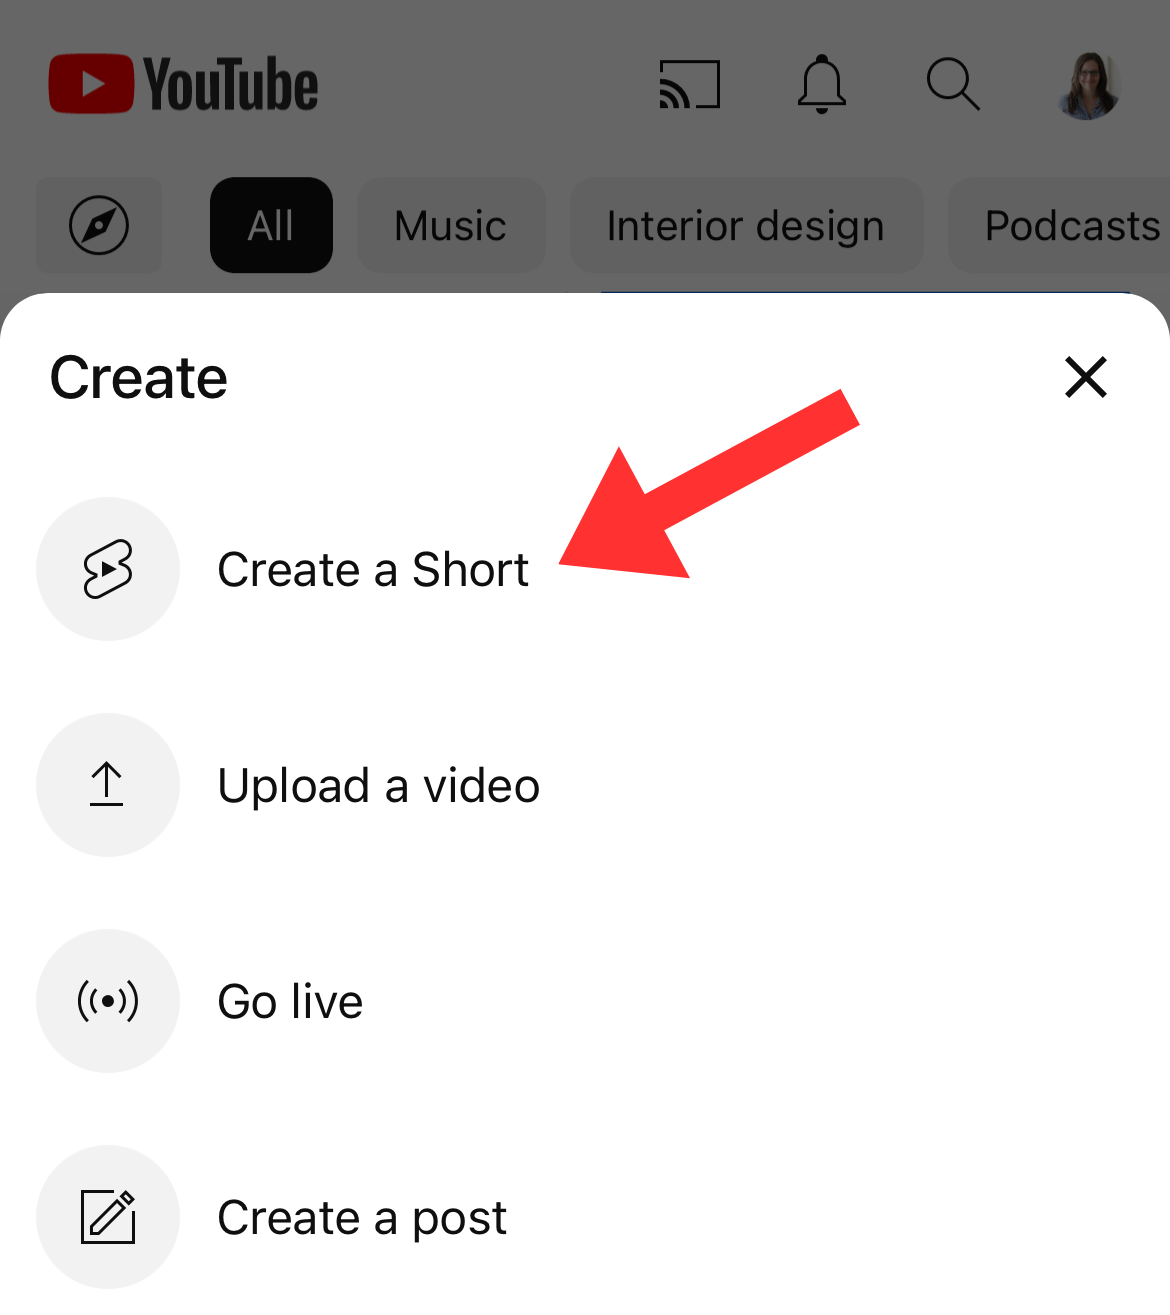
- Access the Shorts Camera: To create a Short, tap the '+' icon at the bottom center of the screen and select 'Create a Short'. This will open up the Shorts camera.
Once you’re in the Shorts camera, you’ll notice a few handy features:
| Feature | Description |
|---|---|
| Record Button | Tap and hold the red record button to start capturing your video. You can record multiple clips! |
| Speed Options | Adjust the speed of your recording to create dynamic effects by tapping on the speed icon. |
| Timer | Set a countdown timer for hands-free recording. Perfect for those solo shots! |
Now you’re all set to unleash your creativity! Play around with different features and styles to make your Shorts truly stand out.
Also Read This: Collections from Imago Images That Will Spark Creativity for Your Next Project
Steps to Create Your YouTube Short
Creating a YouTube Short on your iPad is a fun and straightforward process. Let’s break it down into simple steps so you can easily get started.
- Open the YouTube App: First things first, launch the YouTube app on your iPad. Make sure you have the latest version to access all the cool features!
- Tap on the Create Button: Look for the plus (+) sign, usually located at the bottom center of your screen. Tapping it will reveal a menu.
- Select 'Create a Short': Choose the option that says 'Create a Short.' This is where the magic happens!
- Choose Camera or Upload: You can either record a video directly using the camera or upload one from your library. Just tap on the appropriate option!
- Record Your Clip: If you’re recording live, press and hold the red record button. You can also tap it to start and stop recording at your convenience. Remember, you can make multiple clips!
- Add Music (Optional): Enhance your Short with some background music! You’ll see an option to add tracks from YouTube’s music library.
- Review Your Clips: Once you’ve recorded everything, play back your clips to see if they match your vision. You can always record more if needed!
And there you have it! In just a few steps, you’re ready to dive into the world of YouTube Shorts. Now let’s move on to making it look stunning!
Also Read This: How to Add an Image to Squarespace for Your Website
Editing Your YouTube Short
Edit your YouTube Short to make it pop! The editing process can turn your raw footage into a polished creation that captivates viewers. Here’s how to edit your video using your iPad.
- Access the Editing Tools: After recording your clips, you'll be presented with editing options. Tap on the scissors icon or ‘Edit’ to start enhancing your Short.
- Trim and Cut Clips: If some parts don’t hit the mark, don’t worry! Use the trim feature to cut out any excess footage. Simply drag the edges of the clip to shorten it.
- Change Clip Order: Want to rearrange your clips? Drag and drop them in the desired order. It’s as easy as that!
- Add Text: Want to emphasize a point or add some flair? Use the text tool to overlay text on your video. You can change font styles, colors, and positions!
- Adjust Playback Speed: Add some excitement by speeding up or slowing down certain clips. This feature can be found in the editing toolbar.
- Apply Filters: Add some magic with filters. Enhance your Short’s look by applying one of the many available filters tailored for captivating the audience.
- Preview Your Edit: Don’t forget to preview your edited Short! Watch it a couple of times to ensure it flows just right before finalizing.
With these editing tips, your YouTube Short will surely stand out. Trust your creativity, and don’t hesitate to experiment with different styles and features!
Also Read This: How to Cite an iStock Image in APA Format
Uploading Your Short to YouTube
Alright, so you’ve got your YouTube Short all created and polished on your iPad. Exciting, right? Now comes the moment of truth – it’s time to upload your masterpiece to YouTube!
First things first, ensure you’re signed in to your YouTube account. Don't worry; if you don’t have one, you can quickly set it up, and it only takes a couple of minutes.
Here’s a step-by-step guide to uploading your YouTube Short:
- Open the YouTube App: Tap on the YouTube icon and navigate to the bottom of your screen.
- Click the Create Button: This looks like a camera icon with a "+" sign. It’s usually at the bottom center.
- Select Your Video: Choose your Short from your camera roll or media library. Make sure it’s in vertical format and under 60 seconds!
- Add Details: Write an engaging title and description. Don’t forget to incorporate relevant keywords for better discovery.
- Choose Privacy Settings: Decide whether you want your Short to be public, unlisted, or private.
- Add Tags: These help with finding your video. Consider using popular tags related to your content.
- Hit Upload: Once everything looks good, hit that big “Upload” button and let the magic happen!
And just like that, your Short is live on YouTube! Keep an eye out for views and engagement. You’re well on your way to becoming a part of the YouTube community!
Also Read This: How to Convert Dailymotion Videos to MP3 Files – A Complete Tutorial
Sharing Your Short with the World
Now that your YouTube Short is up and ready, it’s time to share it with the world! Let’s amplify your reach and make sure everyone sees your creativity.
Here are some effective ways to share your Short:
- Social Media Platforms: Share your Short on Facebook, Twitter, Instagram, TikTok, and other platforms where you have a presence. Use eye-catching captions and hashtags.
- Embed in Blogs: If you run a personal blog or website, embed your Short. This not only promotes your video but also keeps your content engaging.
- Email Newsletters: If you have an email list, include a link to your Short in your next newsletter. A personal note about why you made it can encourage clicks!
- YouTube Community Tab: If you have access to it, use the Community tab on your channel to share updates with your subscribers.
- Ask Friends and Family: Don’t hesitate to reach out personally! A quick message to friends and family can bring in those early views and likes.
- Collaborate with Other Creators: Partnering with fellow YouTubers can help you tap into their audience and promote each other’s content.
Opportunities to reach new viewers are everywhere. Share your Short confidently, engage with comments, and take a moment to celebrate your achievement! You’re part of a dynamic community, and your creativity deserves to shine!
Also Read This: How to Use AutoCAD 2007 for 3D Modeling and Design
7. Tips for Success with YouTube Shorts
If you're diving into the world of YouTube Shorts, you'll want to make sure your content stands out from the crowd. Here are some handy tips to help you create captivating shorts that leave an impression:
- Know Your Audience: Understanding who you’re targeting is crucial. Ask yourself, "What entertains my viewers?" Tailor your content to their preferences. Engage with comments to get direct feedback.
- Keep it Crisp: Shorts are all about brevity. Aim for content that is snappy and straight to the point. Aiming for a runtime of around 10-30 seconds can be effective, making your message easy to digest.
- Use Eye-catching Thumbnails: A good thumbnail can be a game-changer. It’s the first thing viewers see, so choose a frame that is visually appealing and reflects the essence of your video.
- Be Authentic: Don’t shy away from showing your personality. Authenticity resonates with viewers and builds a connection. Let your unique traits shine through!
- Add Text and Captions: Not everyone watches videos with sound. Adding text overlays can accentuate your message and grab attention. Use captions to make your content more accessible.
- Experiment with Trends: Keep an eye on trending sounds and challenges! Jumping on a trend can boost your visibility and help you tap into existing audiences.
- Promote Your Shorts: Don't hesitate to cross-promote your shorts on other social media platforms. Share snippets or teasers on Instagram or Twitter to drive viewers to your YouTube channel.
8. Conclusion
Creating and sharing YouTube Shorts on your iPad can be both fun and rewarding. This format not only allows you to express your creativity but also enables you to reach a vast audience in a short amount of time. By keeping your content engaging, concise, and visually appealing, you're setting yourself up for success.
Remember, the key takeaway here is to embrace the short-form video trend wholeheartedly. Don’t worry too much about perfection; focus on having fun and connecting with others. With practice, you’ll discover what resonates best with your viewers.
So grab your iPad, let your ideas flow, and start creating! Who knows? Your next short might just be the one that goes viral. Happy shooting!
 admin
admin


