If you’re looking to breathe new life into your laptop by installing Windows 8, you’ve come to the right place! Windows 8 introduced a sleek, touch-friendly interface and improved performance that can help your machine run more efficiently. However, installing a new operating system can sometimes feel daunting. No worries—this guide will walk you through the entire process step by step, making it a breeze for you!
System Requirements for Windows 8
Before diving into the installation process, it's crucial to ensure that your laptop meets the system requirements for Windows 8. Not all laptops are created equal, and upgrading to a new OS necessitates certain specifications. Here’s what you'll need:
| Component | Minimum Requirement |
|---|---|
| Processor | 1 GHz or faster with support for PAE, NX, and SSE2 |
| RAM | 1 GB (32-bit) or 2 GB (64-bit) |
| Hard Disk Space | 16 GB (32-bit) or 20 GB (64-bit) |
| Graphics Card | Microsoft DirectX 9 graphis device with WDDM driver |
| Display | 1366 x 768 resolution |
*Note:* Always check the manufacturer’s website or your laptop specs for more precise information. Having a machine that meets—or exceeds—these requirements ensures smoother performance and an opportune experience while you transition to Windows 8.
Once you’ve confirmed your laptop’s specs, you’re ready to embark on the exciting adventure of installing Windows 8. Don’t fret; the upcoming sections will guide you through each step of the process. Happy installing!
Preparing Your Laptop for Installation
Before diving headfirst into the installation of Windows 8 on your laptop, it’s important to take a few preparatory steps to ensure a smooth and hassle-free experience. Think of this stage as getting your workspace tidy before starting on a new project. Here’s how you can prepare your laptop:
- Backup Your Data: First and foremost, make sure to back up all essential files and data. Using external drives or cloud services like Google Drive or Dropbox can be really helpful. You wouldn’t want to lose your precious photos or important documents during the process.
- Check System Requirements: Windows 8 has specific system requirements. Ensure that your laptop meets these to avoid any hiccups down the line. Typically, you’ll need:
| Requirement | Minimum Value |
|---|---|
| Processor | 1 GHz or faster |
| RAM | 1 GB for 32-bit, 2 GB for 64-bit |
| Hard Disk Space | 16 GB for 32-bit, 20 GB for 64-bit |
| Graphics Card | Microsoft DirectX 9 compatible |
It’s essential to verify your hardware specifications through the system information settings on your laptop.
- Power Supply: Ensure your laptop is plugged into a power source. You don’t want your laptop dying midway through the installation!
- Internet Connection: While not mandatory, having an internet connection can be a lifesaver for downloading updates and drivers post-installation.
With these preparations in place, you’ll be all ready to begin the installation process smoothly!
Creating a Bootable USB Drive

Alright, now that your laptop is prepped and ready, let’s move on to creating a bootable USB drive. This step is crucial because your laptop will use this device to launch the Windows 8 installation. Don’t worry; I’ll walk you through it!
- Gather Your Tools: You’ll need a USB drive (at least 4 GB) and a Windows 8 ISO file. You can download the ISO directly from the Microsoft website.
- Using a Tool: To make this easier and avoid any headaches, use a tool like Rufus or the Windows USB/DVD Download Tool. For this guide, we’ll focus on Rufus for its simplicity and efficiency.
- Download and install Rufus from its official website.
- Insert your USB drive into the laptop. Ensure it’s empty — anything on it will be erased.
- Open Rufus. You should see your USB device listed in the ‘Device’ dropdown.
- Select the Windows 8 ISO file you downloaded by clicking on ‘SELECT’.
- Keep the partition scheme to 'MBR' and the file system to 'NTFS' for compatibility.
- Click on ‘START’ to begin the process. Rufus will format the USB drive and create the bootable partition.
And there you go! Once Rufus completes the process, you’ll have a bootable USB drive ready for your Windows 8 installation. Just remember to safely eject the USB thereafter. You’re one step closer to enjoying your new operating system!
Installing Windows 8
Alright, let’s dive into the nitty-gritty of actually installing Windows 8. First off, make sure you've got everything you need. You'll want your Windows 8 installation media ready, either on a USB drive or DVD. If you’ve opted for a USB drive, double-check that it’s bootable. You can create a bootable USB using tools like Rufus if you haven’t done that yet.
Next, it's time to boot from your installation media. Here’s how to go about it:
- Restart your laptop.
- As it boots, hit the required key (usually F2, F10, ESC, or DEL) to enter the BIOS or boot menu. This key varies by manufacturer, so keep an eye on the screen as it powers up.
- Once in the BIOS, look for the “Boot” tab. Here you can set your USB or DVD as the primary boot device.
- Save the changes and exit the BIOS.
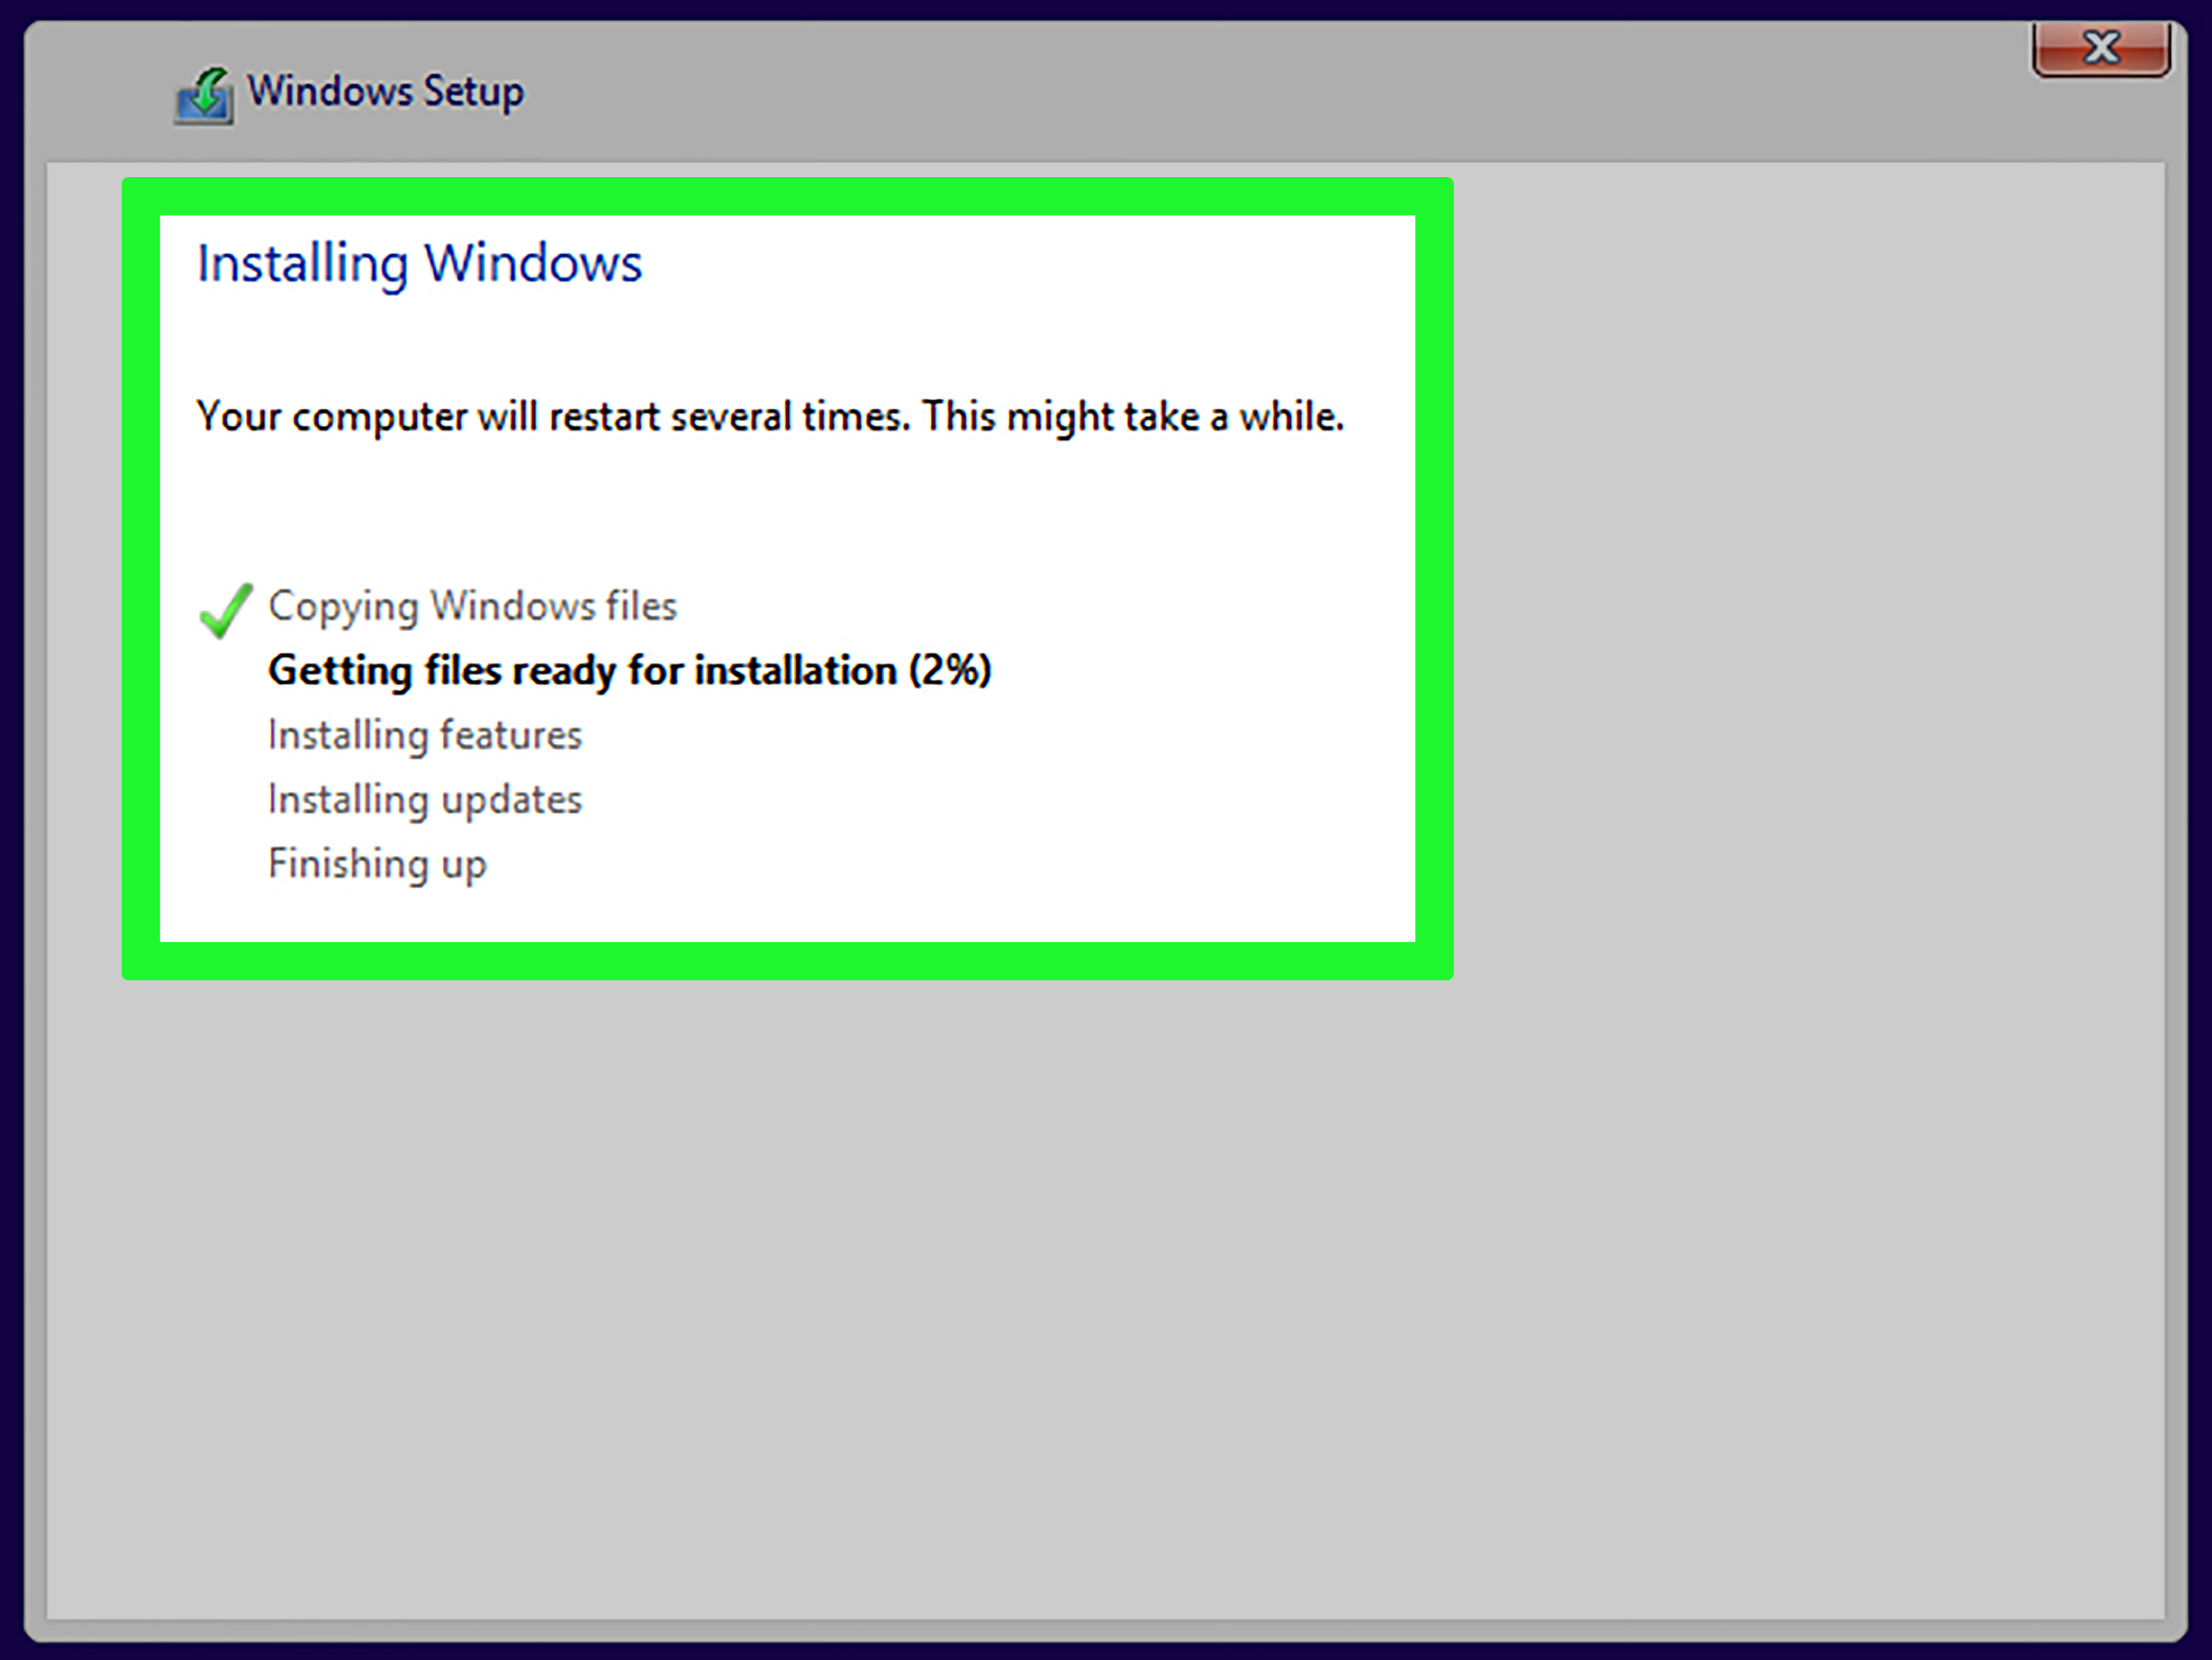
Now your laptop should boot from the installation media. You will see a Windows logo and then the installation setup will launch. Follow these simple steps:
- Select your language preferences and click Next.
- Click on Install Now.
- Input your product key when prompted (make sure you have it handy!).
- Accept the terms and conditions.
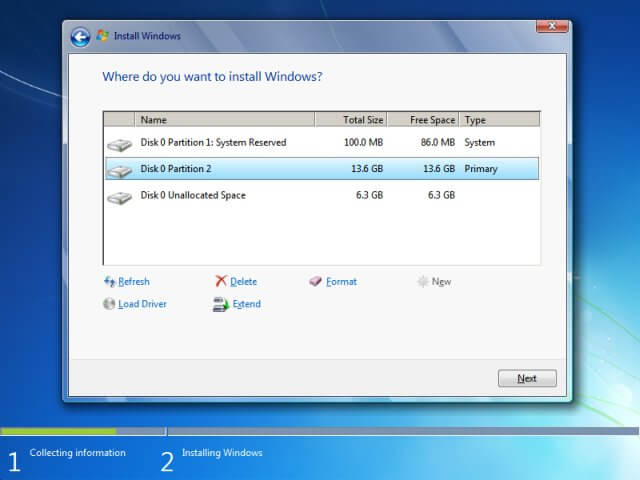
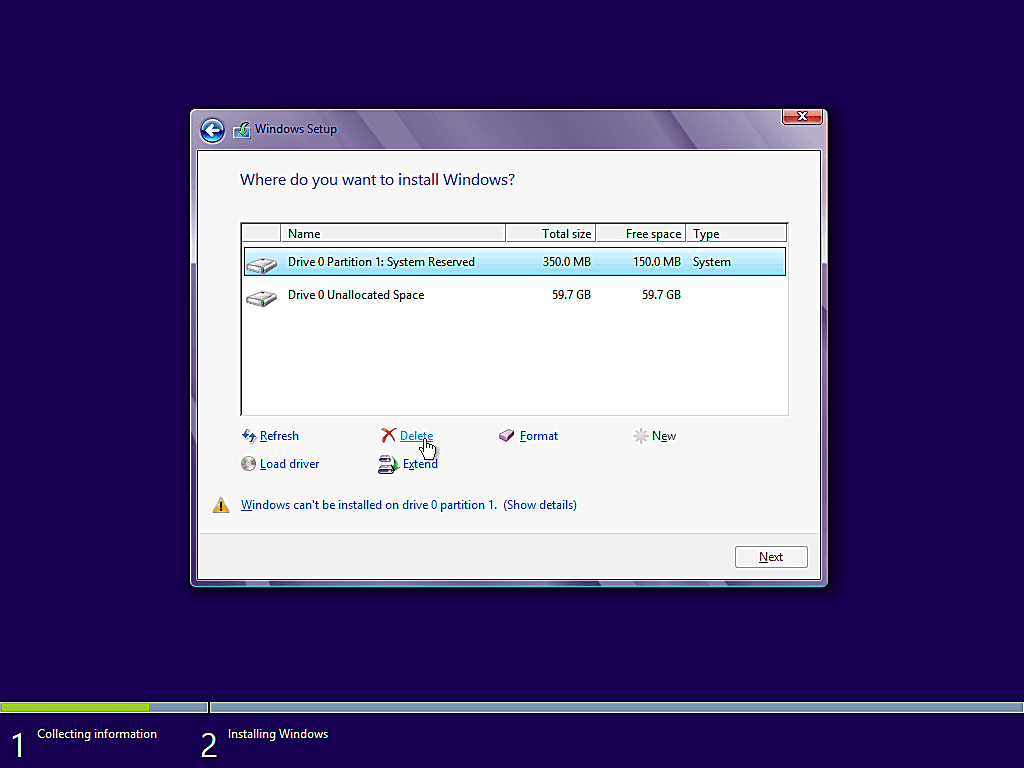
- Choose whether to upgrade or perform a clean installation. For a clean install, select Custom: Install Windows only (advanced).
- Select the partition where you want to install Windows 8 and click Next.
Windows will now begin the installation process. It might take a while, so maybe grab a cup of coffee while you wait!
Post-Installation Steps
Congratulations! You've successfully installed Windows 8 on your laptop. Now, let’s get your new operating system fully set up and running smoothly. Here are the essential post-installation steps to follow:
- Initial Setup: Upon first boot, you’ll be prompted to set up a few things like your Microsoft account, username, and password. Just follow the on-screen instructions to get everything configured.
- Check for Updates: Open Settings from the Start screen, then go to Update & Security and click Check for Updates. This ensures your system is up-to-date with the latest security patches and features.
Next, you'll want to install necessary drivers:
- Graphics Driver: Ensure your graphics card is via its manufacturer’s website (NVIDIA, AMD, or Intel).
- Audio Driver: Similarly, check your laptop’s manufacturer for the latest audio drivers.
After that, consider installing your favorite software applications. Take the time to set up:
- Web browsers (Chrome, Firefox, etc.)
- Office applications (Microsoft Office or alternatives)
- Security software (antivirus and anti-malware solutions)
Finally, customize your desktop. Personalization makes your laptop feel like yours. Change the background, adjust the taskbar settings, and organize your apps. Enjoy your new Windows 8 experience!
Troubleshooting Common Issues
Installing Windows 8 on your laptop can be a breeze, but sometimes things don’t go as planned. Fear not! If you encounter issues along the way, you’re not alone. Here’s a handy guide to troubleshoot some common problems:
- Installation Stalls or Freezes: This can be caused by various factors such as insufficient resources or faulty installation media. Ensure that your laptop meets the minimum system requirements and try restarting the installation from the beginning. If the problem persists, create a new bootable USB drive.
- Drivers Issues: After installation, you may encounter issues with hardware components not working correctly. To resolve this, visit the manufacturer’s website and download the latest drivers compatible with Windows 8. It's a good idea to create a backup of your existing drivers before proceeding.
- Activation Problems: If Windows 8 does not activate after installation, double-check your product key for errors. If you continue to face issues, contact Microsoft support for further assistance.
- No Internet Connection: If you find yourself suddenly offline, check your network adapter settings. You can also try resetting your router or using the Network Troubleshooter in Windows.
- Slow Performance: After installation, if your laptop feels sluggish, it may require some optimizations. Disable unnecessary startup programs, and consider running a disk cleanup to free up space.
Remember, troubleshooting can often be a process of elimination. So take your time and don’t hesitate to seek help through forums or tech support if you’re feeling stuck!
Conclusion
Installing Windows 8 on your laptop opens up a world of functionality, but it’s essential to approach the process with the right mindset and tools. Hopefully, this guide has helped simplify the steps and offered practical advice to avoid and fix common issues.
To recap:
- Before installation, always back up your data.
- Create a bootable media correctly to avoid installation issues.
- Take your time with each step to ensure everything runs smoothly.
- If problems arise post-installation, follow troubleshooting tips or seek professional help.
With patience and proper planning, you can successfully install Windows 8 and enjoy all its features without breaking a sweat. So grab your laptop, roll up your sleeves, and get ready for an exciting new experience with Windows 8!


