Hey there! So you’ve just captured some amazing moments on your iPhone and now you’re itching to share them with the world on YouTube. Great choice! But before you hit that upload button, there are a few steps to follow to ensure your video looks stunning and reaches the right audience. In this post, we’ll break down the process of uploading your iPhone video to YouTube, starting with how to prepare your footage for the best possible presentation. Let’s dive in!
Preparing Your Video for Upload

Before you upload your iPhone video to YouTube, it's essential to ensure it’s optimized and ready for your audience. Here are some key steps to take:
- Trim and Edit Your Video: Use an editing app like iMovie or Clips to cut out any unnecessary parts and refine your video. You want to keep your viewers engaged from start to finish! Here's how you can do that:
- Open the editing app on your iPhone.
- Import your video.
- Use the trim feature to remove unwanted sections.
- Add transitions, music, or text overlays for a professional touch.
| Format | Recommended |
|---|---|
| MP4 | ✔️ |
| AVI | ✔️ |
| MOV | ✔️ |
| WMV | ✔️ |
- Use your iPhone's high resolution settings (1080p is a good standard).
- Utilize good lighting to improve video clarity.
- Consult tutorials on additional editing for color correction and stabilization.
By following these steps, you’ll ensure your iPhone video is polished and ready for YouTube. Now you can move on to the uploading process with confidence!
Also Read This: Tips for Creating a Distressed Look in Photoshop Images
Steps to Upload Your Video from iPhone to YouTube

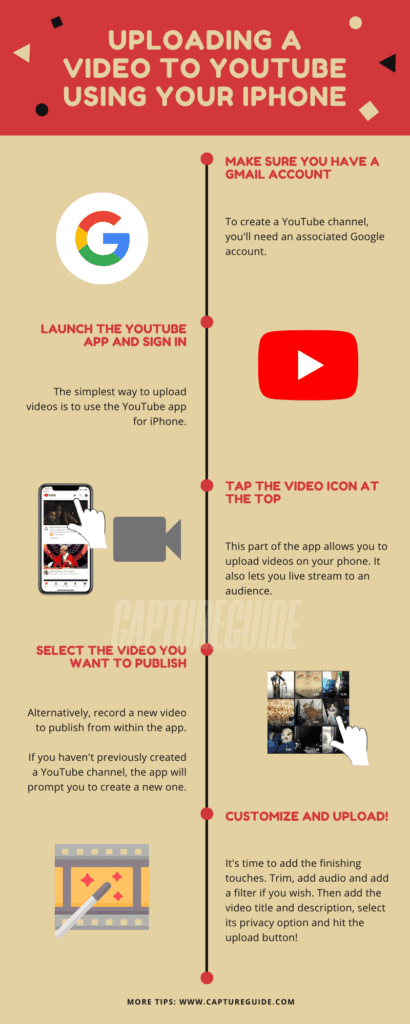
Uploading a video from your iPhone to YouTube is a breeze! Just follow these steps, and you'll be sharing your memories in no time:
- Open the YouTube App: Start by launching the YouTube app on your iPhone. If you don’t have it yet, you can easily download it from the App Store.
- Sign In: Make sure you’re signed in to your YouTube account. Tap the profile icon at the top right, and log in if you haven’t already.
- Tap the Camera Icon: In the app, you’ll find a camera icon (usually at the bottom center). Give it a tap to start the upload process.
- Select Your Video: You can either choose a video you’ve already recorded or record a new one right then and there. If you’re selecting an existing video, tap “Library” and then “Videos” to pick the one you want.
- Add Title and Description: After selecting your video, you’ll need to add a catchy title and a brief description. This helps viewers know what your video is about!
- Set Privacy Settings: Choose your privacy settings: Public (everyone can see it), Unlisted (only people with the link can see it), or Private (only you can see it). This helps you control who gets to view your video.
- Upload: Finally, hit the “Upload” button and watch as your video is sent to the YouTube universe!
And that's it! Your video will soon be available for everyone to see, share, and enjoy!
Also Read This: Exclusive vs. Non-Exclusive Contributor on Shutterstock: Pros and Cons
Troubleshooting Common Upload Issues

Having trouble uploading your video to YouTube? Don’t worry; it happens! Here are some common issues you might encounter and how to fix them:
- Slow Internet Connection: A weak Wi-Fi signal can interrupt your upload. Make sure you’re connected to a strong, stable Wi-Fi network before trying again.
- Video Format Compatibility: YouTube accepts most video formats, but if you’re dealing with a rare file type, try converting it to MP4, which is widely accepted.
- Insufficient Storage: If your iPhone is low on storage, the upload might fail. Check your available space by going to Settings > General > iPhone Storage, and delete any unnecessary files to free up space.
- App Update Needed: An outdated version of the YouTube app can cause issues. Go to the App Store and make sure you have the latest version installed.
- Account Issues: If you’re not signed in properly or your account has restrictions, you won't be able to upload. Ensure your account is in good standing with YouTube.
If you encounter an issue that’s not listed here, don’t hesitate to check the YouTube Help Center for more solutions. Remember, you're not alone in this—many people face these challenges. Keep trying, and you'll get your video uploaded!
Also Read This: How to Download YouTube Videos in MP4 Format for Easy Storage
5. Tips for Enhancing Your YouTube Video
Uploading a video to YouTube is just the tip of the iceberg! To truly make your video shine and attract viewers, you need to consider a few enhancement strategies. Here are some handy tips to elevate your iPhone video:
- Utilize Natural Lighting: Natural light can dramatically improve the quality of your video. Try to shoot during the golden hour, which is shortly after sunrise or before sunset. If you’re indoors, position yourself near large windows.
- Stabilize Your Shots: Shaky videos can be dizzying for viewers. Consider using a tripod or a gimbal, or simply hold your phone steady with both hands to achieve smoother footage.
- Edit Thoughtfully: Use editing apps like iMovie, InShot, or Adobe Premiere Rush to cut out unnecessary parts, add transitions, or incorporate music. Keep your edits clean and professional—don’t go overboard!
- Add Captions and Subtitles: Many viewers watch videos without sound. Adding captions can make your content more accessible and keep viewers engaged.
- Create Eye-Catching Thumbnails: Your video thumbnail is the first impression. Use vibrant images, readable text, and a cohesive style to capture attention. Aim for a resolution of 1280 x 720 pixels.
- Optimize the Title and Description: Use keywords in your title and description to help your video appear in search results. A compelling title can dramatically affect your click-through rate.
- Engage with Viewers: Don’t forget to encourage viewers to comment, like, and subscribe! Responding to comments can foster community and keep your audience coming back.
6. Conclusion
Congratulations on learning how to upload your iPhone video to YouTube! It’s an exciting journey that allows you to share your creativity and connect with millions of people around the globe. Remember, while uploading is straightforward, enhancing your video with thoughtful edits, engaging thumbnails, and clever optimization can truly make a difference in how it’s received.
So whether you're a budding filmmaker, a traveling adventurer, or simply capturing life's moments, take the time to experiment with different filming techniques and editing styles. The more you practice, the better your videos will become! And don’t forget, audience engagement is a two-way street; always interact with your viewers, ask for their thoughts, and adapt based on their feedback.
Now go ahead and hit that upload button with confidence—you’ve got this!
 admin
admin


