Origami is a beautiful art form that captures the elegance and intricacy of nature through the simple act of folding paper. Among the many wonderful creations in origami, paper roses stand out for their stunning visual appeal and the emotional sentiment they can convey. Whether it's for a special occasion or just a way to brighten someone’s day, making origami roses is a delightful project that can be tackled by novices and experienced folders alike. In this guide, we’ll walk you through the step-by-step process of making your own origami paper roses, including the materials you’ll need and tips for perfecting your technique. So, grab your paper and let’s get folding!
Materials Needed for Making Origami Roses
Before you dive into the world of origami roses, you'll want to gather some key materials to ensure your crafting experience is smooth and enjoyable. Here’s what you’ll need:
- Origami Paper: Choose lightweight paper that folds easily. Traditional origami paper comes in various colors and patterns, but you can use any paper that meets your aesthetic preferences. Square sheets are ideal, typically 15cm x 15cm (6in x 6in) or larger for more intricate designs.
- Scissors: You might need scissors to cut your paper if you’re not starting with square sheets. Ensure your cuts are precise for better results.
- Bone Folder: While not essential, a bone folder can help create sharp creases and folds, giving your rose a polished look.
- Ruler and Pencil: If you need to cut your paper to size, a ruler and pencil can help mark precise measurements.
- Glue (Optional): If you want extra durability or if you're combining multiple pieces, a small dab of glue can keep your rose intact.
- Patience and Creativity: The most important materials are your willingness to learn and your own artistic flair. Allow yourself to experiment as you fold!
Gathering your materials will help set the stage for an enjoyable origami experience as you transform a simple piece of paper into a beautiful rose. Happy folding!
Also Read This: Can People See When You View Their LinkedIn Profile
Basic Folding Techniques for Origami
Origami, the beautiful art of paper folding, relies heavily on a few essential techniques that every budding artist should master. Once you get the hang of these basic folds, you’ll find yourself on your way to creating stunning origami pieces, like our paper rose!
Here are some foundational folds that will set you up for success:
- Valley Fold: This involves folding the paper towards yourself, creating a 'V' shape. Think of it as folding a piece of paper in half, where the crease runs at the bottom.
- Mountain Fold: The opposite of a valley fold, this one has the paper folding away from you, resembling a mountain peak. Hence, the name! It's a crucial technique for shaping your origami appropriately.
- Squash Fold: This one is a bit trickier but incredibly useful. You’ll first make a valley fold and then open the folded flaps in a certain way to flatten them down into a new shape.
- Reverse Fold: As the name implies, you essentially fold the paper in the opposite direction from where it’s currently creased. It’s great for adding details like petals!
- Blinky Fold: This whimsical fold lets you create curves or rounded shapes, perfect for giving your rose a more natural flower look.
Once you practice these basic folds, you’ll be ready to dive into creating your own origami masterpieces. Trust me, the more you practice, the more your hands will start to "feel" the folds—before long, you’ll be folding like a pro!
Also Read This: Can You Get NESN on YouTube TV?
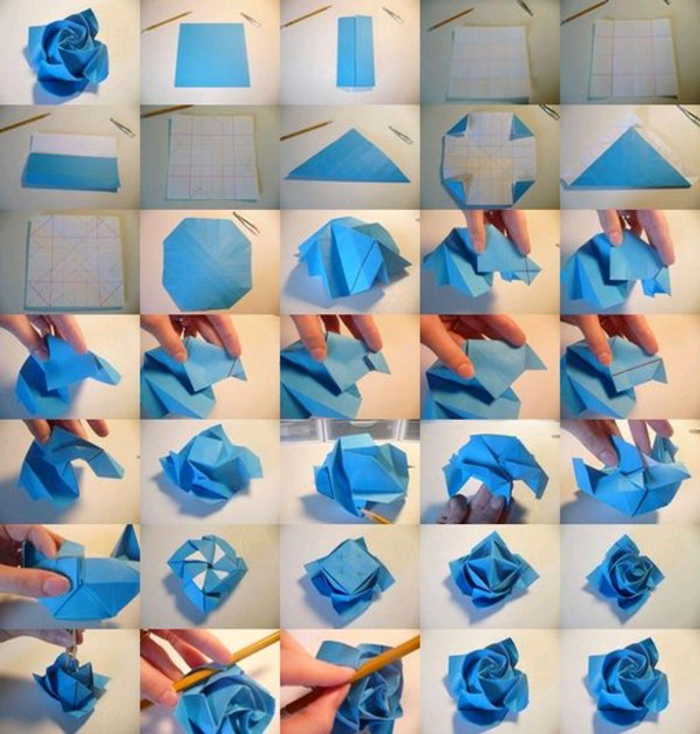
Step-by-Step Instructions for Creating a Paper Rose
Now that you've got your basic folding techniques down, it's time to put them to the test! Making a beautiful origami paper rose is not as daunting as it might seem. Follow this step-by-step guide, and you’ll have a lovely flower in no time.
What You'll Need:
- Square piece of origami paper (preferably colored for a vibrant look)
- Your fingers (for folding!)
- Patience and a little creativity!
Steps to Fold Your Rose:
- Start with a Square: Place your square sheet of paper on a flat surface, colored side down.
- Create a Valley Fold: Fold the paper in half diagonally to form a triangle. Unfold it to reveal a crease.
- Make Another Fold: Fold the top corner of the triangle down to the center crease. This creates a smaller triangle shape.
- Form Petals: Fold the edges of the triangle towards the center line to create a petal-like shape.
- Squash Fold: At the bottom of the newly formed triangle, perform a squash fold to create a flared edge.
- Repeat Petal Formation: Turn the paper over and repeat the previous steps to create another petal layer.
- Assemble and Refine: Gently pull apart the layers to reveal your rose’s shape, adjusting the petals as needed.
- Finish It Off: You might want to roll the edges of the petals for a more realistic touch. And voilà, your origami rose is ready!
And there you have it! Follow these steps, and you’ll create your very own origami paper rose. Remember, practice makes perfect, so don’t be discouraged if your first attempt doesn’t go as planned. Enjoy the process and happy folding!
Also Read This: Link Your YouTube Videos to Your TikTok Profile Effortlessly
Tips for Perfecting Your Origami Roses
Creating beautiful origami roses can be a delightful experience, but sometimes they don't turn out as expected. Here are some handy tips to help you perfect your origami roses:
- Choose the Right Paper: The type of paper you use can greatly affect the outcome of your origami rose. Thin paper is usually easier to fold and holds creases better. However, you might want to experiment with various weights to find what works best for you.
- Practice Your Folds: Precision is key in origami. Practice the basic folds before you start your project. Make sure each fold is sharp and crisp; this will help your rose hold its shape.
- Use a Bone Folder: If you want to create very precise and clean folds, consider using a bone folder. It helps in making your creases sharper and gives a professional finish.
- Be Patient: Don’t rush through the steps. Take your time to ensure each fold is correct and neatly made. Practicing patience will pay off in the end!
- Watch Tutorials: Sometimes a visual guide can be more helpful. Plenty of video tutorials are available online that can provide step-by-step instructions for different styles of origami roses.
- Experiment with Colors and Patterns: Once you’re comfortable with the basic rose, why not play around? Try different colors, patterns, or sizes to create unique and stunning variations.
Also Read This: How to Copy an Image from a PDF for Reuse
Common Mistakes to Avoid
While making origami roses can be fun, there are common pitfalls that might trip you up. Here’s what to watch out for:
- Skipping Steps: It can be tempting to skip a fold if you think you understand it; however, each fold plays an important role. Always follow the instructions carefully.
- Using Dull Folds: If your folds aren’t sharp, your rose may lose its definition and not look as lovely. Ensure that your creases are well-defined by pressing down firmly.
- Incorrect Paper Size: Using a paper size that’s too large or too small can hinder your rose's structure. Stick to the recommended sizes to achieve the best results!
- Not Testing First: If you’re trying a new style of rose, practice first with scrap paper. It’s much better than wasting your nice paper on a prototype that doesn’t work out.
- Forgetting About Proportions: When adding layers to your rose, pay attention to the proportion of each piece. If one layer is too large, it can throw off the entire balance of the rose.
Also Read This: Is Rumble Stock a Dividend-Paying Investment Opportunity
Creative Ideas for Displaying Your Origami Roses
Once you've perfected your origami roses, you'll want to showcase them in creative and beautiful ways. Here are some delightful ideas to display your paper masterpieces
- Vases: Use a clear vase to hold your origami roses. You can fill the base with decorative pebbles, colored sand, or even water beads for an eye-catching touch.
- Shadow Boxes: Create a stunning shadow box that features your roses against a colorful background. This adds depth and can transform a simple display into a piece of art.
- Gift Bouquets: Instead of real flowers, gift a bouquet of origami roses to someone special. You can tie them together with a ribbon or place them in a decorative box.
- Wall Art: Arrange your origami roses in a pattern or shape on a canvas or within a frame. This can make for an attractive wall decoration.
- Table Centerpieces: Use a cluster of roses as a centerpiece for your dining or coffee table. Pair them with candles to create a romantic ambiance.
- Bookmarks: Attach a rose to the top of a sturdy paper bookmark. This adds a personal touch to your reading materials while showcasing your craft.
- Gifts or Party Favors: Wrap a single origami rose in tissue paper and attach it to a gift. Alternatively, use these delicate roses as unique party favors for guests.
Every display choice you make can enhance the beauty of your origami roses and show off your hard work. Get creative and let your personality shine through your displays!
Conclusion and Additional Resources
Creating origami paper roses is not just a fun craft; it’s a fantastic way to express your creativity and give a personal touch to gifts and decor. By following the step-by-step instructions, you can make roses that add beauty wherever they are displayed.
As you venture into this delightful world of folding, don’t forget to explore resources that can enhance your skills further:
- YouTube Tutorials: Platforms like YouTube offer a plethora of video tutorials. Search for origami masters to learn new techniques and patterns.
- Origami Books: Numerous books are dedicated to origami. Check your local library or bookstore for titles focusing on floral designs.
- Online Communities: Join social media groups or forums where you can share your work, ask questions, and get inspiration from other origami enthusiasts.
- Origami Workshops: If you prefer hands-on learning, look for local workshops that offer origami classes. It’s a great way to refine your skills.
Remember, the more you practice, the better you’ll become! Enjoy the journey and have fun folding.