Locking images in PowerPoint is a crucial skill that can dramatically enhance your presentation experience. Whether you’re working on a business pitch, a school project, or a creative portfolio, ensuring your images stay in place can make all the difference. This simple action helps maintain your design integrity and keeps your audience focused on your content rather than accidental image shifts. Let’s dive into why locking images is beneficial and how it can streamline your workflow.
Understanding the Importance of Locking Images

Locking images in PowerPoint isn’t just a nifty trick; it's a smart decision for various reasons. Here’s why you should consider this tool in your presentation arsenal:
- Maintaining Layout Consistency: One of the key reasons to lock images is to preserve your layout. When you're editing slides, it’s easy to accidentally drag images, disrupting your carefully designed slides. Locking them ensures they stay put, making your presentations more professional and polished.
- Preventing Accidental Edits: Accidents happen! You might find yourself clicking on an image hoping to edit text or change background color. By locking the image, you eliminate the risk of unintentionally altering or moving it while you’re working on other elements of your slide.
- Improving Focus: When images shift or jump around, they can distract your audience. Keeping images locked in place helps viewers focus on the main message without being sidetracked by movement. It’s all about creating an engaging and focused presentation experience.
- Streamlining Collaboration: If you're working in teams, locking images is particularly valuable. It prevents team members from moving images around when making edits, ensuring that everyone is on the same page and reducing confusion.
In summary, locking images is an essential step in ensuring your presentations are aesthetically pleasing, focused, and easy to edit — a true game-changer for any PowerPoint user!
Also Read This: How to Contribute Photos to Getty Images for Aspiring Contributors
Step-by-Step Guide to Lock an Image in PowerPoint

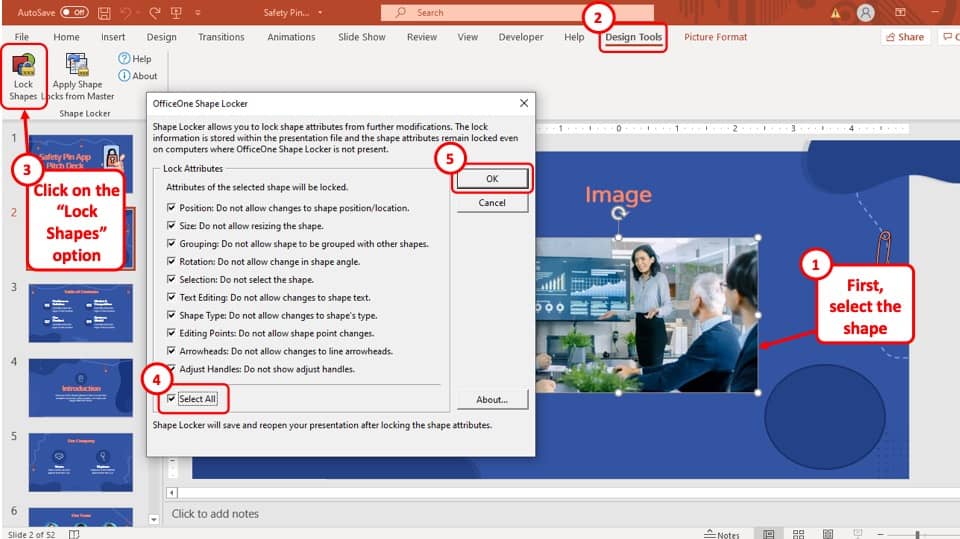
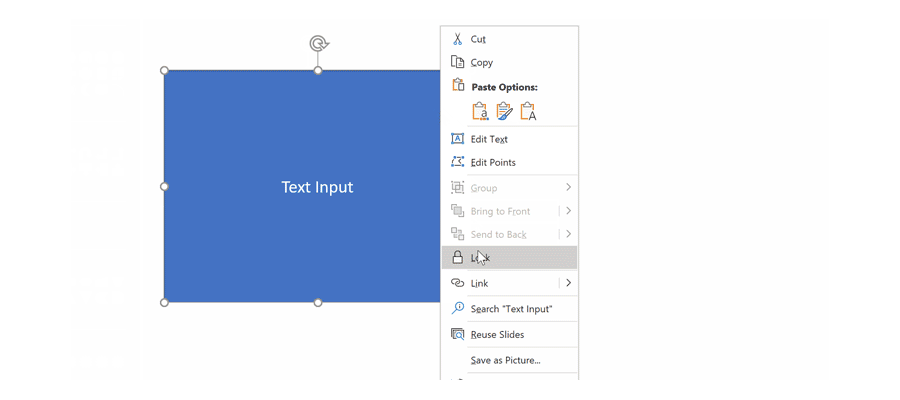
Locking an image in PowerPoint is a handy feature, especially when you want to maintain your layout without any accidental shifts. Here’s a straightforward guide to help you do just that:
- Open Your PowerPoint Presentation: Start by launching PowerPoint and opening the presentation where you want to lock the image.
- Select the Image: Click on the image you wish to lock. You'll see that it is highlighted when selected.
- Right-Click for Options: Right-click on the selected image. A context menu will appear with various options. You want to navigate to the 'Format Picture' option.
- Access Size & Properties: Once you click on 'Format Picture', a sidebar will open on the right. Look for the section labeled 'Size & Properties', often represented by a square with arrows icon.
- Lock the Aspect Ratio: In the 'Size & Properties' menu, you can find an option to 'Lock aspect ratio'. This ensures that the image maintains its proportions while resizing.
- Don't Forget to Protect Position: Here, you’ll also see an option to protect the image's position. Tick this box to prevent accidental moving of your image.
- Close the Sidebar: Once you’ve made any other necessary adjustments, simply close the sidebar. Your image is now locked in place.
And there you have it! Your image is safely locked, preventing any unintentional edits or movements. Feel free to continue designing your slide with peace of mind.
Also Read This: Why OK.ru Is More Than Just a Social Media Platform
Additional Tips for Managing Images in PowerPoint
When working with images in PowerPoint, managing them effectively can save you a lot of time and effort. Here are some additional tips:
- Use Guidelines: Enable guide lines for easy alignment of images. Go to 'View' on the top menu and check 'Guides' to help position your images perfectly.
- Group Images: If you have multiple images that need to stay together, consider grouping them. Select all relevant images, right-click, and choose 'Group'. This keeps them linked in position.
- Utilize the Send to Back/Front Function: Right-click on the image to access these options. This is useful if you have overlapping text or objects.
- Optimize Image Size: Large image files can slow down your presentation. Use compressed images when possible to keep your file size manageable.
- Check Your Layering: Use the selection pane (found under 'Home' -> 'Select' -> 'Selection Pane') to manage overlapping images and adjust which images are on top.
By implementing these tips, you'll develop a better handle on how to manipulate images within PowerPoint, making your presentations not just visually appealing, but also organized and professional!
Also Read This: Can YouTubers See Who Viewed Their Video
Troubleshooting Common Issues
Locking an image in PowerPoint is usually a straightforward process, but sometimes things don’t go as planned. If you find yourself facing issues, don’t worry! Here are some common problems and how to resolve them:
- Image Not Locking: If your image isn’t locking as expected, ensure that you’re not in “edit” mode. First, try exiting to “normal” view before attempting to lock it again.
- Image Moving Around: If the image keeps shifting positions even after trying to lock it, check that you’ve selected the correct image layer. Sometimes multiple images might overlap, making it seem like the wrong one has been locked.
- Group Selection Issues: If you’re trying to lock multiple images at once but only one image gets locked, make sure you’ve grouped them properly. Select all images, right-click, and choose “Group” before locking.
- PowerPoint Stuttering: If PowerPoint freezes or lags when trying to lock images, it could be a software glitch. Save your work, restart PowerPoint, and try again.
- Saved Images Still Editable: If you save your presentation and later find that the images are still editable, check your permissions. If you’re collaborating with others, ensure your settings are correct for shared presentations.
By keeping these common issues in mind and following the suggested solutions, you should be able to navigate any hurdles you encounter while locking images in PowerPoint effectively!
Conclusion
Locking images in PowerPoint is a handy technique that can safeguard your hard work and maintain the integrity of your presentation design. Now that you've gone through the step-by-step guide, troubleshooting common issues, and highlighted the benefits, you should feel more confident about using this feature.
Whether you're preparing for a significant presentation, creating a professional report, or simply crafting a stunning visual story, knowing how to lock images can help you:
- Maintain Layout: Ensure everything stays in place, avoiding misplaced images.
- Streamline Editing: Focus on refining other aspects of your presentation without worrying about accidental image changes.
- Enhance Collaboration: Make it easier for you and your colleagues to work on shared presentations without confusion.
In conclusion, always remember to explore PowerPoint's other features and functionalities. There’s a lot to discover that can make your presentations not only easier to manage but also visually striking! Happy presenting!
 admin
admin


