In today’s digital world, your email address is like your digital handshake—it’s often the first point of contact. Keeping it current is essential, especially on platforms like LinkedIn, which are crucial for networking and professional growth. If you haven't updated your primary email on LinkedIn recently, now might be the perfect time to learn why it matters and how to do it. In this post, we'll dive into the reasons behind updating your primary email and guide you through the process seamlessly.
Why Updating Your Primary Email is Important

Let’s face it—having an outdated email can lead to missed opportunities, lost connections, and a whole lot of confusion. Here are some compelling reasons why you should prioritize updating your primary email on LinkedIn:
- Effective Communication: If your email is outdated, you risk missing out on crucial messages from potential employers, clients, or colleagues. An updated primary email ensures you receive timely notifications and job offers right when they come in.
- Security: Using an old email can pose security risks. If your previous email account is compromised or no longer in use, your LinkedIn account could be vulnerable to hacking attempts. Keeping your email updated adds an extra layer of security to your profile.
- Professional Image: An active, professional email address contributes to your online presence. Outdated or personal emails can make you appear unprofessional. Using a current email that aligns with your professional brand can make a big difference.
- Connection with New Opportunities: Employers and recruiters often reach out via email. If your primary email isn’t updated, you may miss out on job openings, networking events, and collaborations that can enhance your career.
Overall, staying on top of your primary email is not just a good practice; it’s a necessity for maximizing your LinkedIn experience!
Steps to Update Your Primary Email on LinkedIn
Updating your primary email on LinkedIn might sound daunting, but it’s actually a straightforward process! Here’s a step-by-step guide to help you navigate through it smoothly:
- Log into LinkedIn: Start by signing in to your LinkedIn account using your existing credentials.
- Go to Your Account Settings: Once you're logged in, click on your profile picture at the top right corner of the homepage. From the dropdown menu, select “Settings & Privacy.”
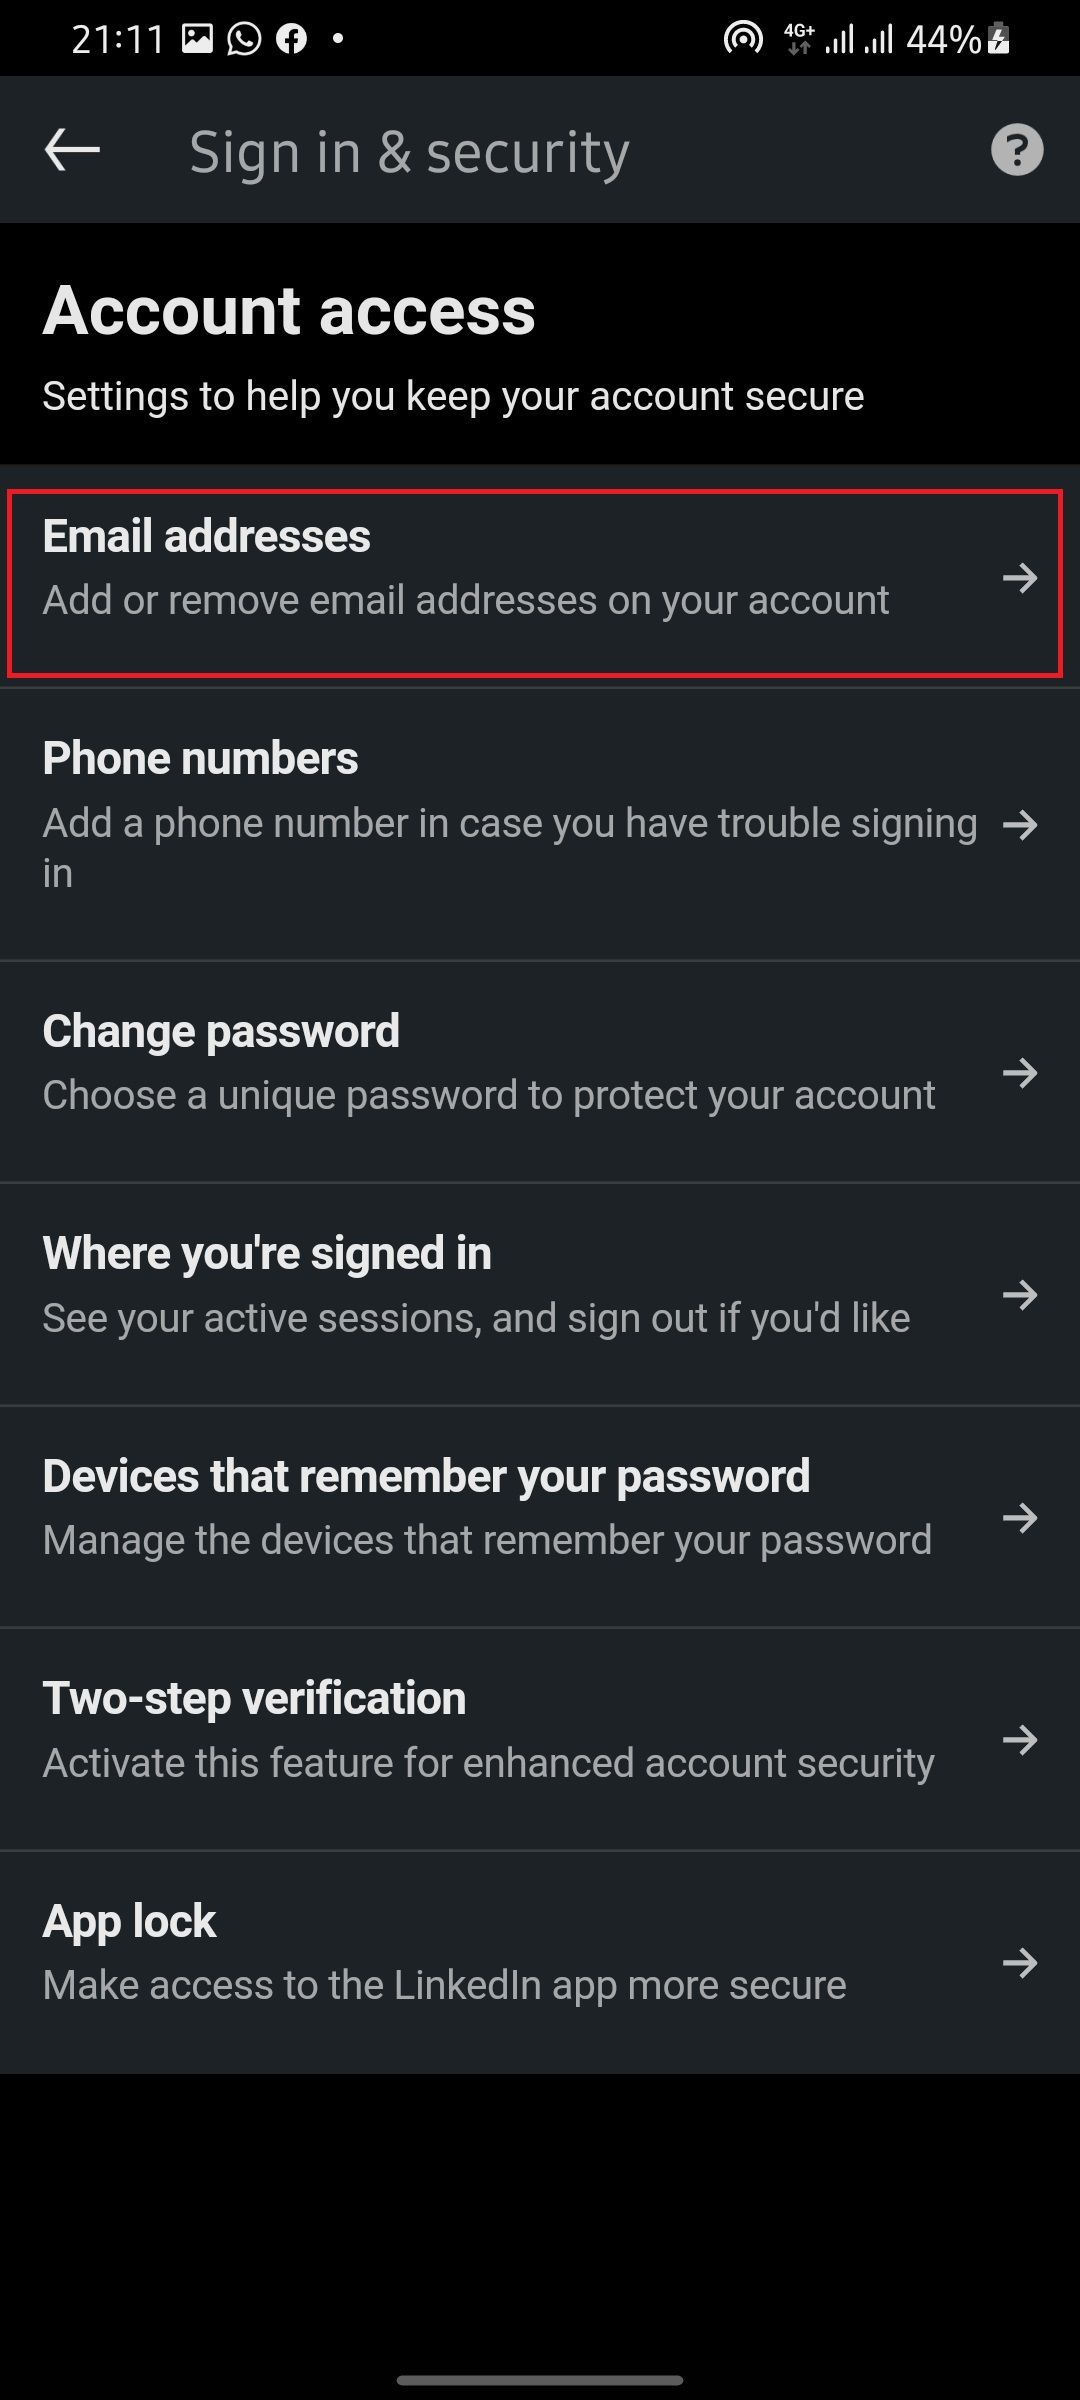
- Access Email Settings: In the “Settings & Privacy” section, look for the “Login and security” tab. Here, you’ll find the option labeled “Email addresses.” Click on this to proceed.
- Add Your New Email: To add a new email address, click on the “Add email address” button. Enter the new email you wish to use and hit “Send verification.”
- Set as Primary: After you verify the new email (we’ll cover this below), go back to the “Email addresses” section and select the radio button next to your new email to set it as your primary address.
- Remove Old Email (Optional): If you no longer want the old email associated with your account, click “Remove” next to the old email address.
There you go! You’ve successfully updated your primary email on LinkedIn. This quick update can greatly enhance your communication experience.
Verifying Your New Email Address
Now that you've added your new email address, you need to verify it to make sure it's valid and functional. Don’t worry; it’s a simple process!
Here’s how to verify your new email address:
- Check Your Inbox: Head over to the inbox of the new email address you just added. Look for an email from LinkedIn with a subject line like “Confirm Your Email Address.” If you don’t see it right away, check your spam or junk folder!
- Open the Verification Email: Once you find the email, open it, and you’ll see instructions to verify your email. This usually consists of a button or link labeled “Confirm” or “Verify Email Address.”
- Click the Verification Link: By clicking the provided link, you’ll be redirected to LinkedIn, confirming that you have access to this new email address.
- Final Confirmation: After successful verification, you should receive another confirmation email from LinkedIn stating that your email has been updated. You can now communicate seamlessly with your new primary email!
Verification is vital because it keeps your account secure and ensures that you can receive important notifications. So don’t skip this step!
5. Common Issues and Troubleshooting
Changing your primary email on LinkedIn might seem straightforward, but sometimes things don't go according to plan. Here are a few common issues users face, along with some troubleshooting tips to help you get back on track.
- Email Not Verified: If you've added a new email address, make sure to check your inbox for a verification email. Sometimes, it ends up in the spam folder. Without verification, your new email won't become your primary one.
- Login Challenges: If you're attempting to log in with your new primary email and it’s not recognized, ensure you have confirmed it per LinkedIn's guidelines. Double-check that you haven't misspelled it during the update.
- Account Locked: In some cases, frequent changes to your email settings may trigger LinkedIn's security measures. If this happens, follow the prompts from LinkedIn to unlock your account, or reach out to their support for assistance.
- Unexpected UI Changes: LinkedIn regularly updates its interface. If you're unable to navigate to the email settings, try refreshing the page or logging out and back in. Look for the updated icons or options—sometimes, they’re relocated in new versions.
- Missing Notifications: Are you not receiving messages or connection requests? Check your email settings to ensure that notifications are enabled for your new primary email.
By addressing these common issues, you can make your transition to a new primary email smoother and ensure that communication on LinkedIn remains seamless.
6. Conclusion
Updating your primary email on LinkedIn is essential for maintaining effective communication and ensuring you don’t miss out on valuable opportunities. Whether you’ve changed jobs, switched email providers, or simply want to consolidate your contact information, following the steps outlined in this guide will help you make a seamless transition.
Always remember to:
- Verify: After adding a new email, confirm it by clicking the link sent to your inbox.
- Check Settings: Regularly update your settings to match your current preferences.
- Stay Informed: Familiarize yourself with LinkedIn’s latest features and changes to the platform's interface.
Taking these simple steps not only enhances your LinkedIn experience but also ensures that you stay connected with your professional network effortlessly. Don’t hesitate to reach out for support if you encounter any hitches along the way. Happy networking!


