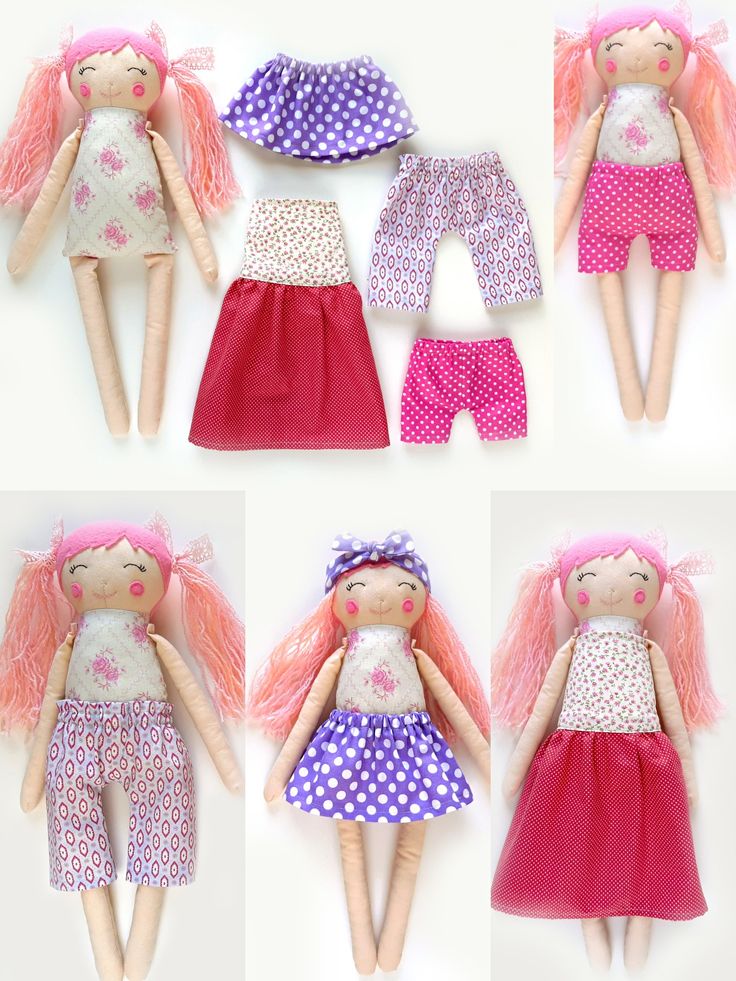
Creating doll clothes can be a delightful and rewarding experience! Whether you're a beginner or have some sewing skills under your belt, making outfits for dolls allows you to express your creativity and craft personalized items that can bring joy to both you and the doll owner. Plus, it's an excellent way to recycle old fabric, teach kids about sewing, or simply enjoy a relaxing hobby. In today's guide, we’ll cover the essentials of sewing doll clothes – from choosing the right materials to crafting patterns that fit perfectly!
Essential Sewing Tools and Materials

Before you dive into the world of doll clothing, it's important to gather the right tools and materials. Having the right supplies can make your sewing experience smooth and enjoyable. Here’s a list of essential items you'll need:
- Sewing Machine: A reliable sewing machine can speed up your sewing process. While you can sew by hand, a machine is much more efficient.
- Fabric: Lightweight cotton or flannel is great for beginners. Choose colorful prints or solid colors that inspire you.
- Thread: Use polyester or cotton thread that matches your fabric. Always have a few colors on hand!
- Scissors: Sharp fabric scissors are crucial for clean cuts. And don't forget some small scissors for snipping threads!
- Measuring Tape: Accurate measurements are vital to ensure a good fit for your doll.
- Pins: To hold fabric pieces together while you sew, a pack of straight pins is essential.
- Patterns: You can either buy pre-made patterns or draft your own. There are plenty of free printable patterns available online!
- Iron: Pressing your fabric and seams as you go will give your finished piece a polished look.
With these tools and materials at your disposal, you’re ready to embark on your sewing adventure! Happy sewing!
Measuring Your Doll for Perfect Fit

When it comes to making doll clothes, getting the measurements right is crucial for a perfect fit. But don't worry, measuring your doll is quite simple! All you need is a soft measuring tape, a notebook, and a pencil. Let’s break it down step by step:
- Head Circumference: Wrap the measuring tape around the head where you’d like the hat or hair piece to fit. Be sure to note this down!
- Chest Measurement: Measure around the fullest part of the doll's chest. This will be handy for dresses and tops.
- Waist Measurement: Find the narrowest part of the doll's waist and measure around it, as this will help you when sewing skirts and pants.
- Hips Measurement: Measure around the doll's hips at their fullest point; this is crucial for making well-fitting trousers or skirts.
- Length Measurement: For dresses, you’ll want to note the desired length from the shoulder down to where the dress should end (like the knee or ankle).
- Arm Length: Measure from the shoulder down to the wrist if you're making long sleeves.
- Leg Length: For pants, measure from the waist down to where you'd like the pants to hit (like the ankle).
After you've gathered all your measurements, it's a great idea to write them down and keep them handy. This way, you can whip up doll clothes in no time that fit like a dream!
Basic Sewing Techniques for Beginners
Getting started in the world of sewing can be super exciting but might feel a little overwhelming too. Don't fret! Here are some basic sewing techniques that will help you whip up those adorable doll clothes in no time!
- Straight Stitch: This is the most fundamental stitch. Simply set your sewing machine to a straight stitch and sew along the edge of your fabric. It’s perfect for seams!
- Backstitch: To secure your seams, especially at the beginning and end, you’ll want to use backstitching. Just sew a few stitches forward, and then reverse to lock it in place.
- Zigzag Stitch: This stitch is excellent for finishing raw edges to prevent fraying. It’s also great for stretchy fabrics!
- Hemming: This is the technique to finish the edges of your fabric. You can fold the edge under and sew it down using a straight stitch for a clean look.
- Gathering: If you want a ruffled effect, you can gather fabric. Simply sew two parallel lines of long stitches along one edge, and then gently pull the threads to gather the fabric.
Practice makes perfect, so don't hesitate to experiment with these techniques on scrap fabric before cutting into your main project. Soon, you’ll be ready to create a wardrobe fit for any doll!
5. Step-by-Step Instructions for Making Doll Clothes
Making doll clothes might seem intimidating at first, but with a bit of patience and practice, you can create charming outfits for your dolls. Let’s break it down into manageable steps to help you nail this fun and creative project!
- Choose Your Materials: Start by selecting the fabric you’d like to use. Cotton, felt, and jersey are great beginner fabrics. You'll also need matching thread, scissors, pins, and a sewing machine or needle for hand sewing.
- Measure Your Doll: Take accurate measurements of your doll. Jot down the following:
- Chest circumference
- Waist circumference
- Length from shoulder to hem
- Arm and leg length
- Create Your Pattern: Using your measurements, sketch a simple pattern on paper. You can look online for free doll clothing patterns or even use existing clothes as a stencil!
- Cut the Fabric: Place your paper pattern on the fabric, pin it down, and carefully cut around it. Include extra fabric for seam allowances, usually about 1/4 inch.
- Sew the Pieces Together: Start assembly! Pin and sew the fabric pieces together, following the pattern. Don’t forget to backstitch at the start and end of each seam to secure your stitches.
- Add Finishing Touches: Hem the edges of the outfit and add any closures like buttons or velcro. Feeling fancy? Why not add some embellishments like lace, ribbons, or appliques?
And voilà! You’ve made a lovely outfit that’s perfect for dressing up your doll. With practice, you’ll find your rhythm and start to create even more complicated designs!
6. Creative Ideas for Doll Outfits
Unleash your inner fashion designer with some creative ideas for doll outfits! There’s a whole world of possibilities out there, so here’s a list to get your creative juices flowing.
- Flower Girl Dress: Use soft pastel fabrics to create a flowy dress with layers, and finish it with a matching flower crown. Perfect for pretend weddings!
- Casual Denim Ensemble: Sew a denim skirt paired with a cute graphic T-shirt. Don’t forget to add mini pockets for an authentic touch!
- Cozy Pajama Set: Make a simple two-piece pajama outfit using flannel or jersey fabric. Add fun prints, like stars or polka dots, for an extra pop!
- Smart Casual Blazer: A tailored blazer can be a showstopper! Pair it with a simple top and pants for an elegant look that’ll impress any doll friend.
- Seasonal Outfits: Create outfits that represent different seasons. Think of warm, knitted sweaters for winter, or breezy sundresses for summer!
- Superhero Costume: Use bright colors and sturdy fabric to make a powerful superhero cape along with matching masks. Let imagination take flight!
Getting creative and customizing each outfit allows you to express different styles and let your doll’s personality shine. Plus, you can easily mix and match to create even more looks! Happy sewing!
Tips for Customizing Doll Clothes
Customizing doll clothes adds a personal touch that makes each garment truly special. Whether you want to create a one-of-a-kind outfit or simply update an existing piece, these tips will help you unleash your creativity and make your doll's wardrobe unique.
- Choose Unique Fabrics: Instead of using plain fabrics, try exploring different textures and patterns. Look for materials like lace, denim, or even recycled fabric from old clothes. Unique materials can add character!
- Accessorize: Don't underestimate the power of accessories! Hats, scarves, and belts can completely transform an outfit. You can create simple accessories by sewing a few extra pieces.
- Experiment with Colors: Mixing and matching colors is a fantastic way to customize! Try bright colors for a playful look or soft pastels for something more delicate.
- Use Embellishments: Add embellishments such as buttons, beads, or patches to give a distinctive look. You can even personalize your doll's clothing with embroidered initials or symbols.
- Mix Patterns: Why stick to one pattern? Try combining different prints to create a quirky style. Just ensure that the patterns don’t clash too much!
Customizing can turn a simple doll outfit into a fashion statement. So get creative, and don’t be afraid to break the mold!
Conclusion and Additional Resources
Creating doll clothes can be a delightful experience, blending creativity with practical sewing skills. Whether you're making pieces from scratch or customizing existing outfits, there’s a rich world of design opportunities right at your fingertips. Remember, every doll is unique, and their clothes should reflect that individual charm!
Although this guide is a great starting point, here are some additional resources that may help you further your doll clothing project:
| Resource | Description |
|---|---|
| Sewing Tutorials on YouTube | A vast range of video tutorials that show different techniques and patterns for sewing doll clothes. |
| Online Sewing Communities | Joining platforms like Reddit or Facebook groups can help you get help, ideas, and support from fellow sewers. |
| Fabric Stores | Visiting local fabric stores or online shops can provide you with unique materials specifically for doll clothes. |
Happy sewing! May your doll's wardrobe be as vibrant and unique as their personality!


