Ah, lip makeup! It’s the cherry on top of any beauty routine and can completely transform your look. Whether you’re going for a subtle hint of color or a bold statement, mastering lip makeup can elevate your overall appearance. From choosing the right shades to understanding different techniques, there’s so much to explore. In this guide, we’ll peel back the layers of lip makeup, making it enjoyable and accessible, so you can flaunt those gorgeous lips with confidence. Let's dive right in!
Essential Tools and Products for Lip Makeup

When it comes to lip makeup, having the right tools and products is half the battle won. You wouldn't cook a gourmet meal without the right utensils, right? The same goes for your makeup routine. Let’s break down the essentials you’ll need for perfectly painted lips.
1. Lip Balm
First things first, prep your lips! A good lip balm is crucial to keep your lips hydrated and smooth. Look for balms with natural ingredients like shea butter or coconut oil for the best moisture.
2. Lip Liner
A lip liner is your best friend when it comes to defining your pout. It helps in preventing feathering while giving shape to your lips. Choose a liner that matches your lipstick or is just a shade darker for that luscious effect.
3. Lipstick
Your lipstick choice depends on the occasion and your mood. Here are some popular types:
- Matte Lipstick: Perfect for bold statements and longer wear.
- Creamy Lipstick: Offers hydration and a glossy finish.
- Liquid Lipstick: Ideal for intense color and durability.
4. Lip Gloss
For that extra shine, a lip gloss can be your go-to product. It adds dimension and can be layered over your lipstick for a playful shimmer.
5. Lip Brush
A lip brush is essential for precise application, especially with bold colors. It allows you to apply lipstick evenly and reach the corners of your mouth.
6. Makeup Remover
Last but not least, don't forget a good makeup remover. It’s essential to clean off your lip makeup at the end of the day to keep your lips healthy.
With these tools and products in your arsenal, you’re already on your way to mastering lip makeup. Remember, practice makes perfect, so don’t hesitate to experiment and find what works best for you!
Also Read This: Using AI to Create Product Images
Step 1: Preparing Your Lips

Before diving into the fun part of applying lip color, it's crucial to prepare your lips properly. Just like a painter wouldn’t start on a canvas without a primer, you shouldn’t begin your lip makeup without getting your lips ready!
Here’s how to achieve beautifully prepped lips:
- Exfoliation: Start with a gentle exfoliating scrub. You can use store-bought lip scrubs or make your own using sugar and honey. Gently massage the mixture on your lips in a circular motion for about a minute to remove any dead skin cells.
- Hydration: After exfoliating, it’s time to hydrate. Apply a good quality lip balm or nourishing oil. Look for ingredients like shea butter, coconut oil, or vitamin E to lock in moisture.
- Base Layer: Once your lips are hydrated, you can apply a thin layer of concealer or foundation if you want a cleaner canvas. This helps to neutralize the color of your lips, making the lip color pop more.
Don’t forget to let the balm sink in for a few minutes before applying any color. This will ensure your lips are smooth and primed for a flawless application!
Also Read This: Combining Two Images in Paint Like a Pro
Step 2: Choosing the Right Lip Color

Choosing the right lip color can feel daunting with so many options available. But fear not! With a little guidance and some understanding of color theory, you’ll be rocking the perfect shade in no time.
Here are some tips for picking the right lip color:
- Skin Tone: Your skin tone plays a pivotal role in what colors will look good on you. Generally, if you have:
- Warm Undertones: Opt for colors like corals, peaches, and warm reds.
- Cool Undertones: Go for pinks, plums, and berry shades.
- Neutral Undertones: Lucky you! Almost any color will suit you, but try to balance between cool and warm shades.
- Occasion: Consider where you’re going. For daytime events, softer, nude shades work beautifully. For evening outfits, bold reds or deep berries make a striking statement.
- Finish: Decide whether you want a matte, glossy, or satin finish. Matte lipsticks have staying power but can be drying, while gloss adds fullness and shine.
Don’t hesitate to experiment! Sometimes the perfect shade might surprise you. And remember, having fun with your lip colors is what it’s all about!
Also Read This: Effective Ways to Cover Dark Circles with Makeup
Step 3: Applying Lip Liner

Applying lip liner may feel like an extra step, but trust me, it’s a game changer for getting that perfect pout! Lip liner helps define your lips, making them look fuller and more polished. Plus, it prevents your lipstick from feathering or bleeding outside your lip line. Here’s how to master it:
- Choose the Right Shade: Always opt for a liner that closely matches your lipstick. If you’re going for a nude look, select a shade that is a bit deeper than your natural lip color.
- Prep Your Lips: Start with clean, dry lips. You can even apply a small amount of lip balm to hydrate them before lining, but make sure to blot off excess moisture.
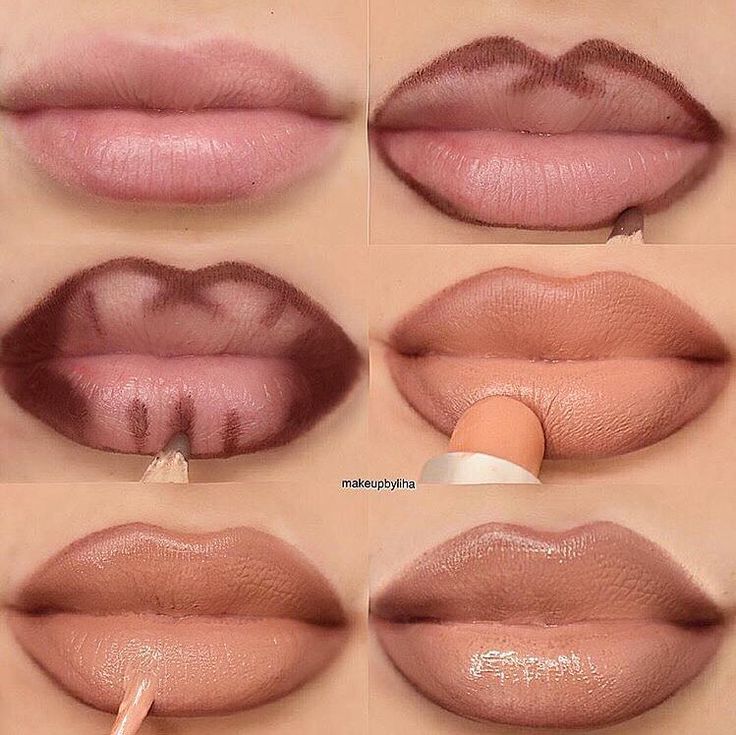
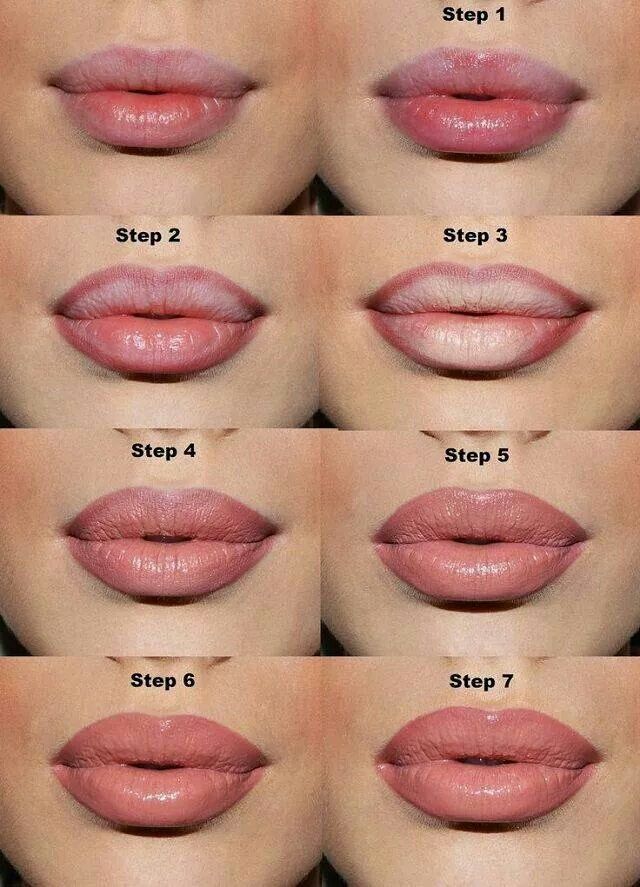
- Outline with Precision: Begin at the Cupid’s bow and draw a defined line outward towards the corners of your mouth. Follow your natural lip shape lightly, and don’t be afraid to correct any unevenness.
- Fill It In: For extra staying power and to avoid any stark lines between your liner and lipstick, gently fill in your lips with the liner. This will create a smooth base for your lipstick.
Remember: practice makes perfect! It may take a couple of tries to get the technique just right, but once you do, you’ll unlock a whole new level of lip makeup.
Also Read This: How to Edit a JPEG Image for Quality Enhancements
Step 4: Filling in the Lips
Now that you’ve defined your lips with liner, it’s time to apply your lipstick! Filling in your lips might sound straightforward, but there are some clever tips to make your color pop and last longer. Let’s dive in!
- Pick Your Formula: Whether you prefer creamy lipsticks, matte finishes, or glossy options, choose a formula that feels comfortable for you. Each has its unique finish and staying power.
- Using the Right Tool: You can use a brush for a more precise application, which is fantastic for bold colors. Alternatively, go straight from the tube for quicker application. Whatever feels right for you works!
- Apply with Care: Start in the center of your lips and work your way outwards. This technique helps to blend the lipstick into the liner you applied earlier and ensures an even coat.
- Blot and Set: After applying your first layer, gently blot with a tissue. This will remove the excess and help set the color. For long-lasting wear, you might want to add a second layer.
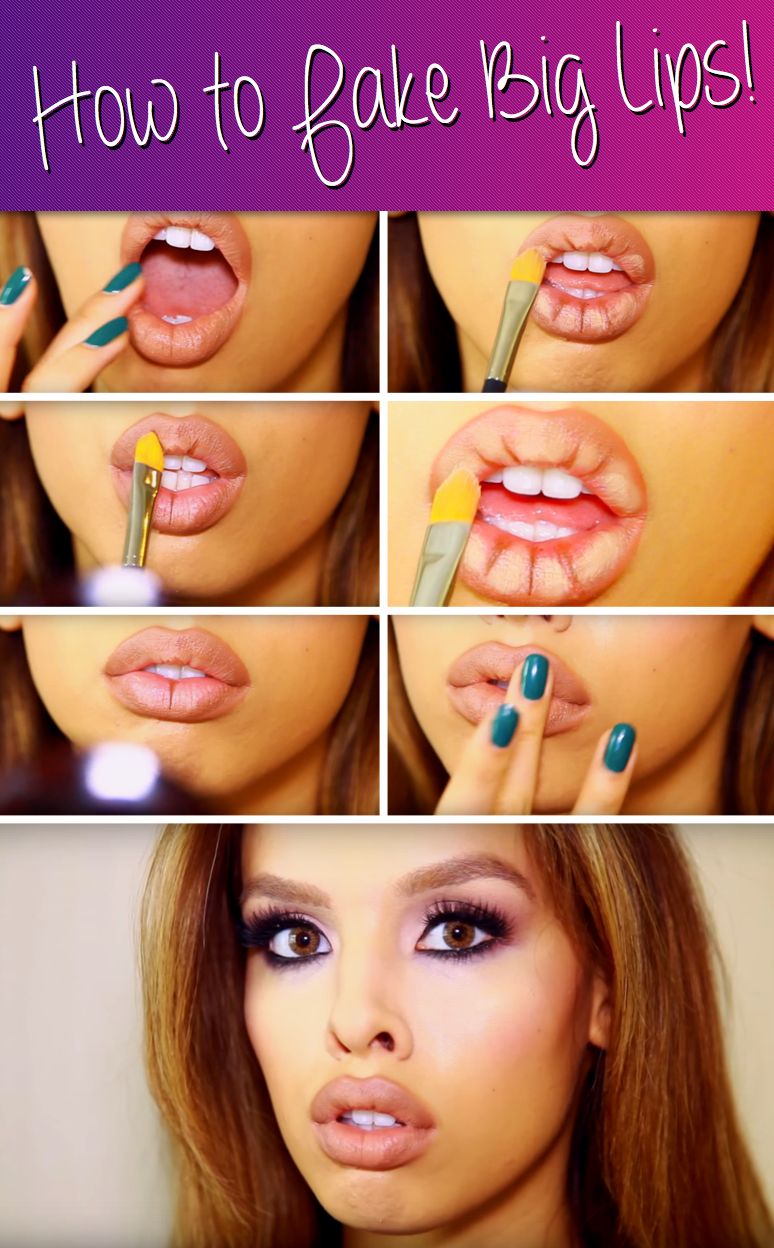
Final touch? A dab of gloss in the center can create the illusion of fuller lips. Voilà! You’re ready to slay with your gorgeous, professionally finished lips.
Also Read This: Editing Adobe Stock Templates in Illustrator
7. Step 5: Adding Gloss or Shine
Now that you've laid down the perfect base for your lip makeup, it’s time to add that extra oomph! Gloss and shine can elevate your look, making your lips appear fuller and more luscious. Here’s how to get it right:
- Choose the Right Gloss: Not all glosses are created equal. Some provide a high-shine finish, while others offer a subtle sheen. If you're looking for a natural vibe, go for a tinted balm with slight shimmer.
- Application Method: For a fuller effect, apply gloss using a lip brush. This allows for more control and even distribution. You can also use your finger for a more casual, "just-kissed" look.
- Placement: Concentrate the gloss in the center of your lips to create a plumping effect. You can even dab a bit on your cupid's bow for an extra highlight!
- Layering: If you're feeling adventurous, you can layer different products. Start with a pigmented lip color and top it with a clear or colored gloss. Just make sure the tones complement each other!
- Go for a Long-Lasting Formula: If you're going out for the night, look for a long-lasting gloss. While they often come with a higher price tag, they ensure your shine stays put!
Remember, gloss can magnify any texture on your lips, so ensure they’re well-prepped before adding that shine!
Also Read This: How to Make a Creative Shopping Bag with Paper
8. Step 6: Finishing Touches and Tips
You’re almost there, and it's time to refine and perfect your lip makeup! These finishing touches can make all the difference, ensuring your look stays flawless throughout the day.
- Check for Uneven Edges: Use a lip liner to clean up any rough edges. You can also use a small concealer brush with a bit of foundation to tidy up around the lips.
- Set with Powder: For those hot summer days, lightly dust translucent powder around the lips. This helps absorb excess oil and keeps your lipstick steady!
- Hydration is Key: Keep a hydrating lip balm handy for touch-ups. It’s essential to keep your lips moist, especially if you’re using matte formulas.
- Choose the Right Time to Reapply: While you might want to reapply gloss frequently, stick to lipstick touch-ups after meals. This helps avoid excess build-up that can lead to lip mishaps.
- Experiment and Have Fun: Don’t hesitate to try out new products and colors! Lip makeup is all about expression, so embrace the process and enjoy it.
Mastering lip makeup is an art, and these finishing touches will truly elevate your look. So grab your favorite products, and feel confident flaunting those gorgeous lips!
How to Master Lip Makeup for Gorgeous Lips
Lips are one of the most prominent features of the face, and mastering lip makeup can significantly enhance your overall appearance. Whether you desire a natural look or a bold statement, the right techniques and products are essential. Here is a comprehensive guide to help you achieve gorgeous lips:
1. Prepare Your Lips
Before applying any makeup, it's crucial to prep your lips:
- Exfoliate: Use a lip scrub or a toothbrush to remove dead skin.
- Hydrate: Apply a nourishing lip balm to keep your lips moisturized.
2. Choose the Right Products
Selecting high-quality products is key to achieving the desired look:
| Product Type | Recommendations |
|---|---|
| Lip Liner | Opt for a shade close to your natural lip color or lipstick. |
| Lipstick | Choose between matte, satin, or glossy finishes according to your preference. |
| Lip Gloss | Perfect for adding shine and dimension. |
3. Application Techniques
Use these techniques for flawless application:
- Outline: Start by defining your lips with lip liner.
- Fill In: Use a lipstick brush for even application.
- Blend: Use your fingertip to blur the edges for a softer look.
- Add Gloss: Apply lip gloss to the center for a plump effect.
4. Maintenance
To maintain your stunning lip look throughout the day:
- Touch Up: Keep your lip products handy for quick touch-ups.
- Blot: After application, blot with a tissue to set the color.
By following these tips, you can master lip makeup that not only enhances your natural beauty but also allows you to express your personality through various styles. Remember, practice makes perfect, so don't hesitate to experiment!
 admin
admin


