In the age of digital media, YouTube stands out as a massive platform for sharing and watching videos. However, you might find yourself wanting to keep a copy of your favorite videos for offline viewing or personal use. This blog post will provide an easy-to-follow guide on how to convert YouTube videos to MP4 format, which is compatible with most devices. Let's dive into the details!
Understanding Video Formats

Before we jump into how to convert YouTube videos to MP4, it’s essential to understand video formats and why MP4 is a popular choice. Video formats are like containers that store video data, audio data, and other related information. Different formats have varied qualities, compatibilities, and compression methods.
Common Video Formats:
- MP4: This is one of the most widely used formats. It's compatible with nearly all devices, offers high quality, and achieves excellent compression rates.
- AVI: Known for its high quality, AVI tends to take up more space compared to MP4. It’s great for editing but not ideal for everyday compatibility.
- MKV: This format supports a variety of codecs and is popular for high-definition online videos. However, not all devices support it natively.
- WMV: Developed by Microsoft, WMV is great for Windows users but can pose compatibility issues for other platforms.
Now, you might wonder why MP4 is specifically highlighted. Here’s why:
| Feature | MP4 |
|---|---|
| Compatibility | Almost universal across devices |
| Quality | Excellent video and audio |
| File Size | Reasonably compact |
| Streaming Capability | Supports online streaming |
In summary, MP4 stands out as a well-rounded choice for video content, making it an ideal format for your YouTube conversion. Got that? Great! Now let’s get into the nitty-gritty of actually converting those videos.
Also Read This: How Much Does Storyblocks Pay for Stock Footage and Other Contributions
3. Tools for Converting YouTube Videos to MP4

When it comes to converting YouTube videos to MP4, you have a variety of tools at your disposal. Depending on your preferences, you might go for online converters, standalone software, or even browser extensions. Let's break down some of the most popular options:
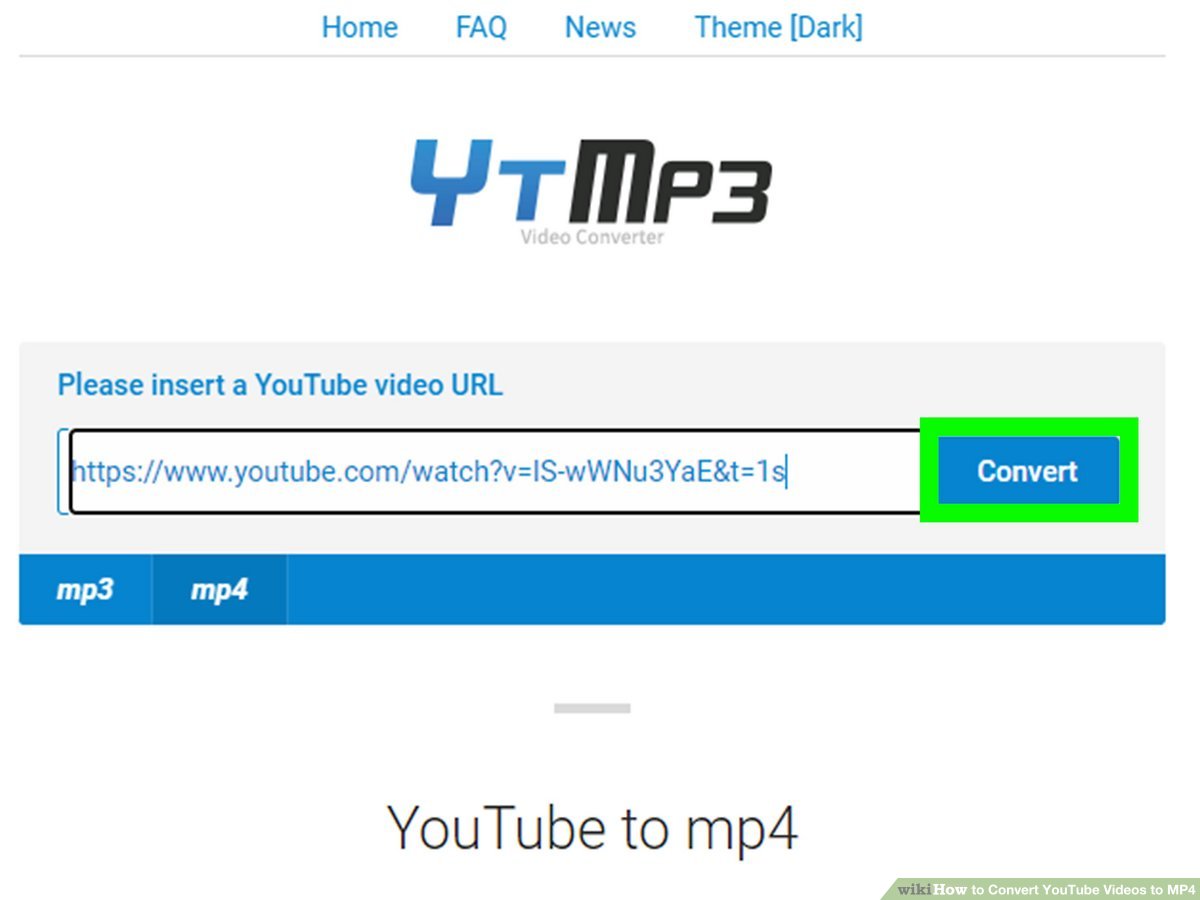
- Online Converters: These are probably the easiest to use since they don’t require any downloads. You simply paste the YouTube URL into a designated box and hit convert. Some reputable online converters include:
- Desktop Software: If you prefer having a dedicated application on your computer, software like 4K Video Downloader or Any Video Converter can do the job well. These tools often offer additional features like batch downloading and conversion options.
- Browser Extensions: For quick access, you might want to consider extensions like Video DownloadHelper or YouTube Video Downloader. These tools integrate right into your browsing experience, making the process smoother.
While you explore these tools, remember to check their user reviews and confirm they’re secure to use. Once you've decided which tool works best for you, the next step awaits!
Also Read This: Explore How to Save a Photo from Pinterest on Iphone With This Simple Method
4. Step 1: Finding the YouTube Video URL

The first step in converting a YouTube video to MP4 is to locate the video's URL. Don't worry; it’s super simple and only takes a few seconds. Here’s how to find the URL effectively:
- Open YouTube: Launch your browser and navigate to the YouTube website.
- Find Your Video: Use the search bar at the top to enter the name of the video you wish to download, or browse through your subscriptions.
- Click on the Video: Once you’ve found the desired video, click on it to open the video playback page.
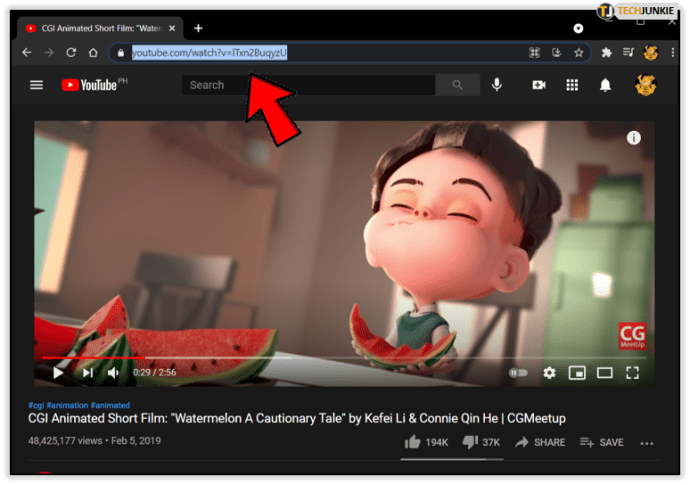
- Copy the URL: Look at the address bar in your browser. The URL should look something like this:
https://www.youtube.com/watch?v=abcd1234. Highlight the entire URL, right-click, and select “Copy” or use the keyboard shortcut Ctrl+C (Windows) or Cmd+C (Mac).
Now that you've copied the URL, you’re ready to move on to the next step in this simple conversion process. It’s as easy as pie!
Also Read This: Speed Up YouTube Shorts for Faster Playback
Step 2: Choosing a Conversion Method

Now that you're all set to convert your YouTube video to MP4, the next step is to choose the best conversion method that suits your needs. There are several options available—each with its own pros and cons. So, let’s break them down, shall we?
- Online Converters: These are web-based services that allow you to input the YouTube URL and convert it without downloading any software. Popular options include Y2Mate and 9Convert. The beauty of these platforms is their simplicity; just paste your link, choose the MP4 format, and let the magic happen!
- Software Applications: If you’re looking for more features like batch conversion or higher quality downloads, software applications can be your best friends. Programs like 4K Video Downloader or Freemake Video Converter offer powerful tools to get the job done efficiently. Just download the app, install it, and you'll be good to go!
- Browser Extensions: For those who prefer a quick solution without leaving your browser, extensions like Video DownloadHelper for Firefox or Chrome can come in handy. These tools allow you to convert and download videos directly from your browser interface, making it seamless.
When choosing a method, consider factors like ease of use, the speed of conversion, and video quality. It's always a good idea to look at user reviews and ratings to pick the best option for you. Remember, the right tool can make your video downloading experience smooth and hassle-free!
Also Read This: How to Create a YouTube Short Video on Your iPad
Step 3: Downloading the Video
Alright, you've chosen your conversion method, and it’s time to download that video! This step is crucial because it’s where you finally get to enjoy your content offline. Here’s how to do it, step by step:
- Copy the Video URL: Go to YouTube and find the video you wish to download. Click on the URL at the top of your browser and copy it.
- Paste the URL: Open your chosen conversion tool, whether it's an online converter, software, or browser extension. You’ll usually see a text box where you can paste the URL. Go ahead and do that!
- Select MP4 Format: Most converters will give you options for format selection. Choose MP4 from the dropdown menu. You can also select the video quality you prefer; higher resolutions like 1080p offer clarity but require more storage space.
- Start the Conversion: Hit the convert button! Depending on your method and video length, this might take a few seconds to a couple of minutes. You’ll usually see a progress bar or some indicator that shows you how it’s going.
- Download the Video: Once conversion is done, there will typically be a download button. Click on it, and your video will begin downloading! Make sure to save it in a location where you can easily find it later.
And that’s it! You’ve successfully downloaded your YouTube video in MP4 format. Now, you can enjoy your favorite content anytime, anywhere, even without an internet connection!
Also Read This: Resizing Images in GIMP Made Easy
Step 4: Verifying the Downloaded File
So, you've followed all the steps and successfully downloaded your YouTube video in MP4 format. But before you start celebrating, it's crucial to verify that the file you downloaded is in good shape. After all, there's nothing worse than realizing too late that your download was corrupted or missing crucial parts!
To ensure everything is in order, follow these simple steps:
- Locate the Downloaded File: Open the folder where your downloads are saved. Most browsers default to the "Downloads" folder, but if you've chosen a different destination, navigate to that folder.
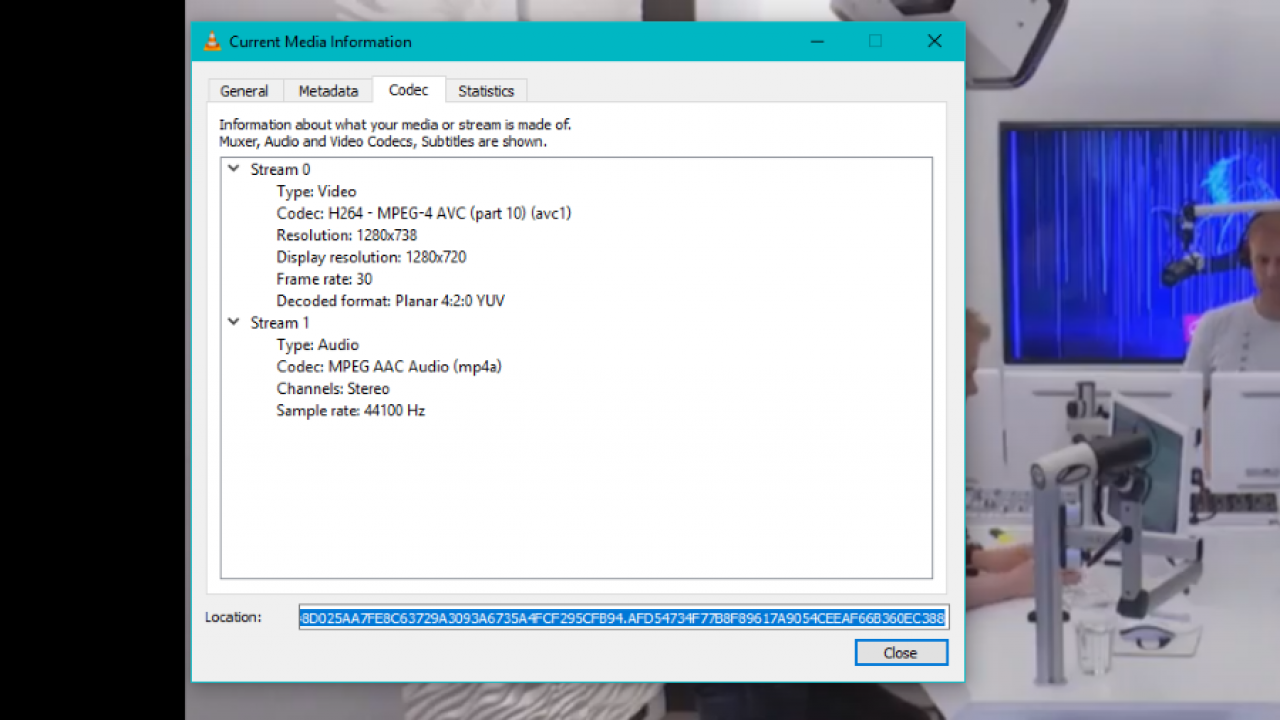
- Play the Video: Double-click on the MP4 file to open it with your preferred media player. Popular choices include VLC, Windows Media Player, or QuickTime. If the video plays without issue, that's a great sign!
- Check the Quality: Pay attention to the video quality and clarity. Make sure the audio is in sync and sounds just as it should. If something seems off, you might need to try downloading the video again.
- File Size Check: You can also check the file size to see if it matches the expected size based on the video’s length and quality. Right-click on the file and select 'Properties' on Windows or 'Get Info' on Mac to view this information.
If everything checks out, then congratulations! You’ve successfully converted and downloaded a YouTube video to MP4 format. If not, don’t hesitate to go back and download it again, ensuring all steps are followed for a successful conversion.
Conclusion
Converting and downloading YouTube videos to MP4 format can be a straightforward process when you follow the right steps. Now that you've learned how to do it, you can easily keep your favorite videos for offline viewing. Remember, whether it's for educational purposes, entertainment, or personal use, having access to these videos can enhance your experience!
Here’s a quick recap of what we covered:
- Understanding the requirements and choosing the right tool to convert your video.
- Following the steps of entering the video link, selecting the format, and starting the download.
- Verifying the downloaded file to ensure everything is in order.
As always, ensure you're in compliance with copyright laws and guidelines when downloading content from YouTube. Enjoy your video viewing, and happy downloading!
 admin
admin


