Tying a tie might seem like a daunting task, especially for beginners, but it doesn't have to be! Whether you're dressing up for a special occasion, heading to the office, or simply want to elevate your style, mastering the art of tying a tie can add a touch of sophistication to your look. From the classic knot to more intricate styles, understanding how to tie a tie can make all the difference. In this guide, we’ll break down the basics and help you navigate the world of ties with confidence.
Choosing the Right Tie for Your Outfit

One of the first steps in mastering the art of tying a tie is knowing how to choose the right one for your outfit. With so many options available, it can get a bit overwhelming! But don’t worry, we’ve got you covered with some helpful tips:
- Consider the Occasion: Are you heading to a wedding, a formal business meeting, or a casual outing? The occasion can greatly influence your tie choice. For formal events, opt for classic colors like navy, black, or deep red. Casual outings might allow for more playful patterns and colors.
- Match Your Tie with Your Shirt: Pay attention to the color and pattern of your shirt when selecting a tie. A solid shirt looks great with a patterned tie, while a patterned shirt works well with a solid tie. Remember the rule of thumb: contrast is key!
- Consider Your Suit: Your tie should complement your suit or blazer. For example, a striped or polka dot tie can enhance a plain suit. When in doubt, go for traditional options like a silk tie for elegance.
- Fabric Matters: The material of your tie impacts its overall look. Silk ties are great for formal occasions, while cotton or knit ties offer a more relaxed vibe. So, think about the fabric that fits your style!
By keeping these points in mind, you’ll find it much easier to select the perfect tie that not only enhances your outfit but also showcases your personal style. Happy tying!
Essential Tools for Tying a Tie

Before diving into the intricacies of knotting a tie, let’s start with the fundamental tools you’ll need. Fortunately, the list is pretty short! Here’s everything you might require to become a tie-tying pro:
- The Tie: Choose a tie that resonates with your style. Whether it’s silk, polyester, or cotton, the material can alter the knot’s appearance slightly.
- Mirror: A good mirror is essential, especially if you prefer to tie your tie on your own. It’ll help you ensure everything looks neat and aligned.
- Patience: Tying a tie might seem straightforward, but it can require a little practice. Make sure you are patient with yourself as you learn.
- Instructional Guide: Having a visual reference or an infographic can be super helpful. Whether it’s a video tutorial or printed step-by-step instructions, it’s great to have something handy.
With just a tie and a few essential tools, you’re ready to embark on this knot-tying journey. Now, let’s move on to what you’ve come here for—the step-by-step guide to knotting a tie!
Step-by-Step Guide to Knotting a Tie

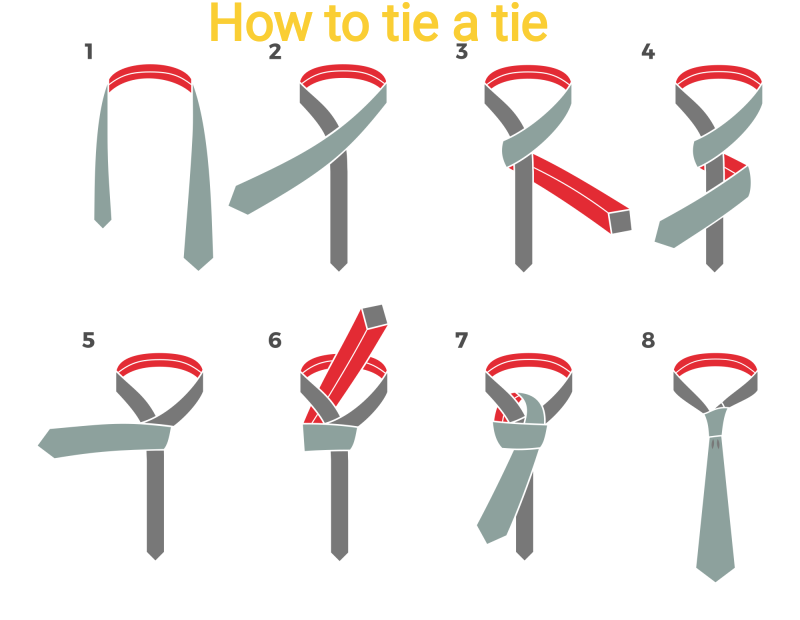
Tying a tie equals a little patience, practice, and a solid step-by-step guide. Here’s an easy-to-follow method for the classic Four-in-Hand Knot, which is a versatile choice for beginners:
- Start with the Tie Around Your Neck: Place the tie around your neck, with the wide end on your right side hanging about a foot lower than the narrow end on your left.
- Cross the Wide End Over the Narrow End: This is the first step in forming your knot. You should create an X-shape.
- Wrap the Wide End Behind the Narrow End: Bring the wide end around the back smoothly. Just be careful not to pull too tightly!
- Bring the Wide End Up Through the Loop: Pull the wide end up through the neck loop you've just created.
- Pass the Wide End Down Through the Knot: Now, push the wide end down through the knot in the front that you formed. Start to gently pull it snug!
- Tighten the Knot: Use both ends to adjust the knot for a proper fit. Slide the knot up toward your collar for a snug, polished look.
And there you have it! With a bit of practice, you’ll be tying your tie in no time. The Four-in-Hand is just the tip of the iceberg; once you’ve mastered it, feel free to explore more complex knots like the Windsor or Half-Windsor! Remember, practice makes perfect.
Common Tie Knots Explained
When it comes to tying a tie, the choice of knot can make a world of difference in your overall look. Here, we’ll break down some of the most common knots that you should know beneath your collar. Each knot has its own charm and suitability, depending on the occasion and your personal style.
- Four-in-Hand Knot: This is perhaps the most popular knot due to its simplicity and versatility. It's slightly asymmetrical, making it perfect for both casual and business settings. To tie, simply create a loop around the tie, then wrap it underneath and pull it through the front loop.
- Windsor Knot: If you’re looking for that classic, polished look, the Windsor is your go-to. It’s a larger, triangular knot that works best with spread collar shirts. To tie it, cross the tie over itself, bring it up through the loop, and wrap it around before pulling it down through the knot.
- Half Windsor Knot: This knot strikes a balance between the simplicity of the Four-in-Hand and the formality of the Windsor. It’s perfect for most occasions and gives a neat appearance. Start the same as the Windsor, but only make a half wrap around the tie before bringing it through the front loop.
- Pratt Knot (Shelby Knot): A great middle ground, the Pratt creates a symmetrical look and is versatile enough for both formal and casual situations. Start with the wide end on top, make a loop, then wrap it around and pull it through.
Each of these knots can elevate your outfit, so it's worth practicing until you've mastered the one that fits you best!
Tips for a Perfectly Knotted Tie
Tying a tie may seem straightforward, but there are a few tips and tricks to ensure your knot looks sharp and stays in place throughout your busy day. Here are some handy pointers to keep in mind.
- Choose the Right Tie: The thickness of your tie matters! Thicker ties may require larger knots, while thinner ties can pull off smaller ones.
- Pay Attention to Length: Your tie should hang just above your belt line. If it’s too short or too long, adjust accordingly by moving the knot upward or downward.
- Practice Makes Perfect: Don’t be discouraged if it takes a few tries to get it right. Practice in front of a mirror until you feel comfortable.
- Consider Fabric: Silk ties might slip more, so ensure you’re tying a tight knot. Wool or knitted ties hold their shape better and may require less tension.
- Check the Label: If you’re unsure, some ties come with instructions or recommendations for the best knots to use, depending on their material.
- Use Tie Accessories: Consider using tie clips or pins to keep everything in its rightful place, especially in more formal settings.
With these tips under your belt (or should we say around your neck?), you’ll be well on your way to mastering the art of tying a perfect tie for any occasion! Practice frequently to ensure your knot is always looking its best.
7. Frequently Asked Questions About Tying Ties
When it comes to learning how to tie a tie, many people find themselves with a mix of excitement and confusion. It’s a rite of passage for some and a skill that many need at various points in their lives. Here are some of the most frequently asked questions that beginners often have about tying ties:
- What types of ties are there? There are several types of ties including neckties, bow ties, and cravats. The most commonly worn is the necktie, which can be styled in various knots.
- What knot should I use? Beginners often start with the classic Four-in-Hand Knot or the simpler Simple Knot. Once comfortable, you can explore more complex knots like the Windsor or Half-Windsor.
- How do I know if my tie is the right length? A well-tied tie should ideally reach the middle of your belt buckle. If it’s too short or too long, you might want to adjust the way you’re tying it or choose a longer tie.
- Can I wear a tie with any outfit? Ties can elevate your wardrobe, but they work best with collared shirts and more formal attire. Always consider the occasion to choose the right tie and knot.
- How do I care for my ties? Store your ties correctly by rolling them up to prevent creases. Occasionally dab them with a damp cloth to refresh them, and avoid over-wearing the same tie to maintain its shape.
A little practice and knowledge can make tying a tie an effortless process, so don’t be shy about asking questions and learning!
8. Conclusion: Practice Makes Perfect
So, there you have it! Tying a tie might seem daunting at first, but with a bit of patience and practice, you’ll be able to master it in no time. Just remember, everyone starts somewhere, and even the best tie-tyers were once beginners. Here are some key takeaways to keep in mind:
- Start Simple: Don’t rush into complex knots. Begin with the basics and build your confidence.
- Practice Regularly: The more you practice, the more comfortable you’ll become. Try tying your tie during your daily routine.
- Be Patient: Mistakes are part of learning. If your tie doesn’t look perfect at first, that’s completely okay!
- Watch Tutorials: Use online resources, such as videos or step-by-step guides, to reinforce your learning.
Before you know it, tying a tie will be second nature to you. Whether you’re dressing for a job interview, a wedding, or just a night out, having this skill in your toolkit is invaluable. So grab that tie, and practice until it feels like a breeze! Remember, practice makes perfect, and soon you’ll not only be tying ties with ease but doing it with flair!
 admin
admin


