Video editing has become an essential skill in today's digital landscape, where visual storytelling is at the forefront of content creation. Enter Storyblocks—a platform that offers an impressive library of stock videos, audio files, and customizable templates. With Storyblocks, even beginners can create professional-quality videos without breaking the bank. Whether you're a content creator, marketer, or hobbyist, this tool makes it easy to breathe life into your creative projects.
With Storyblocks, you have access to a plethora of high-quality assets right at your fingertips. The intuitive interface allows users of all skill levels to navigate easily, making it a fantastic choice for both novices and seasoned editors alike. Plus, with a subscription model, you can enjoy unlimited downloads, meaning you can experiment without the pressure of overextending your budget. So, let’s dive deeper into how you can get started and master video editing on Storyblocks for improved outcomes!
Getting Started with Storyblocks

Getting started with Storyblocks is as easy as pie! Follow these steps, and you'll be editing videos like a pro in no time.
- Create an Account: Visit the Storyblocks website and sign up for an account. You can choose a suitable subscription plan that meets your needs.
- Explore the Library: Once logged in, explore the vast collection of assets. Use the search bar or browse categories to find the perfect footage, music, or sound effects.
- Download Assets: When you find an asset you like, simply click on it to download. With your subscription, you can take as many assets as you want!
- Choose an Editing Tool: Storyblocks works seamlessly with various popular editing software such as Adobe Premiere Pro, Final Cut Pro, and more. Pick one that fits your editing style.
- Start Editing: Import your downloaded files into your chosen software. Use the drag-and-drop feature to arrange clips, add transitions, and incorporate audio—let your creativity flow!
- Export and Share: Finally, once you're satisfied with your edits, export the video in your desired format and share it on your platforms of choice.
So there you have it! With Storyblocks at your disposal, mastering video editing has never been easier. Happy editing!
Also Read This: 10 Creative Ideas for Capturing Unique and Artistic Photos
Navigating the Storyblocks Interface

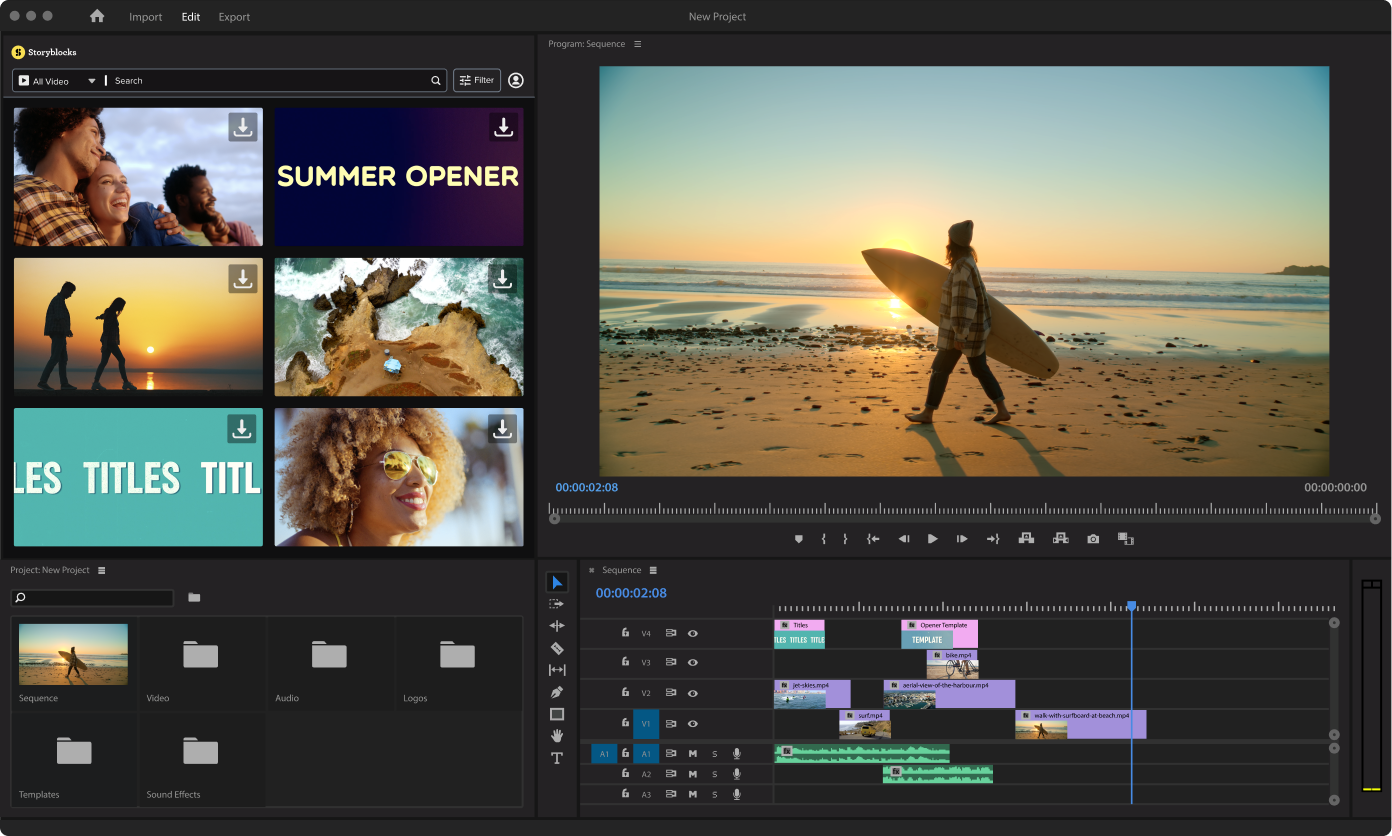
When you first dive into Storyblocks, the user-friendly interface makes it feel like a walk in the park. Let’s break down the main components to help you get started without feeling overwhelmed.
The primary sections you'll notice are:
- Library: Here, you’ll find a treasure trove of stock footage, audio files, and images. Use the search bar or filters to locate assets that fit your project's theme.
- Editor Toolbar: This is your toolkit where you can cut, trim, and rearrange clips. Functions like adding text overlays, adjusting audio levels, or applying filters are all just a click away!
- Timeline: The timeline is where the magic happens. It's like your workspace for organizing clips, effects, and transitions. You can easily drag and drop elements to create your desired flow.
- Preview Window: Want to see how things are coming together? Your preview window lets you watch your edits in real-time so you can make adjustments as needed.
Pro Tip: Familiarize yourself with keyboard shortcuts! They can save you tons of time and make the editing process smoother.
Also Read This: List of Top Linkedin Companies of USA in 2023
Importing Your Video Footage

Getting your video footage into Storyblocks is a breeze, and it’s a crucial step in the editing journey. Let’s walk through the process together!
- Open the Project: Start by opening the project where you want to import your clips. If you haven’t created one yet, just click on “New Project” to set the stage.
- Locate the Import Button: Usually found in the upper corner of your workspace, this button may read “Import” or simply have a plus (+) icon. Go ahead and click on it!
- Choose Your Files: A dialog box will pop up. Here, you can browse through your computer’s folders. Select all the video clips you want to use by either clicking “Open” for one or holding down the Ctrl (or Command) key to pick multiple files.
Once you’ve selected your footage, it will start uploading into your project’s media library. Depending on file size, this may take a moment.
Remember: Quality matters, so ensure that your footage is high-resolution for the best results when editing!
Also Read This: What is the Ideal Size for a YouTube Thumbnail
5. Utilizing Storyblocks Templates and Assets

When it comes to video editing, having the right tools at your disposal can make all the difference. Storyblocks is a treasure trove of templates and assets that can significantly streamline your workflow. So, how can you make the most of these resources?
First and foremost, Storyblocks offers a wide variety of pre-made templates. These templates cater to different formats and genres, from corporate presentations to social media clips. Here’s why you should leverage them:
- Save Time: Instead of starting from scratch, using a template can drastically reduce your editing time.
- Professional Look: These templates are designed by professionals, ensuring your videos have a polished and engaging appearance.
- Customizable: Even though they come pre-designed, you can easily tweak these templates to align with your unique brand or vision.
Besides templates, Storyblocks also offers a plethora of assets, including stock footage, sound effects, and music. Here’s how you can utilize them effectively:
- Stock Footage: Enhance your video storytelling by integrating high-quality clips that complement your narrative.
- Sound Effects: Add depth and emotion to your edits by layering in sound effects that enhance the viewer's experience.
- Music: Choose from a wide array of royalty-free music tracks to elevate your video’s mood and pacing.
In summary, tapping into Storyblocks' templates and assets not only saves you time and effort but also elevates the overall quality of your videos. So don't hesitate to explore and experiment with what Storyblocks has to offer!
Also Read This: Understanding Alamy’s Photo Payment Structure
6. Editing Techniques for Enhanced Video Quality
Mastering video editing isn't just about knowing your way around software; it's also about employing effective techniques that enhance your video's quality. Here are some strategies to consider:
| Technique | Description |
|---|---|
| Color Grading | Adjusting the colors can dramatically change the mood of your video. Use color correction tools to enhance or stylize your footage. |
| Transitions | Use smooth transitions to maintain flow and avoid jarring jumps in your footage. Simple fades or cuts are often the most effective. |
| Audio Mixing | Ensure your audio levels are balanced, and employ background music and effects wisely to complement the visuals without overpowering them. |
| Cutting for Pacing | Be mindful of pacing. Quick cuts can create excitement, while longer shots can build tension or emotional weight. |
| Layering | Using multiple video and audio layers can create a richer experience. Don’t hesitate to layer visuals or sounds to amplify your message. |
Incorporating these editing techniques can genuinely improve the final product. Remember, practice makes perfect! So, don’t be afraid to experiment and find what resonates most with your audience.
Also Read This: Creating Image Outlines in Canva
7. Adding Music and Sound Effects
When it comes to video editing, music and sound effects play a crucial role in setting the tone and enhancing the viewer's experience. Adding these elements can truly transform your project from average to outstanding. Here, we'll break down the process of incorporating music and sound effects in your videos using Storyblocks.
First things first, it's essential to *choose the right music* that fits the mood of your project. Whether you’re aiming for something upbeat, dramatic, or serene, Storyblocks offers a plethora of royalty-free tracks to match your vision. Once you've selected the perfect soundtrack, follow these steps:
- Import Your Audio: Drag and drop your chosen music track into your video editing timeline.
- Align the Audio: Make sure your audio aligns with your visuals. Pay attention to key moments in your video where music changes can enhance the impact.
- Fade In/Out: Use fade-ins and fade-outs for a smoother audio transition. This prevents abrupt starts or stops that can disrupt the flow.
- Layer Sound Effects: Sound effects can add depth. Browse Storyblocks’ library for effects that suit your project, like footsteps, nature sounds, or special effects.
- Adjust Audio Levels: Ensure the music doesn't overpower dialogue or important sounds in your project. Use the audio mixer to find the right balance.
Combining these elements thoughtfully will lead to a more engaging video. Music and sound effects can evoke emotions and reactions, making your content more memorable!
Also Read This: How to Copy Synced Video on Dailymotion
8. Exporting Your Finished Project
After putting in all the hard work into editing your video, it’s time for the moment of truth: exporting your finished project. This step is crucial as it determines the quality and format of your final video, so it’s essential to do it right!
When you're ready to export, Storyblocks provides a user-friendly process. Here’s a simple guide to ensure you get the best outcome:
- Select the Export Option: In your editing software, find and click the “Export” button—often located in the File menu.
- Choose Your Format: Depending on your platform, select the compatible format (e.g., MP4, MOV, etc.). MP4 is widely accepted across most platforms and offers good quality with smaller file sizes.
- Set Your Resolution: Pick the resolution based on where you plan to share your video. For example, 1080p (Full HD) is great for YouTube and social media.
- Adjust Bitrate: This influences the video quality and file size. A higher bitrate means better quality but also larger files. Use a bitrate that's sufficient for your needs without causing unnecessary bulk.
- Add Metadata: Filling in details like title, description, and tags can help make your video more discoverable when uploaded online.
Finally, hit the "Export" button, and let the software work its magic! Once the process is complete, review your video to ensure everything looks and sounds just as you envisioned. With these tips in hand, you're well on your way to mastering video editing on Storyblocks!
Also Read This: Mastering the Art of Selling Stock Photos on Adobe
9. Tips for Achieving Professional-Looking Videos
Creating professional-looking videos doesn’t have to be an uphill battle. Here are some practical tips that can elevate your content to new heights and captivate your audience:
- Plan Your Shots: Before diving into editing, sketch out a storyboard or shot list. This’ll ensure you capture everything you need, saving you time and headaches later.
- Utilize high-quality footage: Storyblocks offers an extensive library of high-quality videos, so don’t hesitate to make full use of it. Picking the right clips can make a world of difference!
- Pacing & Timing: A well-paced video keeps viewers engaged. Avoid long, dragged-out scenes. Instead, check the rhythm and flow of your cuts to maintain interest.
- Color Grading: Adding a color grade can unify your footage and evoke specific moods. Experiment with different palettes to find what resonates best with the story you’re telling.
- Consistent Audio Levels: Ensure your audio is balanced. Silence any unwanted sounds, and use background music to enhance the emotional impact. Storyblocks has a great selection of soundtracks!
- Transitions: While transitions can add flair, use them sparingly. Simple cuts or fades often look more professional than flashy transitions.
- Text & Graphics: Add titles and captions that are easy to read. Stick to one or two styles to maintain a cohesive look throughout your video.
By implementing these tips, you’ll be well on your way to producing videos that not only look professional but also resonate with your viewers.
10. Conclusion: Elevate Your Video Editing Skills
In the dynamic world of digital media, honing your video editing skills is essential for creating standout content. Whether you’re crafting a vlog, an educational video, or a marketing piece, the tools and tips offered by Storyblocks can significantly amplify your editing prowess.
Remember, the world of video editing isn’t just about cutting and splicing footage—it’s about storytelling. Keep your audience engaged by delivering polished, compelling narratives that evoke emotion and deliver your message efficiently. Here’s a quick recap to keep in mind:
| Key Takeaways | Action Steps |
|---|---|
| Utilize Storyblocks | Access high-quality footage and audio to enhance your project. |
| Focus on Planning | Create a storyboard to visualize your project before editing. |
| Prioritize Sound | Balance audio levels and add fitting background music. |
Lastly, don't forget to practice! The more you experiment and refine your skills, the better your videos will become. Embrace the learning curve and watch as you transform into a confident video editor, ready to leave a mark in the digital space. Happy editing!
 admin
admin


