Hey there, beauty enthusiasts! Have you ever thought about making your own lip gloss? Well, you're in for a treat because creating DIY lip gloss is not only super fun but also allows you to customize flavors and colors just the way you like. Today, we're going to focus on using a versatile and accessible ingredient: Vaseline. It's a classic beauty staple that can elevate your homemade lip gloss to a whole new level. So, grab your mixing bowls, and let's dive into the benefits of using Vaseline for your DIY lip gloss!
Benefits of Using Vaseline for Lip Gloss

If you’re on the hunt for the perfect base for your lip gloss, look no further than Vaseline. Here’s why:
- Moisture Locking: Vaseline is a great occlusive agent, which means it creates a barrier on your lips that locks in moisture. This helps to keep your lips hydrated and soft, perfect for those dry winter days!
- Natural Gloss: One of the best things about Vaseline is its ability to provide a natural sheen. This glossy finish makes your lips look plump and more vibrant without any sticky feeling.
- Versatility: Whether you want to create a simple tinted gloss or a sparkling one, Vaseline can easily be mixed with colorants like lipstick, food coloring, or eyeshadow for that personalized touch.
- Easy to Work With: Vaseline has a smooth consistency that makes it a breeze to blend with other ingredients. You don’t have to be a DIY expert to whip up a gorgeous lip gloss!
- Affordability: It’s certainly budget-friendly! Vaseline is inexpensive and readily available, making it a practical choice for everyone looking to DIY their beauty products.
With all these benefits, it’s no surprise that Vaseline is a go-to ingredient in many DIY beauty recipes. So why not give it a go and create your very own luscious lip gloss today?
Ingredients Needed

When it comes to making your own DIY lip gloss with Vaseline, you don’t need a bunch of fancy ingredients. In fact, you'll find most of what you need right in your home or a local store. Here’s a simple list to get you started:
- Vaseline (Petroleum Jelly): This is the base of your lip gloss, providing moisture and a creamy texture.
- Flavoring (optional): You can use anything from vanilla extract, mint extract, or even flavored lip-safe oils. This adds a pleasant taste and scent to your gloss.
- Colorants (optional): For those who want a colored lip gloss, you can use a small amount of lipstick, lip stain, or cosmetic-grade mica powder. Just make sure they are safe for lip use.
- Essential Oils (optional): If you're feeling fancy, a drop or two of your favorite essential oils, like peppermint or lavender, can add a lovely fragrance and additional benefits.
- Small Container: You'll need something to hold your lip gloss once it’s made. Small jars or lip gloss tubes work great.
So, there you have it! Simple ingredients that can easily combine to create your very own DIY lip gloss. You don’t need to break the bank or spend ages sourcing exotic products. Just a few basic items will do the trick!
Step-by-Step Instructions

Now that you have all your ingredients prepared, let’s dive into the fun part: making your own lip gloss! Follow these simple steps, and you'll be flaunting your new gloss in no time.
- Gather Your Supplies: Make sure you have all your ingredients laid out in front of you. This will help you stay organized and keep the process flowing smoothly.
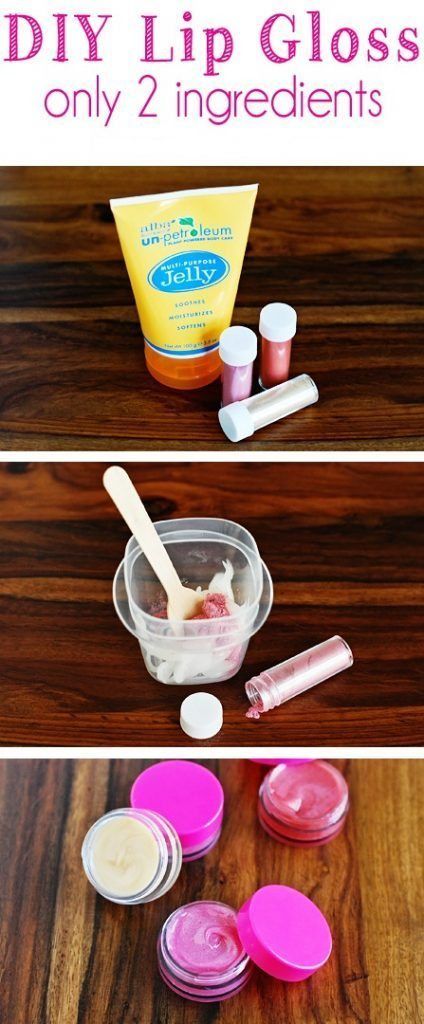
- Combine Vaseline and Colorant: Take about 2 tablespoons of Vaseline and place it in a small microwave-safe bowl. If you're adding color, chop a small piece of lipstick and mix it in. It usually takes about 1/2 teaspoon, but feel free to adjust according to how bold you want the color.
- Heat It Up: Microwave the mixture for about 10 seconds, then stir. Repeat this process until the Vaseline is melted and the color is well mixed. Just be careful not to overheat it.
- Add Flavor and Oils: Once the mixture is uniform, stir in your flavor extract and any essential oils (if using). A drop or two should suffice—don't overdo it!
- Pour Into Container: While the mixture is still warm and pourable, transfer it into your small container or lip gloss tube. You can use a small funnel or a spoon for this step.
- Let It Cool: Allow the lip gloss to sit at room temperature until it hardens. This usually takes about an hour, and you can speed it up by placing it in the fridge for a little while.
- Enjoy Your Creation: Once it's cool, your DIY lip gloss is ready to use! Swipe it onto your lips, and enjoy the moisturizing benefits along with your bespoke scent and shine!
And there you have it—your very own homemade lip gloss! Personalize it however you like and maybe even make a few batches to share with friends!
Customization Options
When it comes to creating your own DIY lip gloss with Vaseline, the fun doesn’t stop at just mixing ingredients! Customization is where you can truly make it your own. Let’s explore a variety of ways you can personalize your lip gloss to suit your style and preferences.
- Color: You can add various pigments for color. Special products like mica powder or lipstick shavings allow you to produce anything from a subtle tint to a bold hue. Start small and mix until you achieve your desired shade!
- Flavor: Bask in the deliciousness of adding natural flavors. A few drops of essential oils or flavor oils such as vanilla, mint, or citrus can add an extra sensory experience to your lip gloss. Just remember to stick to safe cosmetic quality oils!
- Shimmer: Want to sparkle? Consider adding a touch of cosmetic-grade glitter or shimmer powder. This can give your lip gloss that glamorous edge, perfect for a night out or special occasions.
- Moisturizing Boost: Incorporate natural oils like coconut, almond, or olive oil to enhance hydration. These additions not only benefit your lips but can also elevate your gloss’s texture.
- Packaging: Don’t forget about presentation! You can use cute containers like small jars or lip gloss tubes. Label them with unique names or even add custom stickers to make them gift-worthy.
With these options, the sky's the limit! Get creative and let your imagination run wild.
Tips for Best Results
Creating your own lip gloss can be a rewarding and enjoyable experience, but it’s essential to keep a few tips in mind to ensure your DIY project turns out perfectly every time. Here are some handy tips for the best results with your Vaseline-based lip gloss.
- Start Small: If you're new to DIY lip gloss, begin with a small batch. It’s easier to experiment with minimal amounts, and you can always scale up after you find a combination you love.
- Measure Accurately: Precision matters! Use a spoon or a small scale for measuring your ingredients accurately. This way, you’ll achieve consistency in texture and flavor each time.
- Heat Gently: If you're melting your base, do it gently. Use a double boiler or a microwave in short bursts to avoid overheating, which can mess up the consistency.
- Test Consistency: After mixing, check the consistency of your gloss. If it’s too thick, add a bit more oil; if it’s too runny, a little more Vaseline will do the trick!
- Store Properly: To maintain freshness, transfer your gloss to a clean container and store it in a cool, dark place. This helps prevent any degradation of the ingredients.
By keeping these tips in mind, you’ll be well on your way to creating fabulous, custom lip gloss that feels as great as it looks!
Creative DIY Lip Gloss with Vaseline
Creating your own lip gloss using Vaseline is a fun and easy way to keep your lips moisturized while adding a pop of color. This DIY project is perfect for beauty enthusiasts and those looking to customize their lip care products to suit their individual styles. Here's a simple guide on how to make your own Vaseline lip gloss at home.
Ingredients Needed:
- 1 tablespoon of Vaseline
- 1 teaspoon of lipstick (any desired shade)
- 1-2 drops of essential oil (optional, for fragrance)
- A small container or lip balm jar
Instructions:
- In a microwave-safe bowl, add the Vaseline.
- Microwave the Vaseline for about 10-15 seconds until it starts to melt (stir halfway to ensure even melting).
- Add the lipstick to the melted Vaseline, and mix until it is well combined.
- If you would like a pleasant scent, add 1-2 drops of your favorite essential oil.
- Pour the mixture into your small container or lip balm jar.
- Allow it to cool and solidify completely before using.
Benefits of Using Vaseline for Lip Gloss:
| Benefit | Description |
|---|---|
| Moisturizing | Vaseline creates a barrier to lock moisture into your lips. |
| Customizable | You can create any shade you desire by mixing different lipsticks. |
| Affordable | Making your own lip gloss is often cheaper than buying commercial products. |
| Natural Ingredients | You can control what goes on your lips by choosing natural ingredients. |
In conclusion, DIY lip gloss with Vaseline is not only simple and economical but also a great way to personalize your lip care routine. With just a few ingredients, you can create lip gloss that suits your style while keeping your lips soft and hydrated.
 admin
admin


