When working with photos, sometimes you find yourself needing to rotate an image to get the perfect composition. Whether it's a landscape that was taken in portrait mode or a photo that’s upside down, Lightroom offers an easy way to rotate your images. Rotating your image properly can improve its alignment, fix orientation errors, and help you showcase your work in the best way possible.
In this guide, we will walk you through the process of rotating images in Lightroom, highlighting various tools and techniques to make the task effortless. By the end, you'll be comfortable rotating individual images or even multiple ones at once—ensuring your photos always look their best.
Understanding Lightroom’s Image Rotation Tools

Before diving into the details of rotating an image, it’s important to understand the tools available in Lightroom. The software offers several simple rotation options, which can be accessed through different modules. Here’s a quick overview of the key rotation features:
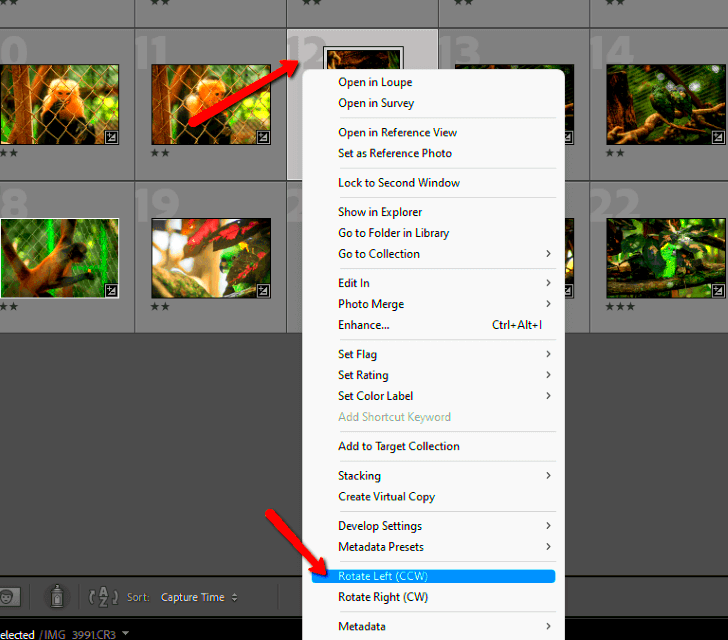
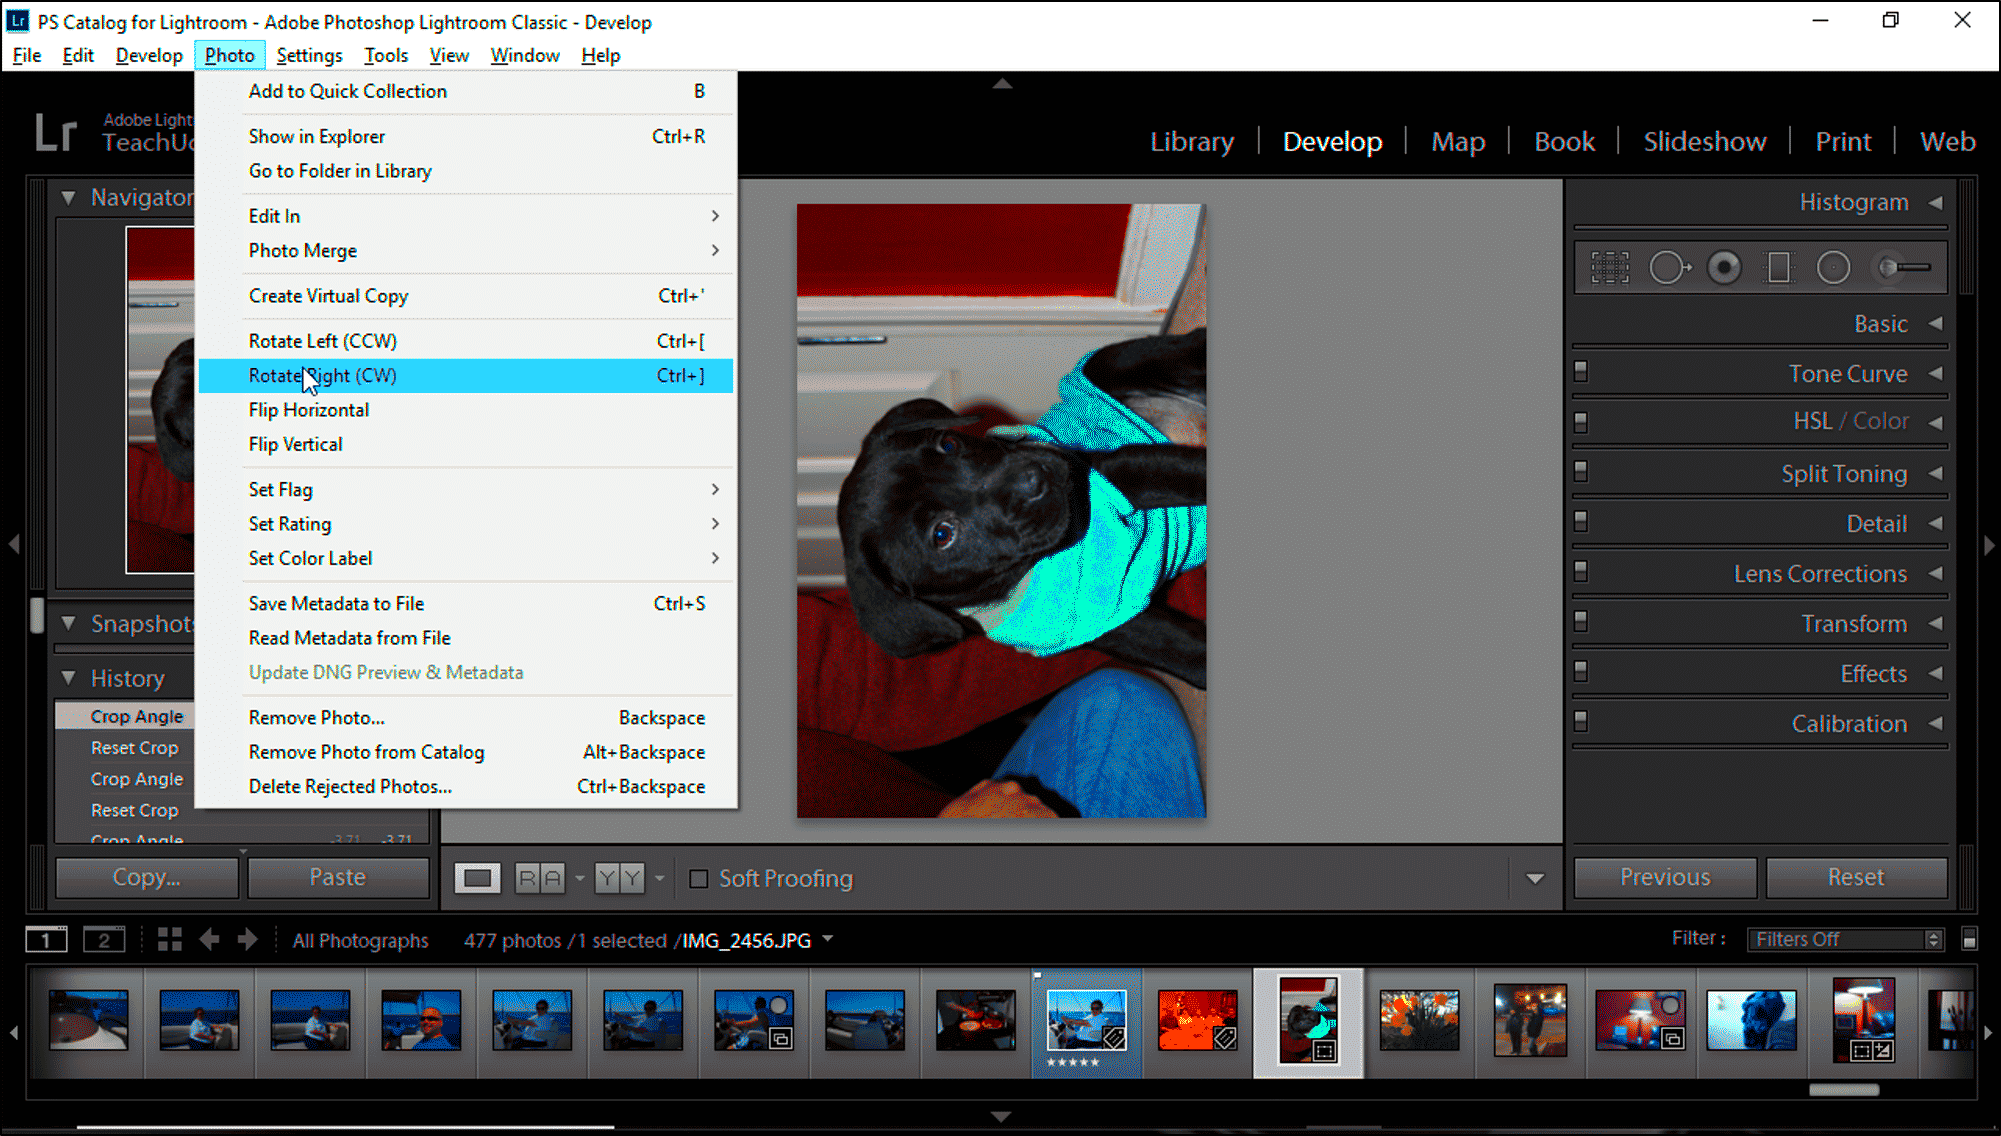
- Rotate Left (Counterclockwise): This option rotates the image 90 degrees to the left, perfect for correcting landscape-oriented images that were shot in portrait mode.
- Rotate Right (Clockwise): Rotate your photo 90 degrees clockwise to correct a similar issue or to achieve the right orientation.
- Flip Horizontal: This rotates your image horizontally, creating a mirror image. This is particularly useful for creative purposes or to fix an upside-down photo.
- Flip Vertical: This flips your image vertically, turning it upside down. It can be helpful in specific situations like fixing an inverted photo.
These basic tools help you correct the orientation of your images, but there’s more to it when you want to align your photo perfectly with the horizon or crop it while maintaining balance. Lightroom gives you the flexibility to make adjustments without damaging your photo’s quality.
Also Read This: Shutterstock vs Alamy: Choosing the Best Stock Photography Platform
How to Rotate an Image in Lightroom Using the Develop Module

One of the most common ways to rotate an image in Lightroom is through the Develop module. This module offers a comprehensive set of editing tools, and rotating an image is a straightforward process. Here's how you can do it:
- Open the Image in the Develop Module: First, open the image you want to rotate. Go to the "Develop" module by clicking on it in the top-right corner of Lightroom.
- Locate the Rotation Controls: In the right panel, under the “Basic” tab, you’ll find the rotation options. These controls allow you to rotate the image 90 degrees either to the left or right.
- Use the Image Orientation Buttons: At the top of the photo, you’ll see a toolbar that includes small icons for rotating left or right. You can simply click on the arrows to rotate your image clockwise or counterclockwise.
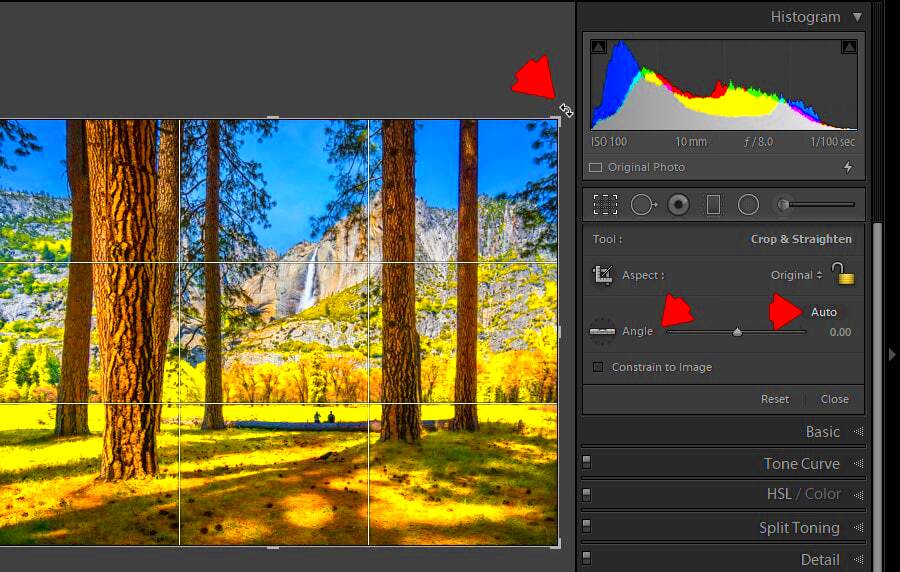
- Fine-Tuning the Rotation: If you need to rotate the image by smaller increments, you can use the Crop Overlay Tool to manually adjust the rotation. Click on the Crop tool, then drag the rotation dial to fine-tune the image's orientation.
The Develop module makes it easy to rotate images quickly and efficiently. Not only can you rotate photos, but you can also correct horizons and fine-tune the crop, all within the same space. This integrated approach saves time and enhances the editing process.
In addition, the Develop module ensures that these edits are non-destructive. This means that your original image remains unchanged, and you can always reset your rotation if needed.
Also Read This: Highest Followers On The Likee In USA 2023
How to Rotate Multiple Images at Once in Lightroom
If you’re working with a set of images that need to be rotated in the same way, Lightroom makes it easy to rotate multiple photos at once. This feature is especially useful when you have a batch of photos that were taken in the wrong orientation or need to be aligned for consistency.
Here’s how to rotate several images at the same time in Lightroom:
- Select All the Images You Want to Rotate: In the Library module or Filmstrip, hold down the Ctrl (Cmd on Mac) key and click on each image you want to rotate. You can also select a range of images by holding down Shift and clicking the first and last image in the range.
- Sync Settings: Once your images are selected, click the Sync button in the right-hand panel. A dialog box will appear where you can choose which settings you want to sync. Make sure to select Rotation from the list of options.
- Apply the Rotation: After syncing, Lightroom will apply the same rotation to all the selected images, saving you time and effort. You can also use the Sync Settings button to adjust other editing features simultaneously.
Rotating multiple images is a great way to streamline your workflow, especially if you're editing event or batch photos. The best part is that Lightroom will apply these edits non-destructively, so you can always make changes later.
Also Read This: How to Download Pictures from Behance
Using the Crop and Straighten Tool to Rotate Images
The Crop and Straighten tool in Lightroom is more than just for cropping. It also serves as a powerful tool for rotating images. This is particularly helpful when you want to fix a tilted horizon or align elements in your photo with more precision.
Here’s how to use the Crop and Straighten tool for rotation:
- Access the Crop Tool: In the Develop module, select the image you want to rotate, and then click on the Crop Overlay tool (the icon that looks like a square with overlapping lines).
- Activate the Straighten Tool: In the Crop Overlay panel, you’ll notice a small straightening icon (a level). Click on this to activate the Straighten tool.
- Align with the Horizon: Now, click and drag along a straight edge in your image that should be horizontal or vertical. For example, you might want to align the horizon of a landscape shot. Lightroom will automatically rotate the image based on the line you draw.
- Adjust the Crop: Once your image is straightened, Lightroom will crop the image to fit the new rotation. If necessary, you can manually adjust the crop to maintain the composition.
This tool is incredibly helpful when working with images that have a tilted horizon or when you're aiming for perfect alignment. It makes the rotation process more precise than simply using the basic rotation tools, as it accounts for angles and allows you to make subtle adjustments.
Also Read This: Here’s How to Change Your Age on Telegram
Shortcuts and Tips for Rotating Images in Lightroom
If you want to speed up your editing workflow, keyboard shortcuts and a few helpful tips can make rotating images in Lightroom even easier. Here are some shortcuts and tricks that can save you time and improve your photo editing process:
- Keyboard Shortcuts for Rotation:
- Rotate Left: Press Ctrl + [ (Windows) or Cmd + [ (Mac) to rotate an image 90 degrees counterclockwise.
- Rotate Right: Press Ctrl + ] (Windows) or Cmd + ] (Mac) to rotate an image 90 degrees clockwise.
- Use the Crop Tool for Fine Adjustments: When you need more control over rotation, use the Crop tool. Click and drag the rotation slider to adjust the angle in smaller increments, helping you get exactly the orientation you want.
- Batch Edit for Multiple Photos: As mentioned earlier, you can sync rotation settings across multiple images. To make batch editing easier, select a set of images in the Library module, sync the rotation settings, and apply them all at once.
- Keep an Eye on the Aspect Ratio: If you’re rotating images significantly, make sure that the aspect ratio doesn’t get distorted. Lightroom will maintain the aspect ratio by default, but if you unlock it, be cautious to avoid stretching your photos.
These tips are designed to speed up your editing process while maintaining accuracy. Whether you’re working with a single photo or a batch of images, these shortcuts and techniques can help you rotate photos with ease and efficiency.
Also Read This: How to Replace an Image in Word
Common Issues When Rotating Images and How to Fix Them
Rotating images in Lightroom is usually a straightforward task, but sometimes you might encounter a few common issues that can cause frustration. These problems can range from minor alignment glitches to more complex issues with the aspect ratio. In this section, we’ll explore these problems and how to fix them.
Here are some common issues you might face when rotating images, along with tips on how to resolve them:
- Image Crop or Aspect Ratio Distortion: When rotating an image significantly, the crop might change or the aspect ratio could get distorted. To fix this, ensure that the aspect ratio is locked before rotating, or adjust the crop manually after the rotation to maintain proper proportions.
- Uneven Cropping After Rotation: Sometimes after rotating an image, Lightroom will crop it in a way that feels off. You can manually adjust the crop area by selecting the Crop tool and fine-tuning the edges until the image looks well-balanced and aligned.
- Image Becomes Too Large or Too Small: After rotating, your image might appear stretched or compressed. If this happens, try using the "Constrain to Crop" option to prevent excessive scaling, or reset the crop to the original settings and adjust it accordingly.
- Rotating Multiple Images at Once Causes Errors: When batch-rotating images, Lightroom might sometimes apply the wrong settings to a few photos. This can happen if you have mismatched settings. Double-check that all the images are properly selected, and make sure to sync only the rotation settings to avoid syncing unwanted changes.
By understanding these common issues, you can troubleshoot and fix them quickly. Lightroom's flexibility ensures you can always return to the original image or make adjustments until you get the perfect result.
Also Read This: Why 123RF Is an Essential Tool for Creative Agencies
Conclusion: Mastering Image Rotation in Lightroom
Mastering image rotation in Lightroom can greatly improve your photo editing workflow, especially when you're working with multiple images or correcting orientation issues. By understanding the various rotation tools available—whether it's using the basic rotation options, the Crop and Straighten tool, or batch-editing images—you can ensure your images are always properly aligned and presented in their best light.
With the tips and techniques covered in this guide, you should be able to rotate your images efficiently and without frustration. Whether you’re correcting a quick orientation error or aligning images for a professional finish, Lightroom gives you the control and flexibility you need.
So, practice rotating your images, experiment with the different tools, and remember: every photo is just one click away from being perfectly rotated and ready to impress!
FAQ: Frequently Asked Questions About Rotating Images in Lightroom
1. Can I rotate an image in Lightroom without affecting its quality?
Yes, Lightroom allows you to rotate images non-destructively, meaning the quality of your original image remains intact. The rotation is applied as a virtual edit, and you can always reset or adjust it later.
2. What is the difference between rotating and flipping an image?
Rotating an image changes its orientation by 90-degree increments, while flipping an image mirrors it either horizontally or vertically. Flipping can be used for creative purposes or to fix an upside-down image.
3. How do I rotate an image incrementally by smaller angles?
To rotate an image by smaller increments, you can use the Crop tool and adjust the rotation slider manually. This allows you to fine-tune the angle and achieve precise alignment.
4. Why is the Crop and Straighten tool important for rotating images?
The Crop and Straighten tool helps you not only rotate images but also ensures that the horizon or other straight lines in the image are aligned properly. It’s perfect for fixing tilted landscapes or architecture shots.
5. Can I rotate multiple images at once in Lightroom?
Yes, Lightroom allows you to select multiple images and apply the same rotation settings to all of them at once. This is a great time-saver when working with a batch of photos that need the same rotation.


