When you're working with images, you might often hear the terms "image size" and "KB" being used. But what do they actually mean, and why should you care about them? Let's break it down. Image size refers to the amount of data that makes up the
KB, or kilobytes, is a unit of digital information. The more detailed or high-resolution an image is, the larger its file size (in KB). However, for many purposes, such as web design or mobile viewing, reducing the KB of an image can significantly improve performance, making pages load faster and saving bandwidth.
Understanding how image size affects your work will help you make better decisions when choosing or editing images. Now, let's dive deeper into why changing the KB of an image might be necessary for your projects.
Why You Might Want to Change the KB of an Image

There are several reasons why you might need to adjust the KB of an image. Here are some common situations where reducing or increasing the KB of an image is helpful:
- Improved website performance: Large images can slow down page load times, which can lead to a poor user experience and affect SEO rankings. Reducing the KB can speed up load times.
- Ease of sharing: Smaller images are easier to share through email, social media, or messaging apps, especially when there are size limits on file uploads.
- Optimizing for mobile: With more people browsing the web on mobile devices, reducing image KB ensures smoother mobile experiences with faster loading times.
- Reducing storage space: Large images take up a lot of storage, whether on your computer, in your online storage, or on your website. Lowering the KB can save valuable space.
On the other hand, there may be situations where you need to increase the KB of an image, especially if you're editing or enlarging the image for printing or professional use. Let's now explore the different methods you can use to change the KB of an
Also Read This: how do you flatten an image in photoshop
Methods to Change the KB of an Image

Changing the KB of an image can be done in a variety of ways, depending on whether you want to reduce or increase the file size. Here are some effective methods:
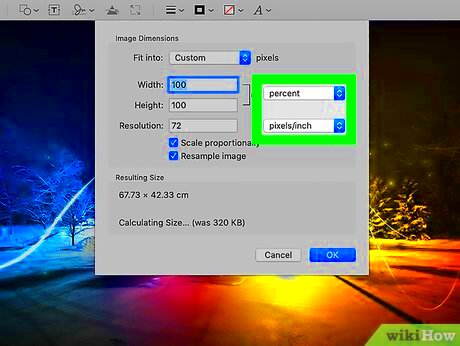
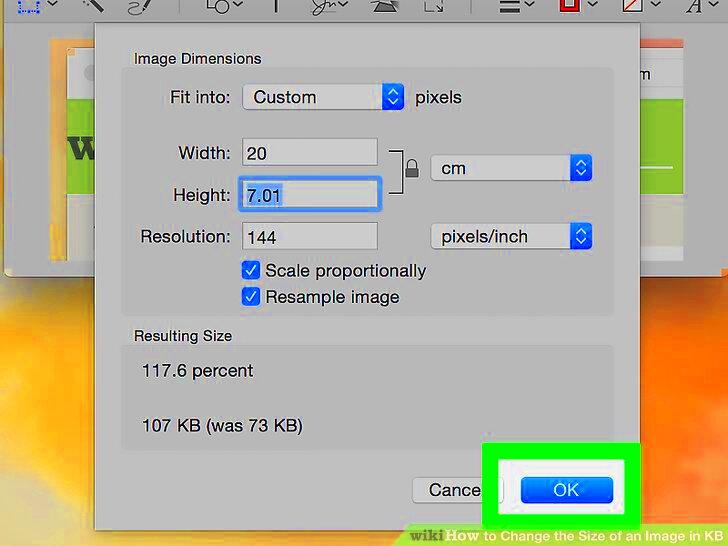
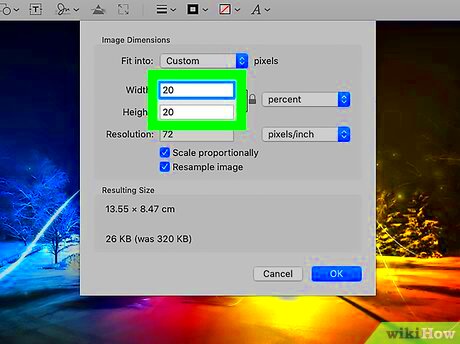
- Resizing the Image: One of the easiest ways to reduce the KB of an image is by resizing it. When you reduce the dimensions of an image (like width and height), its file size naturally becomes smaller. This can be done with simple image editing tools or online resizers.
- Compressing the Image: Compression is a technique that reduces the file size without changing its dimensions. You can use lossy or lossless compression methods. Lossy compression sacrifices some image quality to achieve a smaller file size, while lossless compression retains the original quality but might not reduce the KB as much.
- Changing the Image Format: Different image formats can have varying file sizes. For example, JPEGs tend to have smaller file sizes compared to PNGs. Converting an image to a different format can help you manage its KB.
- Adjusting Image Quality: If you're working with a JPEG or PNG file, reducing the quality of the image will lower the KB. Many online tools let you set the quality level, so you can strike a balance between image clarity and file size.
Each of these methods can help you effectively change the KB of an image. Choosing the best method depends on your needs and the specific use case of the image. Let's take a closer look at how you can use some of these methods with free online tools.
Also Read This: Unprivate Your Projects on Behance for Public Viewing
Using Free Image Editors to Adjust Image KB
Adjusting the KB of an image doesn’t have to be complicated or expensive. In fact, there are plenty of free online image editors that make it easy to reduce or increase the size of your images. These tools are perfect for users who don’t want to download bulky software but still need quick and efficient results. Let’s explore some of the most popular free image editors available today and how they can help you manage your image’s KB.
Some of the top free image editors include:
- Photopea: This is a free, web-based tool that functions like Adobe Photoshop. You can easily resize, compress, and adjust the quality of your images.
- Pixlr: Pixlr is a user-friendly online image editor that allows you to crop, resize, and change the image format, helping you reduce the KB effectively.
- GIMP: GIMP is a free, open-source software that’s great for more advanced editing. It can reduce image size by changing resolution, compressing the image, or using different file formats.
- ResizeImage.net: A simple and quick online tool that lets you resize and compress your images with just a few clicks. It’s perfect if you’re in a rush and need a straightforward solution.
To use these editors, simply upload your image, adjust its dimensions, compress it, or save it in a different format. The best part is that most of these tools provide instant previews, so you can see how the changes will affect your image quality before you download it.
Using free image editors is a hassle-free way to adjust your image’s KB without needing specialized software or expensive subscriptions.
Also Read This: Account Alchemy: Crafting a Seamless AliExpress Experience
How to Use Online Tools to Change KB
Online tools are an excellent option for adjusting the KB of an image because they are easy to access, require no installation, and can be used from any device. Whether you need to resize, compress, or change the image format, online tools make the process simple. Let’s walk through how you can use these tools step by step to manage your image’s KB.
Here’s a basic guide on how to use online tools:
- Step 1 - Choose an Online Tool: Select a reliable image editing website like ResizeImage.net, iLoveIMG, or Compress JPEG.
- Step 2 - Upload Your Image: Once you’ve chosen your tool, upload the image you want to adjust. Most websites allow you to drag and drop the image or use a file selector to upload it from your computer.
- Step 3 - Choose Your Adjustment Type: Depending on the tool, you can resize, crop, compress, or change the file format. If you’re looking to reduce the KB, choose the compression or resize option.
- Step 4 - Apply Changes: After selecting the desired adjustments, apply the changes. You might be given an option to set the quality level or choose between different formats like JPEG, PNG, or WebP.
- Step 5 - Download the Adjusted Image: Once the tool processes the image, you can download it in the new size or format. Check the KB to ensure it meets your needs.
Online tools are incredibly intuitive, and you’ll be able to change your image’s KB in just a few minutes. Most of these tools also provide additional features like bulk image editing, making them a great choice for users working with multiple images.
Also Read This: Citing Alamy Images: Proper Attribution for Academic and Creative Works
Best Practices When Reducing Image KB
Reducing the KB of an image is a useful skill, but it’s important to do so without sacrificing too much quality. If you reduce the KB too much, your image can look blurry or pixelated, which is not ideal for websites or print. Here are some best practices to follow when reducing the KB of an image to maintain the right balance between file size and image quality:
- Start with the Right Image Size: Before compressing or resizing, make sure the image is already appropriately sized for its intended use. For example, if it’s for a website, don’t use a high-resolution image when a smaller one will suffice.
- Use the Right Compression Type: When compressing, choose lossless compression for images where quality matters, like logos or graphics. For photos, lossy compression can help reduce the KB significantly without a huge loss of detail.
- Set the Quality Level Carefully: Many online tools let you choose the quality level of the compressed image. Lowering the quality too much can result in a grainy image, so experiment to find a setting that reduces the KB but still keeps the image looking good.
- Choose the Right Format: Different formats can affect the KB of an image. For example, JPEG is usually the best option for photos, while PNG is better for images with transparency. If you’re looking for the smallest file size, consider using WebP, which offers great compression while maintaining quality.
- Preview Your Image: Always preview your image before finalizing it. Check for any noticeable loss of detail or blurriness that may occur after compression, and adjust as needed.
By following these best practices, you can successfully reduce the KB of your images without sacrificing too much image quality, making them perfect for websites, emails, or social media posts.
Also Read This: Roblox Rhythms: Playing SoundCloud While Immersed in Roblox – A Multisensory Experience
Common Mistakes to Avoid When Changing Image KB
While adjusting the KB of an image can seem straightforward, there are some common mistakes that can lead to poor results. Whether you're resizing, compressing, or changing formats, it's easy to make small errors that can negatively affect image quality or your workflow. Let’s go through some of the most frequent mistakes to avoid when changing the KB of an image.
- Over-Compressing the Image: One of the most common mistakes is applying too much compression. While compression reduces file size, excessive compression can blur details, distort colors, and make the image look pixelated. Always check the quality of your image after compressing and adjust the compression level to balance size and clarity.
- Reducing Dimensions Too Much: Shrinking the dimensions of an image too drastically to reduce KB can lead to poor quality, especially if the image is later enlarged. Be mindful of the final display size and ensure you don't shrink the image below a usable resolution.
- Not Previewing the Image: It’s easy to hit the “save” button without checking how the changes have affected your image. Always preview the adjusted image before finalizing it. This way, you can make sure there are no unwanted visual effects.
- Using the Wrong File Format: Choosing the wrong file format for your image can result in a larger file size. For example, PNG files are larger than JPEGs, so if you’re working with photos, JPEG is typically the best option for reducing KB without sacrificing quality. Make sure you’re using the best format for the content.
- Not Considering the Purpose of the Image: Sometimes, people change image KB without considering how the image will be used. For instance, an image meant for printing should have a higher KB to maintain quality, while an image for a website should be smaller for faster loading times. Tailor the KB adjustments to the intended use.
By avoiding these mistakes, you can ensure that your images remain visually appealing while optimized for speed and storage.
Also Read This: Essential Guide to Saving Images as JPEG on Mac
FAQ
Here are some frequently asked questions (FAQs) to help you further understand the process of changing image KB and to guide you through any doubts you may have:
- What is the best way to reduce an image's KB without losing quality?
The best way to reduce KB while maintaining quality is to compress the image without overdoing it. You can also resize the image to a smaller dimension and use the correct file format (JPEG for photos, PNG for graphics) to ensure an optimal balance. - Can I change the KB of an image without using any online tools?
Yes, you can use desktop software like Adobe Photoshop, GIMP, or Paint to resize, compress, and change the format of images. Online tools are just a more convenient option if you don't want to install software. - What file formats are best for reducing KB?
JPEG is great for photos, while PNG is ideal for images with transparency. WebP is another format that offers good compression without a significant quality loss, making it a good option for both photos and graphics. - How much can I compress an image without noticeable quality loss?
The amount you can compress an image without visible quality loss varies. A good rule of thumb is to aim for a compression rate between 60-80% for JPEGs. Always preview the image after compressing to ensure it still looks good. - Will resizing an image always reduce its KB?
Yes, resizing an image to smaller dimensions usually reduces its KB. However, if you change the image format or increase its quality, the KB might not decrease as much. The key is balancing size and quality.
Conclusion
In conclusion, changing the KB of an image is an essential skill for optimizing files for various uses, from web publishing to sharing on social media. With the right tools and techniques, you can reduce file sizes without compromising quality. Always keep in mind the intended use of the image and the best practices for resizing, compressing, and choosing the right format. By avoiding common mistakes and following the steps outlined in this guide, you can confidently manage your images’ KB and improve their performance across different platforms.
Whether you choose to use free online editors, desktop software, or a mix of both, the goal is to find the balance that works best for your needs—one that maintains image clarity while keeping file sizes manageable. So, start experimenting and see how small adjustments can make a big difference!


