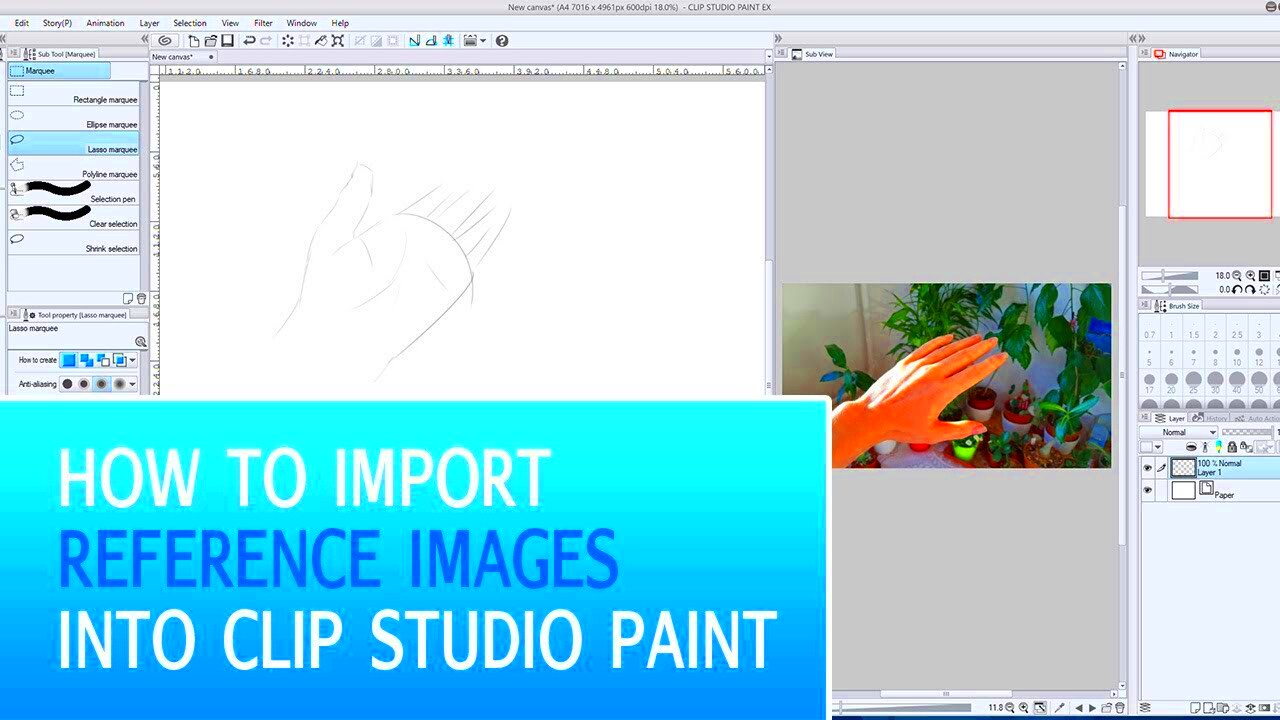
Clip Studio Paint is a powerful tool for digital artists and illustrators, offering a wide range of features for creating detailed artwork. One of the essential skills you'll need is inserting images into your project. Whether you're working on a comic, illustration, or any other project, adding images can enhance your work and save time. The process is simple, and knowing the best methods for inserting images into your canvas will make your workflow more efficient.
In this guide, we will cover different ways to insert images into Clip Studio Paint and help you understand how to manage them once they're added. You'll learn how to use the File menu, drag and drop images, and adjust their positioning to fit your needs.
Steps to Insert an Image in Clip Studio Paint

Inserting an image in Clip Studio Paint is easy, and there are multiple ways to do it. Let’s break down the steps for you:
- Open your project: Start by opening your Clip Studio Paint project where you want to insert the image.
- Select the right layer: Make sure you have selected the layer where you want the image to appear. This helps to organize your work.
- Insert Image: Follow any of the methods outlined below to bring the image into your project.
- Adjust and position: Once the image is inserted, use the transform tool to adjust its size and position according to your project needs.
Now that you know the general steps, let's look at specific methods you can use to insert an image.
Also Read This: Mastering OK.ru for Creating and Sharing Memorable Digital Content
Using the File Menu to Add Images

One of the most common ways to insert an image in Clip Studio Paint is through the File menu. This method is straightforward and ideal for beginners or anyone who prefers using menu options over shortcuts. Here's how you can do it:
- Step 1: Open Clip Studio Paint and your current project.
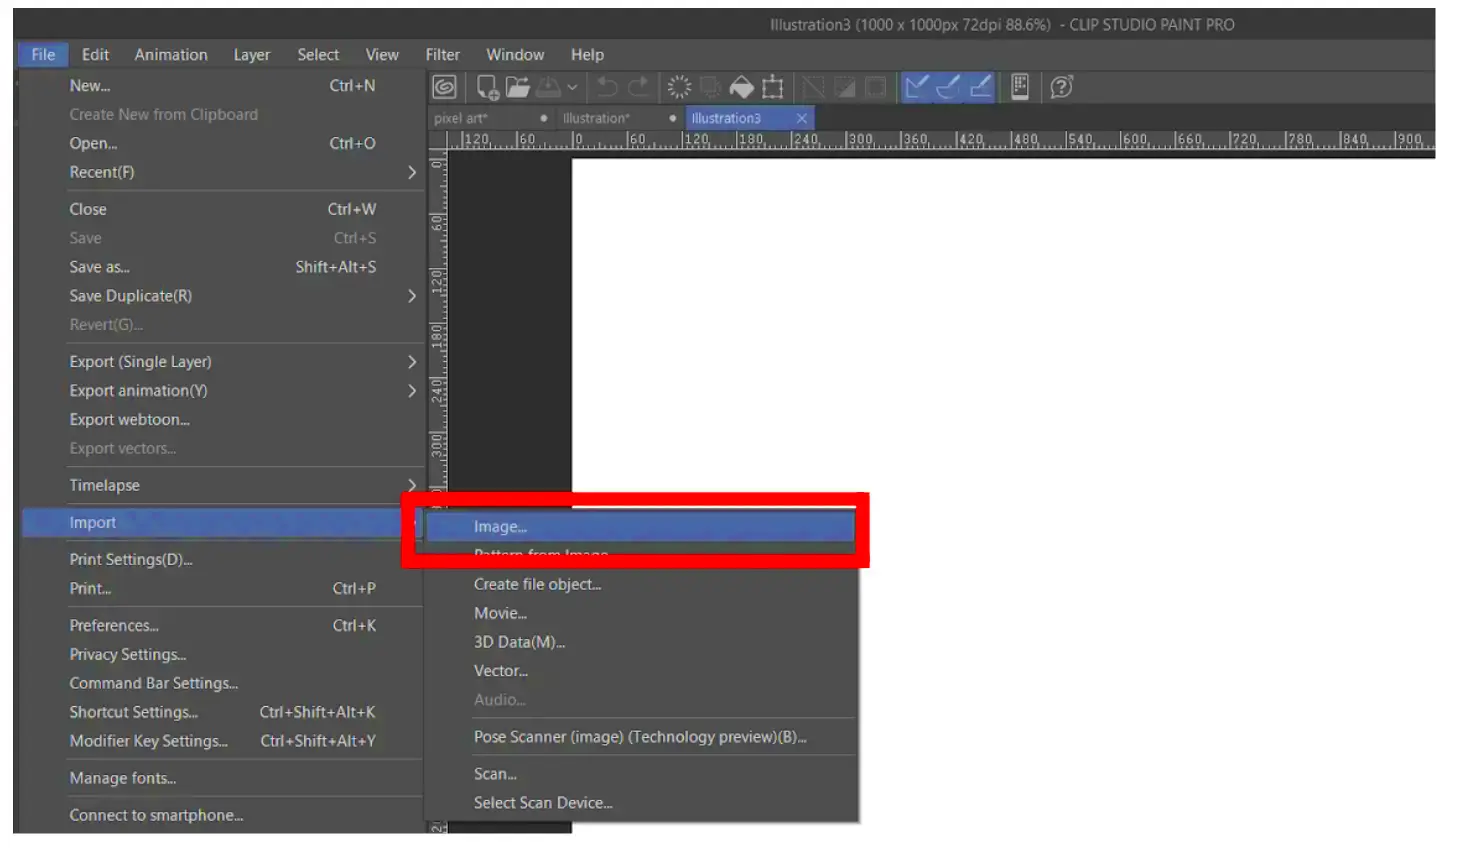
- Step 2: Go to the File menu located at the top left corner of the screen.
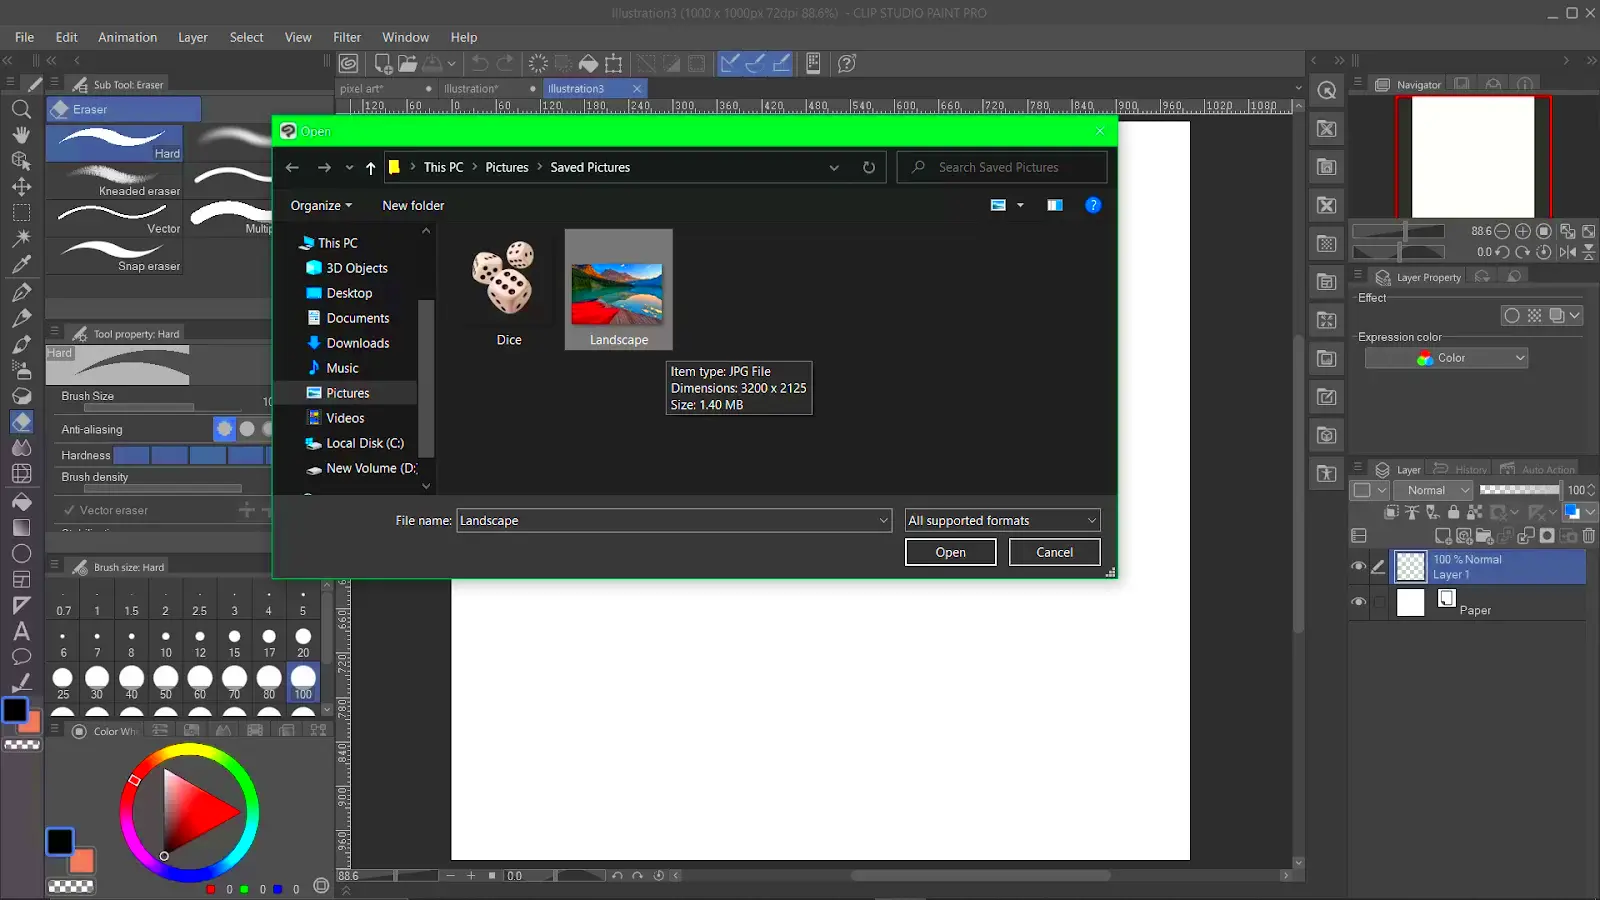
- Step 3: Select Import and then Image from the dropdown menu. This will open a file explorer window.
- Step 4: Navigate to the folder where your image is saved, and select the image you want to insert.
- Step 5: Once the image is selected, click Open to import it into your canvas.
The image will now appear in your project, usually in a new layer. You can then resize, rotate, or move it to your desired position.
By using the File menu, you can keep your workspace organized and ensure the image is imported correctly. It's a reliable method when working with external resources, such as photos, textures, or reference images.
Also Read This: Saving a Freeform Shape as an Image
Inserting Images via Drag and Drop

Another quick and efficient way to insert images into Clip Studio Paint is by using the drag and drop method. This method is particularly useful when you're working with files on your computer and want to quickly import them without navigating through menus. It’s fast, intuitive, and can save you a lot of time during your creative process. Here’s how to do it:
- Step 1: Open the folder containing the image you want to insert into your Clip Studio Paint project.
- Step 2: Click on the image file you want to use and hold down the mouse button.
- Step 3: Drag the image from the folder and drop it directly onto your Clip Studio Paint canvas.
- Step 4: Once you release the mouse button, the image will automatically be placed on your canvas.
After the image is dropped, Clip Studio Paint will create a new layer for it. This way, the image stays separate from other elements of your artwork, and you can easily adjust it. The drag-and-drop method is fast and seamless, allowing you to quickly move multiple images into your project without interrupting your flow.
Additionally, you can also drag images directly from your web browser or other applications. This makes it a versatile option for importing reference materials or assets you might need while working.
Also Read This: Can You Use Video Game Music in YouTube Videos Without Facing Copyright Issues
Adjusting the Image Position and Size
Once you’ve inserted your image into Clip Studio Paint, you’ll probably want to adjust its position and size to make it fit perfectly with your project. Thankfully, Clip Studio Paint provides simple tools for this. Let’s walk through how you can adjust your image:
- Step 1: Select the image layer from the Layers panel. This is important because it ensures that you're editing the right image.
- Step 2: Choose the Operation Tool from the toolbar (shortcut: 'V').
- Step 3: Click on the image on your canvas. You will see bounding boxes around the edges of the image.
- Step 4: To resize the image, click and drag one of the corners of the bounding box. Hold the Shift key while dragging to maintain the image’s aspect ratio.
- Step 5: To reposition the image, simply click inside the bounding box and drag it to the desired location.
If you need more precise adjustments, you can enter specific values for size and position in the Property panel on the right side of the screen. Here you can manually input width, height, and position values to make sure the image fits exactly as you want.
Remember that resizing too much can reduce the quality of the image, especially if you scale it up significantly. So, try to keep your original image size in mind and only adjust within reasonable limits.
Also Read This: Download Likee Videos Without Logo With This Method
Layering and Managing Images in Clip Studio Paint
When working with multiple images, it's crucial to understand how layers work in Clip Studio Paint. Layers allow you to keep your images organized, and they give you flexibility when it comes to editing different parts of your artwork independently. Here’s how to manage and organize your images in layers:
- Step 1: Each image you insert into your project will automatically create a new layer. You can see all your layers in the Layers Panel, usually located on the right side of the screen.
- Step 2: To move an image layer, simply click and drag it in the Layers Panel. Layers higher in the panel will appear on top of lower layers on the canvas.
- Step 3: To hide or show a layer, click the eye icon next to the layer name. This is useful when you want to focus on certain parts of your artwork.
- Step 4: To delete an image layer, select the layer and press the Delete key on your keyboard or click the trash bin icon in the Layers Panel.
- Step 5: You can also group layers together by selecting multiple layers (hold down Ctrl or Cmd to select multiple layers) and clicking the folder icon in the Layers Panel. This helps you keep your project organized.
Managing layers is especially important when you’re working on detailed or complex projects. With multiple images, you might want to group similar images together, lock certain layers to prevent accidental edits, or even apply different layer effects like opacity and blending modes.
By mastering layers and their management, you can take full control of your Clip Studio Paint project and keep everything organized, allowing for smoother workflow and faster edits.
Also Read This: Imago Images: The Best Stock Photo Agency for Designers and Creatives
Common Issues While Inserting Images and How to Solve Them
While inserting images into Clip Studio Paint is usually a straightforward process, you may encounter a few issues along the way. These can range from file compatibility problems to image placement errors. In this section, we’ll discuss some common problems and how you can solve them efficiently.
1. Image File Not Showing
Sometimes, after importing an image, it might not appear on your canvas. This could be due to:
- Layer visibility: Make sure the layer is visible. Check the eye icon next to the layer in the Layers Panel.
- Incorrect file format: Ensure the image is in a supported format like PNG, JPG, or BMP. If it's not, convert it using an image editor before importing.
2. Image Quality Lost During Resizing
Scaling an image up too much can lead to pixelation or loss of quality. To avoid this:
- Use high-resolution images: Start with images that have a high resolution to maintain quality when resized.
- Rescale carefully: Avoid enlarging images beyond their original size. If resizing is necessary, do it moderately.
3. Image Not Fitting the Canvas
If the image doesn’t fit the canvas properly, use the Transform Tool (Ctrl + T) to adjust its size and position. You can also check the canvas settings to make sure your project dimensions are appropriate for the image size.
4. Layers Becoming Unresponsive
If an image layer becomes unresponsive or glitchy, try restarting the program or resetting the layer's settings. In some cases, it may help to rasterize the layer.
Also Read This: How to Download Images from Figma for Web Design Projects
Best Practices for Working with Images in Clip Studio Paint
Working with images in Clip Studio Paint can be a seamless process if you follow some best practices. By keeping things organized and optimizing your workflow, you can improve your productivity and the quality of your artwork. Let’s explore some of the best practices:
- Use Layers Wisely: Always insert images on separate layers to maintain flexibility in editing. This allows you to adjust, delete, or modify an image without affecting other parts of your artwork.
- Keep Image Resolution High: Use high-quality, high-resolution images to prevent pixelation when scaling. This is particularly important if you're working on larger projects or need to zoom in on specific details.
- Organize Layers: Name your layers based on the content (e.g., “Background Image,” “Reference Image”) to easily identify and manage them. Group similar layers together to maintain a clean workspace.
- Lock Layers When Necessary: To avoid accidental changes, lock layers that you don’t want to edit. This is useful for background elements or reference images.
- Adjust Opacity and Blending Modes: Play with the opacity and blending modes of image layers to create different effects, like overlays or transparency. This can give your project a more professional touch.
- Save Your Work Regularly: Always save your work regularly, especially when adding multiple images. Clip Studio Paint offers auto-save features, but it’s a good habit to save manually too.
By following these best practices, you can avoid many of the common pitfalls and make the process of working with images in Clip Studio Paint more efficient and enjoyable.
Also Read This: How to Verify the Copyright Status of Images for Legal Use
FAQ
Q1: Can I insert animated images into Clip Studio Paint?
A1: Clip Studio Paint primarily handles still images, but you can work with animated GIFs by converting them into individual frames. Use the Animation Folder feature for better management of each frame.
Q2: How can I remove the background from an image?
A2: You can remove the background from an image using the Magic Wand Tool to select the background, then delete it. You can also use a layer mask for non-destructive editing.
Q3: Why is my image not appearing on the canvas after insertion?
A3: This could be due to the layer being hidden, the image being off-canvas, or the image being placed on a locked layer. Make sure to check your layers and ensure the image is within the canvas boundaries.
Q4: Can I add a 3D model to my project in Clip Studio Paint?
A4: Yes, Clip Studio Paint supports 3D models. You can import 3D assets and use them as reference material for drawing or even incorporate them into your artwork directly.
Q5: What should I do if the image is too large for the canvas?
A5: You can resize the image using the Transform Tool (Ctrl + T) or change the canvas size to better fit the image dimensions. Always make sure the resolution remains high when resizing.
Conclusion
Inserting and managing images in Clip Studio Paint can be a simple and efficient process when you understand the various methods and tools available. Whether you choose to insert images via the File menu, drag and drop, or adjust their size and position, Clip Studio Paint offers powerful features to ensure your images integrate smoothly into your artwork. By following best practices such as using layers, maintaining high image resolution, and organizing your workspace, you can enhance your productivity and avoid common issues. With a little practice, you'll be able to insert and manipulate images with ease, bringing your creative vision to life in no time.


