GIMP, or GNU Image Manipulation Program, is a popular free software for editing images. One of its essential features is the ability to change an image's resolution. Whether you want to enhance an
Understanding Image Resolution and Why It Matters

Before diving into the process, it’s important to understand what image resolution means and why it’s so significant. Resolution refers to the number of pixels in an image, typically measured in pixels per inch (PPI) or dots per inch (DPI). Higher resolution means more pixels, leading to greater detail and sharpness.
Why does resolution matter? Here are a few reasons:
- Printing: High-resolution images are crucial for clear, professional-looking prints.
- Digital Use: Lower resolution can reduce file size, making images easier to upload and share online.
- Editing: Adjusting resolution allows you to fine-tune images for specific purposes, such as web design or photography.
By knowing the purpose of your image, you can decide on the ideal resolution for your needs, ensuring a balance between quality and file size.
Also Read This: Uncropping Images: How to Restore Cropped Edges
Steps to Open an Image in GIMP
Getting started with GIMP begins with opening your image. Follow these simple steps:
- Launch GIMP: Open the software on your computer.
- Access the File Menu: Click on File in the top-left corner of the screen.
- Select Open: From the dropdown menu, choose Open. A file explorer will appear.
- Locate Your Image: Navigate to the folder containing your image, select it, and click Open.
Once the image is loaded, you’re ready to start making adjustments. Make sure to save a backup copy of your original file to avoid losing any important data during editing.
Also Read This: 10 Creative Ideas for Capturing Unique and Artistic Photos
How to Access and Use the Scale Image Tool
The Scale Image tool in GIMP is an essential feature when it comes to resizing your image or changing its resolution. It allows you to modify the dimensions of your image while maintaining control over its quality. Whether you're preparing images for printing or optimizing them for the web, the Scale Image tool offers precise adjustments.
Here’s how to access and use it:
- Open your image: First, make sure your image is open in GIMP.
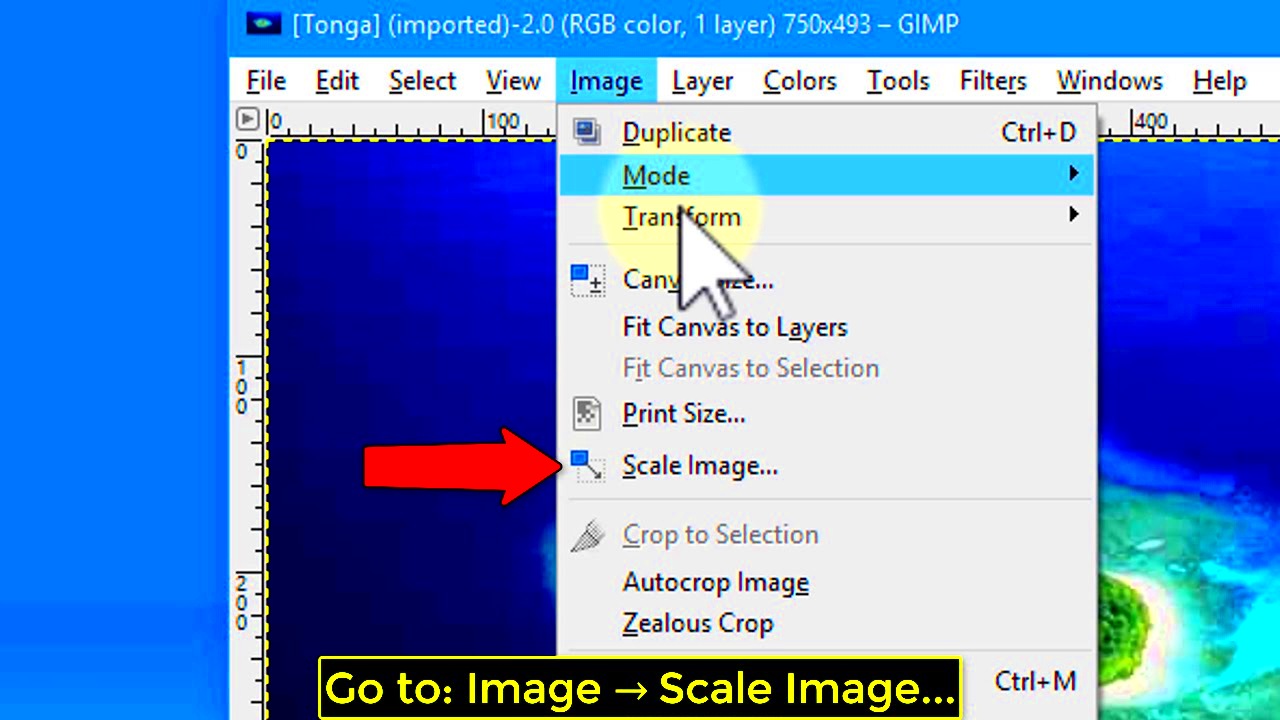
- Navigate to the Image Menu: In the top menu bar, click on Image.
- Select Scale Image: From the dropdown menu, click on Scale Image. A window will pop up with options to adjust the image size.
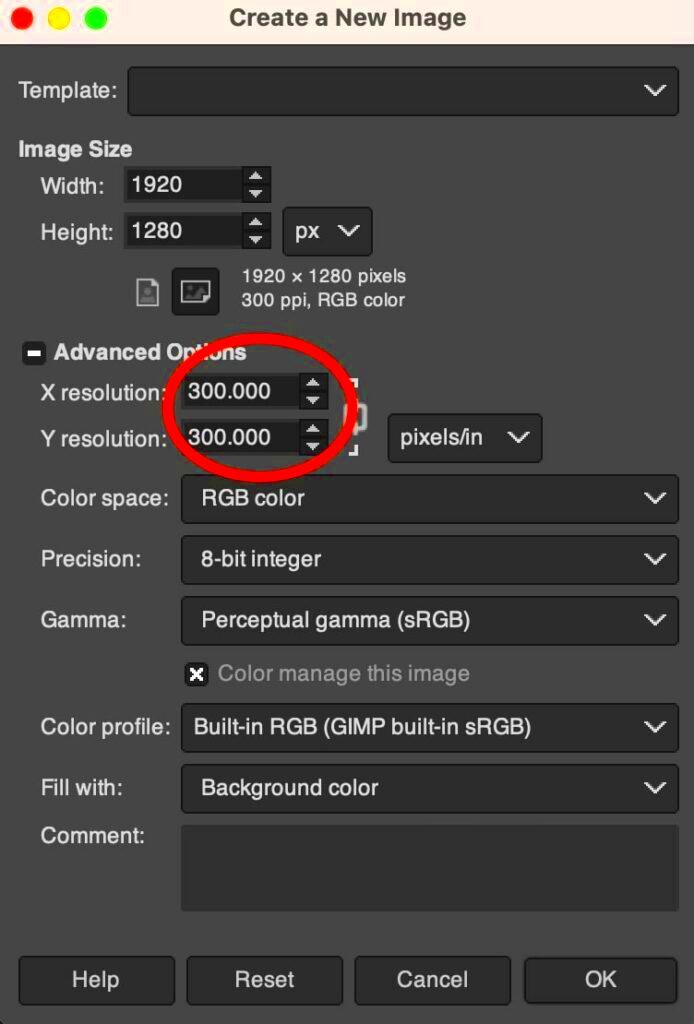
- Adjust Image Resolution: In the Scale Image window, you will see two fields for width and height. Below these, you can change the resolution (measured in PPI or DPI). Enter your desired value, and GIMP will automatically adjust the size of the image accordingly.
- Maintain Aspect Ratio: If you want to maintain the proportions of your image, make sure the chain icon next to the width and height fields is linked. This ensures that resizing one dimension will adjust the other proportionally.
- Apply Changes: Once you’re satisfied with the settings, click Scale to apply the changes.
Now your image is resized, and you can save it in your preferred format!
Also Read This: How Old Is Noelle Kate from YouTube?
Best Practices for Choosing Image Resolution
Choosing the right image resolution depends on the final use of the image. Whether you're designing for web, print, or social media, the resolution plays a significant role in the image’s quality. Here are some best practices to follow:
- For Print: Images for print should have a resolution of 300 DPI or higher. This ensures that the print quality is sharp and clear. If you're designing a flyer or poster, 300 DPI is the standard.
- For Web: When working for digital platforms, 72 DPI is typically sufficient. Lower resolutions reduce file sizes, making images faster to load online.
- For Social Media: Different platforms have varying size requirements. For instance, Instagram photos are generally 1080px wide at 72 DPI, while Facebook prefers 1200px wide images.
- Consider Image Dimensions: While resolution is essential, also consider the pixel dimensions of the image. For example, a 300 DPI image may still look bad if it’s too small, while a low DPI image can still look good if it’s large enough for screen use.
- Balance Quality and File Size: Higher resolution means better quality, but it also increases file size. Strive for a balance between quality and size, especially for web use where fast loading times are important.
By understanding the purpose of your image, you can select the optimal resolution to ensure it meets your needs.
Also Read This: Understanding the Costs of Behance and Its Subscription Plans
Tips for Maintaining Quality While Resizing
Resizing images can sometimes lead to a loss in quality, but with the right techniques, you can minimize this. Here are some tips for maintaining image quality while resizing:
- Use the Right Tool: When resizing in GIMP, always use the Scale Image tool rather than simply dragging the edges of the image, as the Scale Image tool preserves better image quality.
- Avoid Extreme Resizing: Avoid enlarging images too much. Increasing an image's size beyond its original dimensions can result in pixelation or blurriness. If you need a larger image, consider using higher-resolution source files.
- Maintain the Aspect Ratio: Always maintain the image’s aspect ratio (the proportion of width to height) unless you specifically want to stretch or compress the image. Keeping the aspect ratio ensures the image looks natural after resizing.
- Sharpen After Resizing: After resizing an image, it may look a bit soft. Use GIMP’s sharpening tools to improve clarity. You can apply Unsharp Mask or High Pass Filter to make the image crisper.
- Choose the Right Interpolation Method: GIMP offers various interpolation methods that affect the quality of the resized image. For better quality, choose methods like Cubic or Sinc (Lanczos3), as these provide smoother results compared to simpler methods like Linear.
- Use High-Quality Source Images: Always start with the highest-quality image possible. This gives you more flexibility when resizing and helps prevent a loss of detail.
By following these tips, you can resize your images without sacrificing quality, ensuring they look great for any project.
Also Read This: How to Own a Stock with Adobe
Common Mistakes to Avoid When Changing Resolution
When changing the resolution of an image in GIMP, it’s easy to make mistakes that can affect the quality or appearance of your image. Here are some common errors to watch out for and tips on how to avoid them:
- Not Keeping the Aspect Ratio: One of the most common mistakes is not maintaining the aspect ratio when resizing an image. This can distort your image, making it look stretched or compressed. Always make sure the chain icon next to the width and height fields in the Scale Image tool is linked to keep the aspect ratio intact.
- Enlarging Small Images: Enlarging a small image too much can result in pixelation, making the image look blurry or jagged. If you need a larger image, start with a higher resolution file to avoid compromising quality.
- Overcompensating on DPI: While increasing the DPI can improve print quality, setting it too high can create unnecessarily large files. For most print jobs, 300 DPI is sufficient. Avoid setting the DPI too high, unless required for very large prints.
- Ignoring Image Dimensions: Just focusing on resolution without considering the actual pixel dimensions can lead to unexpected results. Always check both the DPI and the pixel size when adjusting resolution, especially for web or print purposes.
- Resizing Without Backup: It’s easy to forget to save a backup of your original image before making changes. Always duplicate your image file before resizing to avoid losing the original details.
By being aware of these common mistakes, you can avoid poor-quality images and ensure your resized images meet your expectations.
Also Read This: Master the Art of Syncing and Playing Videos on Dailymotion
Frequently Asked Questions About Changing Image Resolution in GIMP
If you're new to GIMP or image editing in general, you might have some questions about changing image resolution. Here are answers to some frequently asked questions:
- What is the difference between DPI and PPI? DPI (dots per inch) is typically used for printing, while PPI (pixels per inch) is used for digital images. Both refer to how many pixels or dots are packed into an inch of the image, but the terms are often used interchangeably.
- How does changing the resolution affect the image size? Changing the resolution impacts both the image’s quality and its file size. A higher resolution generally results in better quality but also larger file sizes, while lower resolution reduces the image’s quality and file size.
- Can I increase the resolution without losing quality? Increasing the resolution of an image can’t add detail that wasn’t there in the first place. If you increase resolution too much, it may lead to a loss in image sharpness. However, GIMP’s interpolation methods can help preserve quality when resizing.
- What resolution is best for printing? For high-quality prints, a resolution of 300 DPI is ideal. This ensures the image will be sharp and clear when printed. For larger prints viewed from a distance, you might get away with a lower DPI.
- How do I know the best resolution for web use? For most web applications, 72 DPI is sufficient. Web images typically focus on pixel dimensions (like 1200px by 800px) rather than resolution, as screen displays don't require high DPI.
If you have other questions, experimenting with GIMP’s tools and settings can help you get comfortable with resolution adjustments!
Conclusion
Changing image resolution in GIMP is a straightforward process that allows you to control the size and quality of your images for various uses, whether it's for print, the web, or social media. By understanding how resolution works and applying best practices, you can ensure that your images meet the requirements of any project.
Remember to avoid common mistakes such as resizing without maintaining the aspect ratio or enlarging images too much, which can lead to quality issues. Always back up your original image, and choose the right resolution for your specific needs. Whether you're a beginner or experienced user, GIMP provides the tools you need to effectively manage image resolution.
With these tips and techniques in mind, you’ll be able to confidently resize and adjust images, preserving their quality while achieving your desired results.


