When creating a presentation in Google Slides, linking images can make your slides more interactive and dynamic. By linking an image to a website, another slide, or even a document, you can provide extra context or direct your audience to important resources. This technique is especially useful for creating engaging presentations that keep the audience interested and help them explore related content easily. In this guide, we’ll walk you through the process of linking images in Google Slides and explain why it’s such a valuable tool for your presentations.
Why You Should Link Images in Google Slides

Linking images in Google Slides isn't just about making your presentation look good. It can also improve how your audience interacts with your content. Here are some reasons why you should consider linking images:
- Improved Engagement: Linked images make your presentation more interactive, encouraging your audience to explore additional content.
- Easy Access to Resources: If you're presenting data or additional materials, linking images to documents or web pages makes it easy to access important resources without leaving the slide.
- Enhanced Visual Appeal: Adding links to images can make your presentation look more polished and well-organized, as it gives a clear direction for the audience to follow.
- Better Navigation: For larger presentations or interactive decks, linking images to specific slides or sections makes navigation smoother.
By linking images, you're essentially adding more depth to your presentation. This small action can elevate the overall experience, making it not only visually appealing but also informative and easier to navigate.
Also Read This: How to Upload Your PDF Portfolio on Behance and Showcase Your Work
Steps to Link an Image in Google Slides

Now that you understand the benefits, let’s dive into how you can link an image in Google Slides. Here’s a simple, step-by-step guide:
- Step 1: Open your Google Slides presentation and select the slide where you want to add the linked image.
- Step 2: Insert an image by clicking on the Insert menu, then selecting Image. Choose an image from your computer or the web.
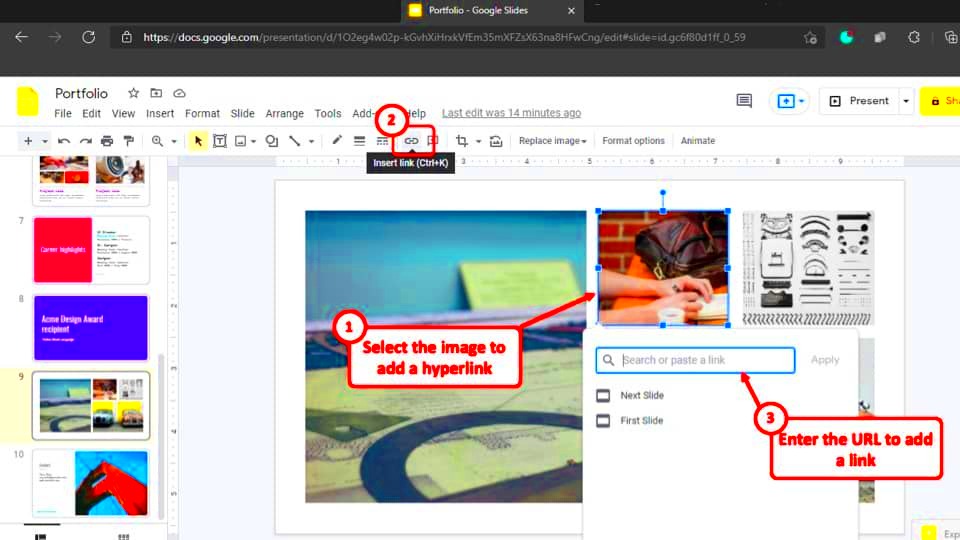
- Step 3: Once the image is placed on your slide, click on it to select it.
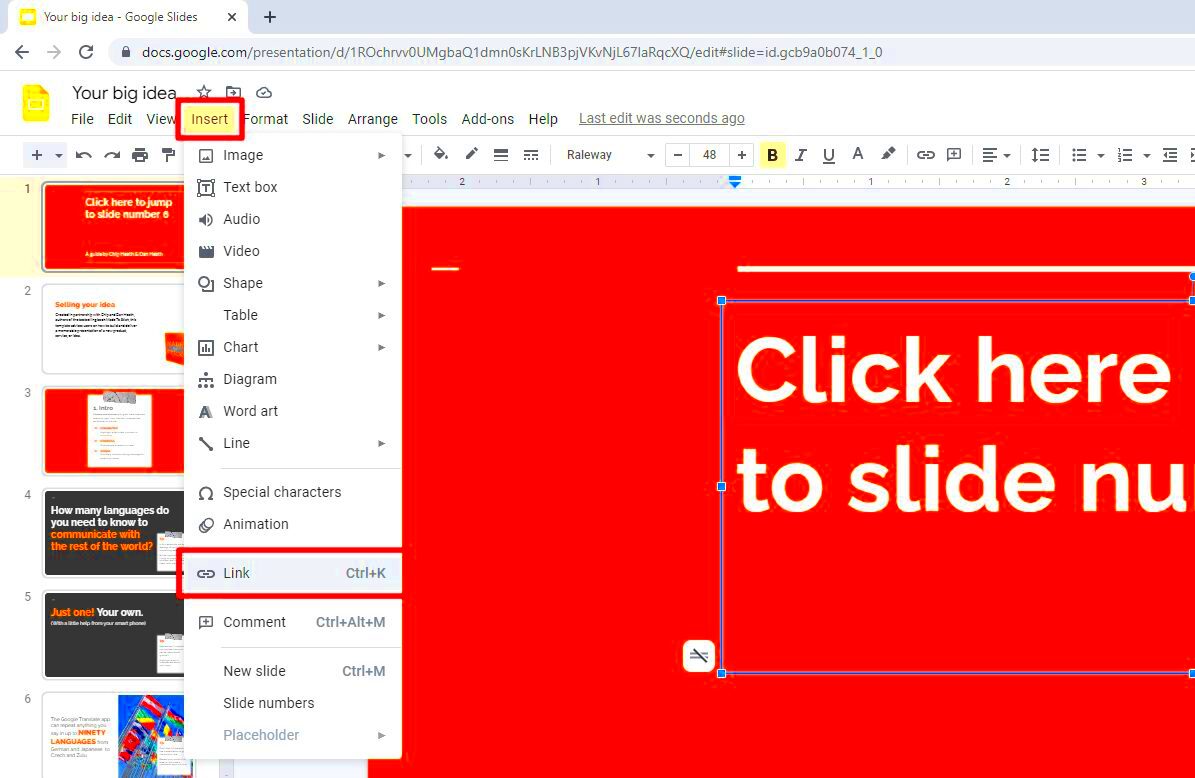
- Step 4: With the image selected, click the Insert menu again and choose Link.
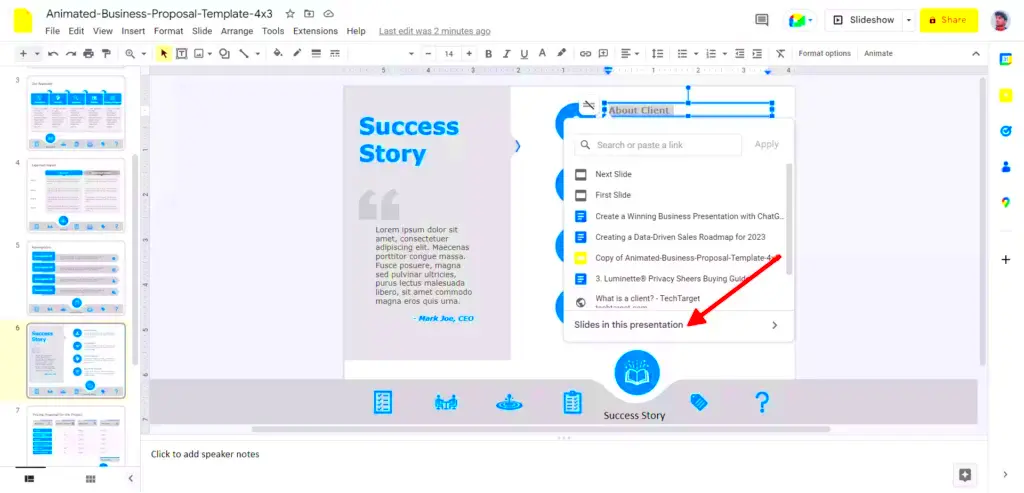
- Step 5: A box will appear where you can enter the URL or choose the destination slide. Paste the link or select the slide you want to link to.
- Step 6: Click Apply, and your image will now be linked. You can test the link by clicking the image in the presentation mode.
And that’s it! You’ve successfully linked an image in Google Slides. By following these steps, you can enhance your presentation and provide your audience with more opportunities to engage with your content.
Also Read This: Adding Background Audio to Your YouTube Shorts
Choosing the Right Image to Link
When linking an image in Google Slides, it’s important to choose the right one for the job. The image you link should not only be visually appealing but also relevant to the content you're presenting. Selecting an appropriate
- Relevance: Ensure that the image directly relates to the topic you're discussing. For example, if you’re talking about a product, use an image of the product that links to a page with more information about it.
- High Quality: Choose clear, high-resolution images. Poor-quality images can distract from your message and make your presentation appear unprofessional.
- Consistency: Maintain a consistent style throughout your slides. If you’re using a particular color scheme or design, make sure the image fits seamlessly with the rest of the presentation.
- Purposeful Linking: Think about what the image will lead to. Whether it’s a website, another slide, or a document, ensure that the link adds value to the presentation and provides useful, accessible information to your audience.
By choosing the right image to link, you create a more cohesive and effective presentation that captivates your audience and enhances their overall experience.
Also Read This: Understanding the Perfect Dimensions for Dailymotion Channel Banner Images
How to Create Interactive Presentations Using Image Links
Images are not just for decoration; they can make your Google Slides presentations interactive and engaging. By linking images to other slides, websites, or resources, you can create a more dynamic experience for your audience. Here’s how to use image links to make your presentation interactive:
- Linking to Other Slides: Use images as buttons that link to specific slides in your presentation. For instance, clicking on an image of a product could take the viewer to a slide with more details about that product.
- Embedding External Resources: Link images to external websites or documents that provide more in-depth information on a subject. This is especially useful for educational or business presentations where you want to reference resources.
- Clickable Navigation: For large presentations, you can create clickable navigation menus using images. This allows your audience to jump to different sections easily, making the presentation more user-friendly.
- Interactive Quizzes or Polls: If you want to engage your audience more directly, link images to interactive quizzes, forms, or polls. This allows the audience to participate actively in your presentation.
Interactive presentations keep your audience engaged and help them explore content at their own pace. By using image links effectively, you can create an interactive, engaging, and seamless experience that holds your audience’s attention.
Also Read This: Stylish Ways to Wear Net Saree on Dailymotion
Common Mistakes to Avoid When Linking Images
While linking images in Google Slides can enhance your presentation, there are some common mistakes that can lead to problems or distractions. Here are a few things to watch out for:
- Broken Links: One of the most common mistakes is linking to a page or resource that no longer exists. Always double-check your links to make sure they are functional before presenting.
- Overuse of Links: While links can be helpful, overloading your presentation with too many linked images can be overwhelming. Keep it simple, and only link images that truly add value.
- Non-Relevant Links: Make sure the destination of the link is relevant to the audience. Linking to unrelated or confusing resources can cause distractions and derail the flow of your presentation.
- Poor Image Quality: Linking low-quality images or blurry visuals can make your presentation look unprofessional. Always use high-quality, clear images to maintain a polished and credible appearance.
- Not Testing Links: Before presenting, always test your links in both edit mode and presentation mode. This will ensure that everything works as expected and avoids any embarrassing technical issues during your presentation.
By avoiding these mistakes, you can create a more professional, streamlined presentation that will impress your audience and keep their attention focused on your message.
Also Read This: How to Slice Images on Cricut for Craft Projects
Best Practices for Linking Images in Google Slides
Linking images in Google Slides can make your presentation interactive and informative, but it’s essential to follow some best practices to ensure that the links are effective and professional. By adhering to these guidelines, you can avoid common mistakes and create a smooth, engaging experience for your audience. Here are some best practices to keep in mind:
- Use Clear Call-to-Action (CTA) Images: Make sure your linked images clearly indicate where the audience should click. Use buttons or icons with text such as “Learn More” or “See Details” for better clarity.
- Maintain Visual Consistency: Choose images that match your presentation's style and color scheme. Consistency in design will make your presentation look cohesive and professional.
- Limit the Number of Links: Don’t overdo it with linked images. Too many links can overwhelm the audience and distract from the main message. Keep the links relevant and purposeful.
- Test the Links: Always check your links to make sure they work before presenting. Ensure they lead to the correct destinations and that the links are live (not broken or outdated).
- Make Links Accessible: Ensure that the content linked to is accessible to all your audience members. For example, if you link to a document or website, ensure it’s not behind a paywall or login screen.
- Use Descriptive Text for Links: If the link has a descriptive text or a hover-over feature, make sure it explains the link’s purpose clearly. This makes the experience intuitive for the audience.
By following these best practices, you’ll create a seamless and polished presentation that enhances your message and engages your audience effectively.
Also Read This: The Symbolism Behind the Sound in A Rumble in the Jungle
How to Test the Links in Your Google Slides
Testing your links is an essential step before presenting. Even if you’ve added links correctly, it’s important to test them to avoid any surprises during your presentation. Here's how you can do it:
- Step 1: In your Google Slides, go to Present Mode by clicking on the “Present” button at the top right of the screen.
- Step 2: Click on the image that has the link. This will allow you to test if the link works as expected. Make sure the link opens to the correct destination (another slide, a website, or a document).
- Step 3: If the link leads to a website, make sure the page loads correctly and doesn’t have any errors (such as a 404 error). Check that all external content is accessible.
- Step 4: If the link directs to another slide in your presentation, ensure that it opens directly to that slide and not a different one.
- Step 5: After testing the links, return to edit mode and fix any issues if necessary. For example, you may need to update the link URL or reselect the target slide.
Testing your links ensures everything functions smoothly during your presentation. By taking the time to do this, you’ll avoid technical hiccups that could disrupt your flow and distract your audience.
Also Read This: How to Change the Color of a Shutterstock Vector: A Step-by-Step Guide
FAQ
Q1: Can I link an image to a file stored on my Google Drive?
A1: Yes, you can link an image to any file stored in your Google Drive. Simply obtain the shareable link to the file and paste it into the link box when selecting the image.
Q2: How do I remove a link from an image in Google Slides?
A2: To remove a link, select the image, click on Insert, then Link, and click the Remove Link option in the link dialogue box.
Q3: Can I add a link to an image in Google Slides from another website?
A3: Yes, you can link to any URL from the web. Just copy the URL and paste it into the link box when you select the image. Ensure that the website is relevant and accessible for your audience.
Q4: Why do my image links not work during presentation mode?
A4: Make sure you’ve properly tested your links in Present Mode and that they lead to the correct destination. If they still don't work, try updating the links or check for broken URLs or permissions issues.
Q5: Can I link an image to another slide in the presentation?
A5: Absolutely! When you select the image, choose the option to link it to a slide within your presentation. You can easily link to specific slides to improve navigation in larger presentations.
Conclusion
Linking images in Google Slides can significantly enhance the interactivity and functionality of your presentations. By carefully selecting relevant, high-quality images and linking them to important resources, you can create a more engaging experience for your audience. Whether you're navigating through different slides, referencing external content, or adding interactive elements, image links can help make your presentation more dynamic and informative. Remember to test all your links to ensure everything works smoothly, and avoid overloading your slides with too many links. Following these guidelines will lead to a professional, seamless presentation that captivates and informs your audience effectively.

 admin
admin


