When working with digital images, there might come a time when you need to enlarge an image without losing quality. This process is called upscaling, and Krita is a fantastic tool for the job. Whether you're a digital artist, photographer, or content creator, understanding how to upscale images correctly is crucial for maintaining sharpness and detail. In this guide, we'll explore how Krita, a powerful free tool for image editing, can help you achieve high-quality upscaled images with ease. Let’s dive into the basics of
What is Image Upscaling and Why is it Important?

Image upscaling refers to the process of increasing the resolution of an image. When you upscale an
Why is upscaling important? Here are a few key reasons:
- Better Printing Quality: When you enlarge an image for printing, upscaling ensures the print comes out clear and crisp.
- Improved Visual Appeal: Upscaling can make an image look better on high-resolution screens, ensuring it retains detail and sharpness.
- Preserving Image Integrity: A well-upscaled image retains most of its detail, unlike poorly upscaled images that can appear blurry or pixelated.
While upscaling can improve image quality, it’s not always a simple task. If not done properly, you can end up with images that look blurry, pixelated, or unnatural. That’s where Krita’s advanced tools come in handy, allowing for precise control over the upscaling process.
Also Read This: How to Discover the Artist of an Image
How Krita Can Help with Upscaling Images

Krita is a free, open-source software known for its powerful tools in digital painting and image editing. It offers a variety of features that can help you upscale images while keeping their quality intact. Here’s why Krita is an excellent choice for this task:
- High-Quality Resampling Algorithms: Krita uses advanced resampling algorithms like Bicubic and Lanczos, which are designed to preserve image quality during the upscaling process. These algorithms minimize blurring and pixelation, resulting in sharper and more accurate enlarged images.
- Customizable Image Settings: Krita gives you the flexibility to adjust settings such as resolution, size, and quality, so you can fine-tune the upscaling process based on your needs.
- Non-Destructive Editing: With Krita’s use of layers, you can work on your image without permanently altering it. This is especially useful when you want to test different upscaling techniques before settling on the best one.
- Advanced Filters and Tools: Beyond upscaling, Krita offers various filters and editing tools to further enhance your images, ensuring they look even better once enlarged.
Using Krita, you can upscale images for various purposes like digital artwork, photo editing, or web design. With its wide range of features, Krita makes it easier to get professional results without the steep learning curve or high cost of other software options.
Also Read This: Guide to Using Adobe Stock on 99designs
Step-by-Step Guide to Upscaling Images in Krita

Upscaling images in Krita may seem like a daunting task, but once you understand the process, it becomes a lot easier. Krita provides a user-friendly interface with powerful tools that allow you to upscale your images efficiently. Follow these simple steps to get started:
- Open Your Image in Krita: Launch Krita and open the image you want to upscale by going to File > Open and selecting the image from your computer.
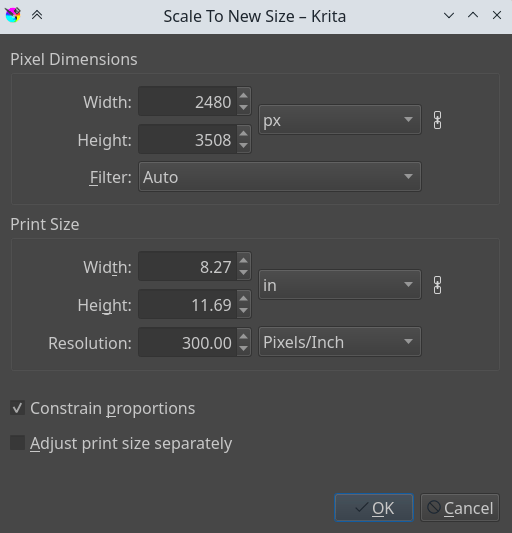
- Access the Image Resize Menu: To resize the image, go to Image > Scale Image to New Size. This will open a dialog box where you can adjust the image dimensions.
- Set the New Resolution and Dimensions: In the scale dialog box, you’ll see options for width, height, and resolution. Adjust the width and height to your desired size, but make sure to maintain the aspect ratio to avoid distortion. Increase the resolution if necessary for better print quality.
- Select a Resampling Method: Krita offers several resampling methods for upscaling. Choose one that suits your image, such as Bicubic or Lanczos, to maintain the best quality. Each method has its advantages, with Lanczos being particularly good for retaining sharpness.
- Apply the Changes: Once you've selected the appropriate settings, click OK to apply the changes. Krita will resize the image and you’ll see the result in the workspace.
- Save the Upscaled Image: Finally, save your upscaled image by going to File > Save As and choosing the format you prefer (JPEG, PNG, etc.).
With these steps, you can upscale your images in Krita with ease. The software makes it simple to increase your image size while maintaining its quality, ensuring your final result looks great!
Also Read This: how to replace the image in canva
Tips for Maintaining Image Quality While Upscaling
When upscaling images, the challenge is to enlarge them without compromising quality. The key is to carefully follow the process and apply specific techniques to preserve sharpness, clarity, and detail. Here are some essential tips to maintain image quality during upscaling:
- Choose the Right Resampling Method: Always select an appropriate resampling method in Krita. Bicubic and Lanczos are great choices for reducing pixelation and ensuring sharpness. Avoid methods like Nearest Neighbor, as they can produce jagged edges.
- Maintain Aspect Ratio: When resizing, make sure the aspect ratio remains locked. If you manually adjust the width and height without keeping the ratio intact, your image might appear stretched or distorted.
- Increase Resolution Gradually: Rather than drastically increasing the resolution all at once, try to scale the image in small increments. This allows Krita to preserve details better and minimizes the risk of blurriness.
- Use High-Quality Source Images: Start with the best quality image possible. Upscaling a low-resolution image can only improve it so much, so always work with the highest resolution image you have.
- Apply Sharpening After Upscaling: Once you’ve resized the image, applying some sharpening filters can help restore detail. In Krita, you can use tools like Unsharp Mask to enhance fine details.
- Avoid Over-Smoothing: Be cautious of over-smoothing filters that can cause loss of texture. Keep the natural grain and detail of the image intact while enhancing the resolution.
By following these tips, you can ensure that your upscaled images look crisp, clear, and professional. Remember, the goal is not just to make the image larger but to retain the same high quality after resizing.
Also Read This: Visualizing the States Across the USA Through Images
Advanced Techniques for Image Enhancement in Krita
After upscaling your image, you might want to apply additional enhancements to further improve the image quality. Krita offers several advanced techniques that can make your upscaled image look even better. Let’s take a look at some of the best ways to enhance your image after resizing:
- Use Layers for Non-Destructive Editing: Krita allows you to work with layers, so you can apply adjustments and enhancements without affecting the original image. Try duplicating your image layer and working on the copy to experiment with different effects.
- Apply Filters for Detail Enhancement: Krita has a variety of filters that can help sharpen details and enhance textures. Use filters like Gaussian Blur for softening areas that might have become too harsh after upscaling, or Unsharp Mask for sharpening details without causing noise.
- Brushes for Texture Refinement: Krita offers a vast selection of brushes that you can use to manually adjust textures. Use a soft brush to gently add back any lost details or to smooth out areas that became rough after resizing.
- Color Adjustments: Sometimes, upscaling can cause slight color shifts in your image. Use Krita’s color correction tools, such as Levels and Curves, to fix any tonal imbalances and bring back the original vibrancy of your image.
- Advanced Blending Modes: Krita supports different blending modes for layers, which can be used to creatively enhance your image. For instance, using the Soft Light or Overlay mode on an adjustment layer can increase contrast without losing highlight details.
- Use the Clone Tool for Touch-Ups: If there are any unwanted artifacts or imperfections after upscaling, use Krita’s Clone Tool to retouch areas of the image and blend them seamlessly with the rest of the picture.
These advanced techniques, when applied correctly, can take your upscaled images to the next level. Krita’s wide range of tools allows you to adjust everything from texture and color to fine details and sharpness, ensuring your image not only looks larger but better overall.
Also Read This: Complete Guide to Downloading Telegram Videos on iPhone
Common Mistakes to Avoid When Upscaling in Krita
Upscaling images can be tricky, and even with the best tools like Krita, it's easy to make mistakes that can lead to less-than-ideal results. Whether you're a beginner or an experienced user, it’s important to be aware of the common pitfalls when enlarging your images. Here are some mistakes you should avoid to ensure your upscaled images look their best:
- Not Using the Right Resampling Method: Krita offers several resampling methods, and choosing the wrong one can lead to blurry or pixelated results. Always opt for methods like Bicubic or Lanczos for the best sharpness and detail preservation.
- Over-Scaling in One Go: Trying to increase the image size too much in one step can cause significant loss of detail. Instead, scale up your image gradually in smaller increments to help preserve the quality.
- Ignoring the Aspect Ratio: Forgetting to lock the aspect ratio while resizing can distort your image, making it look stretched or squished. Always ensure that the aspect ratio is locked when changing dimensions.
- Using Low-Quality Source Images: If you start with a low-resolution image, upscaling it will only magnify the imperfections. Always start with the highest resolution image you can find for the best results.
- Overdoing the Sharpening: While sharpening can enhance details, too much sharpening can introduce noise and halos around edges. Apply sharpening filters carefully and avoid over-applying them.
- Not Checking Image at 100% Zoom: When working on an upscaled image, avoid judging its quality at low zoom levels. Always check the image at 100% to see the true detail and avoid missing any imperfections that need fixing.
Avoiding these common mistakes will help you get the most out of Krita's powerful upscaling features, ensuring your images remain crisp, sharp, and high-quality after enlargement.
Also Read This: how to download image with transparent background
Conclusion: Achieving Better Image Quality with Krita
In conclusion, Krita is a fantastic tool for upscaling images without losing quality. Whether you're a digital artist looking to enlarge your artwork or a photographer needing to print high-quality images, Krita provides the features and flexibility to get the job done right. By understanding the process of upscaling, using the right settings, and applying a few enhancements, you can easily improve the quality of your images.
Remember to:
- Choose the best resampling method to avoid blurring or pixelation.
- Upscale images gradually to maintain sharpness and detail.
- Use Krita’s powerful tools, like sharpening filters and color adjustments, to enhance the final image.
With these techniques and Krita’s advanced features, you can confidently upscale any image, knowing that you'll achieve better results than with basic upscaling methods. Take your images to the next level with Krita, and see just how much you can enhance their quality!
Frequently Asked Questions (FAQ)
Here are some common questions about upscaling images in Krita:
- What is the best resampling method for upscaling in Krita?
For the best quality, try using either Bicubic or Lanczos resampling. These methods help preserve details and minimize blurriness when enlarging images. - Can I upscale any image in Krita?
Yes, you can upscale any image, but keep in mind that the quality of the final result depends on the quality of the original image. Starting with a high-resolution image is always the best option. - How do I fix pixelation after upscaling?
If your image becomes pixelated after upscaling, try using Krita’s sharpening filters and check if you need to adjust the resolution or resampling settings. It's also helpful to apply gradual upscaling steps. - Is there a way to preserve texture when upscaling?
Yes, Krita allows you to maintain texture by using specific filters and adjustments. Be mindful of over-smoothing or too much sharpening, as these can flatten textures. Experiment with layers and soft brushes for the best results. - Can I upscale images for printing in Krita?
Absolutely! Krita allows you to adjust both the resolution and image dimensions, making it perfect for preparing images for print. Be sure to increase the resolution to at least 300 DPI for the best print quality.

 admin
admin


