Google Slides offers a lot of flexibility when it comes to customizing your presentations, and one feature that stands out is the ability to crop images into various shapes. One of the most popular shapes is the circle, which can make your visuals look more polished and professional. Whether you’re working on a business presentation, a personal project, or even a classroom slideshow, making an image circular can be a great way to highlight important content or create a unique design element. In this guide, we’ll walk you through why and how to crop images into circles in Google Slides.
Why You Might Want to Make an Image Circular
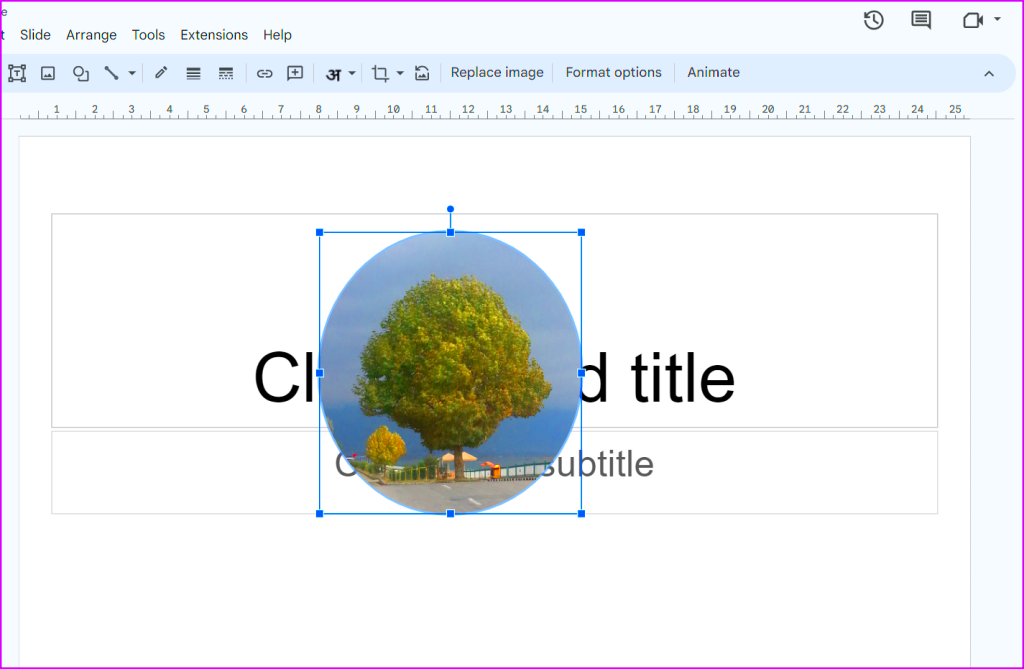
Making an image circular can serve multiple purposes, whether it's for aesthetic appeal or for highlighting a specific part of your image. Here are some common reasons why you might want to create a circular
- Enhanced Aesthetic Appeal: Circular images can give your presentation a modern, clean look, making it visually appealing.
- Focusing Attention: By cropping an image into a circle, you can focus your audience’s attention on a specific part of the image, such as a person's face or a key detail.
- Professional Design: Circular images often appear more polished and deliberate than rectangular ones, which can elevate the overall design of your slides.
- Consistency: If you’re working with a series of images and want them to appear uniform, using circular images can help achieve that consistent look.
In short, making an image circular can be an effective way to both enhance your presentation’s design and make the content more engaging. Now, let's dive into the process of doing this in Google Slides!
Step by Step Guide to Making an Image Circular
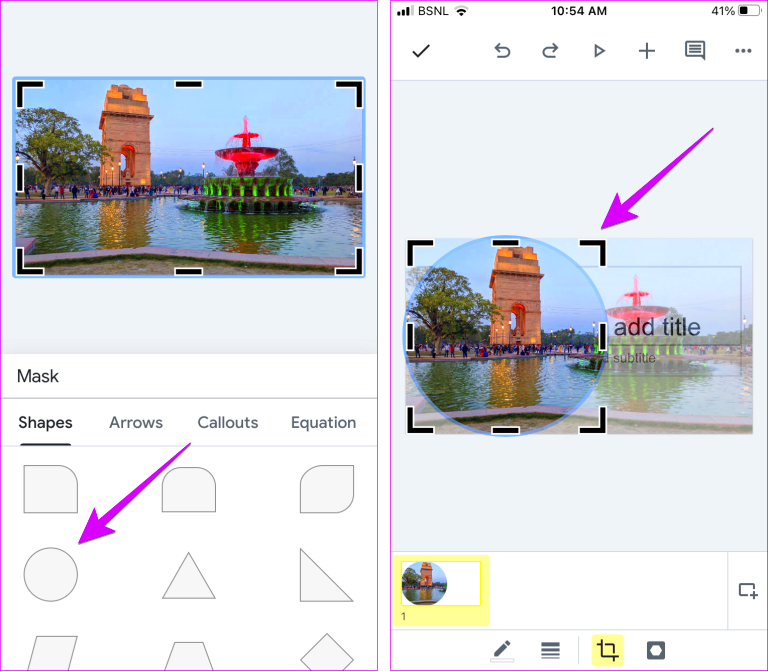
Follow these simple steps to crop an image into a circle in Google Slides:
- Insert the Image: First, you’ll need to insert the image you want to make circular. Click on "Insert" in the menu, then select "Image" and choose your image file from your computer or Google Drive.
- Click on the Image: Once the image is inserted, click on it to select it.
- Open the Crop Tool: In the toolbar, you'll see a crop tool. Click on the small down arrow next to it to open a drop-down menu.
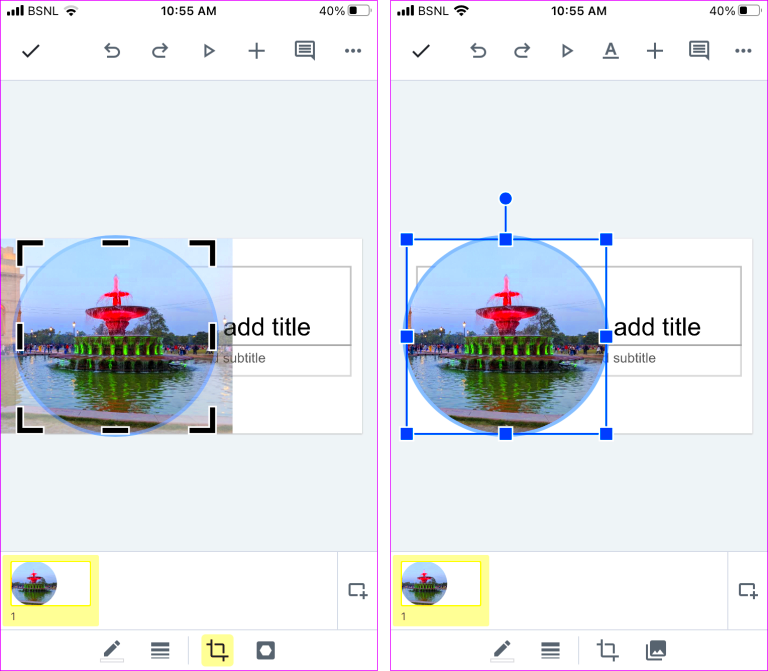
- Select "Shape" and Choose a Circle: In the drop-down menu, hover over the "Shape" option and then choose "Circle" under the "Basic Shapes" section. Your image will automatically be cropped into a circular shape.
- Adjust the Crop: If needed, use the handles around the image to resize the circle or reposition the image within the circle.
- Finalize the Crop: Once you’re happy with the image's positioning and size, click outside the image to finalize the crop. Your image should now appear in a perfect circle!
This simple process allows you to add a polished, professional look to any image in Google Slides. The best part? It’s quick, easy, and doesn’t require any external tools!
Using the Crop Tool to Create Circular Images
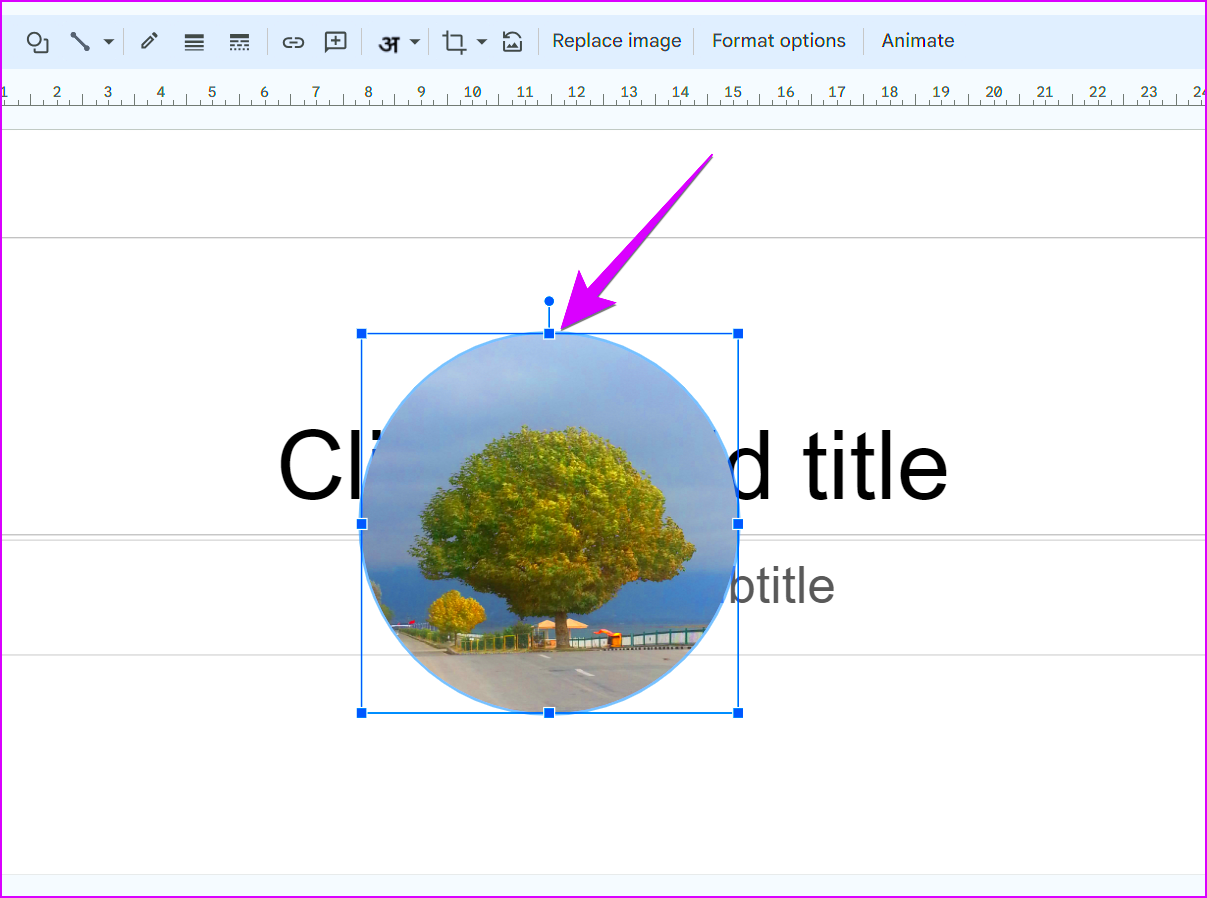
One of the easiest ways to create circular images in Google Slides is by using the built-in crop tool. This tool is simple to use and allows you to quickly change the shape of an image without needing any extra software. Here’s how to use the crop tool to create a circular image in just a few steps:
- Insert the Image: Start by inserting the image you want to crop into your slide. Go to "Insert" in the menu and select "Image" to add your image from your device or Google Drive.
- Select the Image: Click on the image to select it. Once selected, the toolbar at the top of the screen will display several options, including the crop tool.
- Access the Crop Tool: Click the crop icon (it looks like a small triangle inside a box). From there, click on the down arrow next to it to open the shape options.
- Choose Circle Shape: Hover over the "Shape" option and select the "Circle" shape under "Basic Shapes." The image will automatically be cropped into a circle.
- Fine-Tune the Crop: If needed, adjust the circle size or reposition the image within the circle using the handles around the image. Click and drag the edges or corners to get the perfect fit.
- Finish the Crop: Once the image is properly adjusted, click outside the image or press "Enter" to finalize the crop. Your image should now appear as a perfect circle!
Using the crop tool in Google Slides makes cropping images into a circle quick and easy. With just a few simple clicks, you can add a fresh, clean look to your presentation.
Adjusting the Image Size for a Perfect Circle
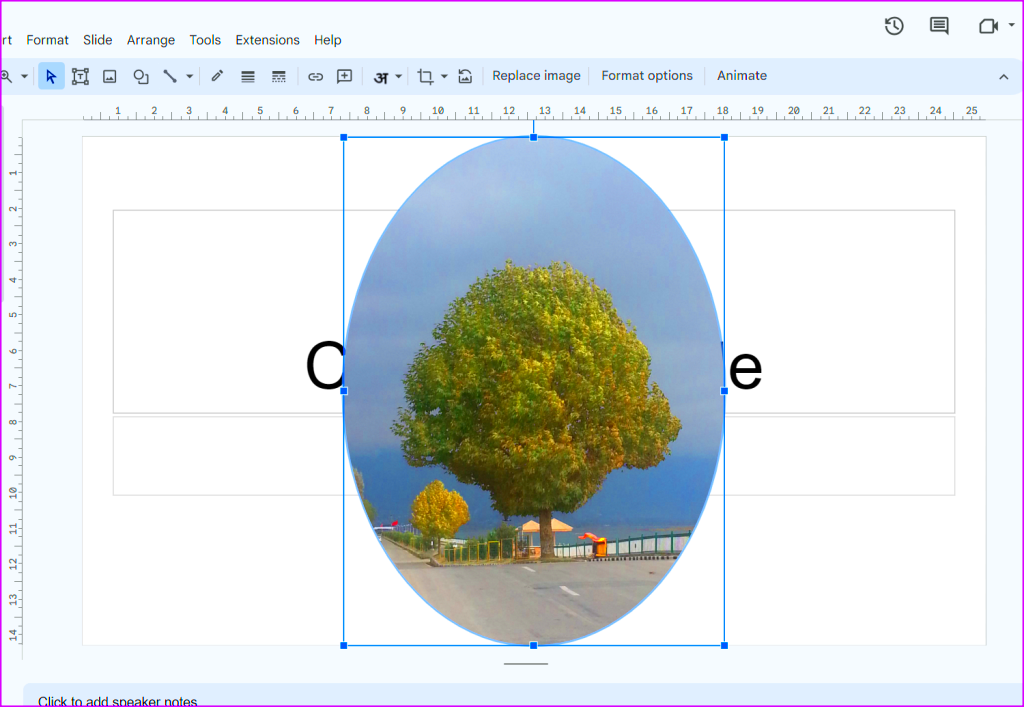
Once you’ve cropped an image into a circle, you may need to adjust its size to make sure it fits well with the rest of your slide’s content. Proper resizing ensures that your circular image looks balanced and doesn’t distract from other elements. Here’s how to adjust the size of your circular image:
- Resize Using the Handles: After cropping the image, click on the image to select it. You'll see small blue handles appear around the image. Click and drag any of these handles to resize the image. Make sure to hold the "Shift" key while resizing to keep the circle’s proportions perfect.
- Resize from the Corners: If you want the circle to stay perfectly round, always resize it from one of the corner handles. Resizing from the side handles may distort the shape.
- Adjust the Position: If resizing changes the image’s position, click and drag the image to reposition it within the circle. Ensure the most important part of the image stays centered.
- Consider the Slide’s Layout: When adjusting the image size, keep the layout of your slide in mind. The image should complement your text or other elements rather than overcrowding the slide. It’s important to maintain a visually appealing balance.
By adjusting the size and position of your circular image, you can ensure it fits perfectly within the overall design of your slide, making your presentation look clean and professional.
Tips for Using Circular Images Effectively in Presentations
Using circular images in your presentation can be a great way to capture your audience’s attention and create a visually pleasing design. However, to make the most of this design choice, there are some tips and best practices you should keep in mind:
- Focus on Key Content: Circular images are often used to highlight specific elements, like a person’s face or an important detail. Make sure that your image content is clear and meaningful so it draws the right amount of attention.
- Use Consistency Across Slides: If you’re using circular images in multiple slides, try to maintain consistency in size and positioning. This will help create a uniform look and feel throughout your presentation.
- Keep It Simple: Don’t overload your slides with too many circular images. Use them strategically to avoid cluttering the slide and detracting from your main message.
- Choose High-Quality Images: A circular crop can make low-quality images look blurry or pixelated, so ensure the images you’re using are high resolution. This will give your presentation a more polished and professional look.
- Play with Contrast: Circular images can stand out more if they are placed against a contrasting background. For example, a circular image of a person on a plain white or dark background can create a strong visual impact.
- Consider Your Audience: Think about your audience and how they will perceive the use of circular images. In some cases, this design choice may be more suitable for creative or informal presentations than for formal ones.
By following these tips, you can ensure that circular images enhance your presentation without overwhelming your audience or detracting from your message. Use them wisely, and they’ll help create a clean, professional, and eye-catching presentation.
Common Mistakes to Avoid When Making Images Circular
While creating circular images in Google Slides is a simple process, there are a few common mistakes that people often make which can affect the overall look of your presentation. Avoiding these errors will ensure your images look professional and fit seamlessly into your slides.
- Not Keeping the Image Proportional: One of the most common mistakes is resizing the image unevenly, which can distort the circle. To prevent this, always hold the "Shift" key while resizing from the corners to maintain the perfect circular shape.
- Using Low-Resolution Images: If your image is of poor quality, cropping it into a circle will only make it more noticeable. Low-res images tend to look blurry when cropped, so ensure you are using high-quality images that will look crisp even after cropping.
- Overcrowding the Slide: Circular images can be eye-catching, but too many of them on a single slide can create visual clutter. Avoid using more than two or three circular images per slide unless they serve a clear purpose.
- Ignoring the Background: Circular images with busy or complicated backgrounds can become hard to see and detract from your main message. Consider using a solid or blurred background behind your circular image to make it pop and draw attention.
- Not Adjusting the Image's Position: After cropping, it's important to center the most important part of the image. Make sure the subject of your image is in the center of the circle so that it looks well-composed and balanced.
- Inconsistent Sizing: If you’re using multiple circular images in your presentation, be sure to keep their size consistent. Varying image sizes can create visual imbalance and distract from the flow of your presentation.
By being mindful of these mistakes and taking a little extra care, your circular images will look clean, professional, and make your slides stand out in the right way.
Alternative Methods for Customizing Images in Google Slides
While cropping images into circles is a great way to add style to your slides, Google Slides also offers several other ways to customize your images and make them fit better with your presentation. Here are some alternative methods to enhance your images:
- Applying Filters: Google Slides lets you adjust the color and brightness of your images. To apply filters, click on the image, then go to "Format options" and explore options like brightness, contrast, and recoloring. These can give your image a unique look that matches your slide’s theme.
- Adding Borders: If you want your image to stand out even more, you can add a border around it. Select the image, go to "Format" in the menu, and choose "Border color" to add a solid color border. You can also adjust the border’s thickness and style for more visual interest.
- Using Shadows and Reflections: To give your image a 3D effect, consider adding a shadow or reflection. This option can be found under "Format options" when you select your image. Shadows can make your image appear more dynamic, while reflections can add a sleek, polished look.
- Masking Images to Other Shapes: While circles are popular, Google Slides allows you to crop images into other shapes as well. To do this, select your image, click on the crop icon, and choose from a variety of shapes, such as squares, stars, and even custom shapes.
- Resizing and Positioning: Another simple but effective way to customize your images is by resizing and repositioning them on your slide. Experiment with different placements and sizes to see what works best with your slide’s layout.
These customization options allow you to further personalize your images, making them a seamless part of your presentation’s design. Try experimenting with different options to see how they fit with your content and presentation style.
Frequently Asked Questions
Here are some of the most commonly asked questions when it comes to cropping images into circles in Google Slides:
- Can I crop an image into other shapes besides circles? Yes! Google Slides allows you to crop images into a variety of shapes, such as squares, hearts, stars, and custom shapes. Just use the crop tool and select the desired shape from the "Shape" menu.
- How do I resize a circular image without distorting it? To maintain the circular shape, always resize the image using the corner handles while holding the "Shift" key. This ensures that the proportions stay consistent.
- Can I add a border around my circular image? Yes, you can add a border by selecting the image, clicking on the "Format" menu, and choosing "Border color." You can also adjust the thickness and style of the border to make it stand out.
- Why does my circular image look blurry? This is likely because the image has a low resolution. Always use high-quality images to ensure that your circular crop doesn’t make them appear pixelated or blurry.
- Can I add effects like shadows or reflections to my image? Yes! Google Slides offers options to add shadows and reflections to your images. You can find these options in the "Format options" menu once your image is selected.
- Is it possible to adjust the position of the cropped image within the circle? Yes, after cropping the image into a circle, you can click and drag the image to reposition it within the circle. This allows you to center the main subject of the image.
These FAQs should help answer any lingering questions about cropping and customizing images in Google Slides. If you have more specific queries, don’t hesitate to explore Google Slides’ "Help" menu or look for additional tutorials online!
Conclusion
In conclusion, making circular images in Google Slides is an easy and effective way to enhance your presentations. Whether you're using it to highlight a specific part of an image, create a cleaner look, or simply add a touch of creativity, this simple design technique can make a big impact. By following the steps outlined in this guide, you can ensure that your images are not only cropped correctly but also fit seamlessly into your overall slide design.
Remember to avoid common mistakes like using low-resolution images or resizing improperly, and consider other customization options like adding borders or applying filters to make your images stand out even more. With these tips, you’ll be able to create professional-looking presentations that captivate your audience and deliver your message effectively.
 admin
admin


