PowerPoint is a powerful tool for creating presentations, and one of its lesser-known features is the ability to subtract images. This technique allows you to remove parts of an image or combine images in creative ways to create unique effects. Subtracting images can help you emphasize key parts of a design, blend elements together, or simply add a creative touch to your slides.
If you're looking to make your presentations more engaging and visually appealing, learning how to subtract images in PowerPoint is a great skill to have. Whether you want to create clean shapes, integrate logos, or produce custom backgrounds, this method opens up many possibilities. In this post, we'll show you how to get started with subtracting images in PowerPoint and why it's worth learning this technique.
Why Use Image Subtraction in PowerPoint?

Subtracting images in PowerPoint can make your presentations more dynamic and visually interesting. Here's why you should consider using this feature:
- Custom Visual Effects: Image subtraction lets you create unique visuals that are tailored to your content, which is not possible with stock images alone.
- Seamless Design: This technique helps you blend images with shapes or other elements for a cleaner, more professional look.
- Emphasize Key Points: By subtracting parts of an image, you can draw attention to specific areas, helping your audience focus on important details.
- Easy to Learn: Even if you're new to PowerPoint, subtracting images is a simple process that doesn't require advanced design skills.
- Enhanced Creativity: When combined with other PowerPoint features, image subtraction opens the door to endless creative possibilities.
By using image subtraction, you can turn a basic slide into a visually engaging masterpiece. Whether you're designing a presentation for work, school, or a personal project, this technique helps you communicate your message in a more creative and effective way.
Step-by-Step Guide to Subtracting Images

Now that you understand why image subtraction is useful, let’s dive into the process. Here's a simple, step-by-step guide to subtracting images in PowerPoint:
- Insert Your Image: Start by adding the image you want to work with. Go to the "Insert" tab, click "Pictures," and select the image from your device.
- Insert a Shape: Next, insert a shape that you want to subtract from the image. This could be a circle, rectangle, or any other shape. You’ll find shapes under the "Insert" tab, in the "Shapes" dropdown.
- Position the Shape: Drag the shape over the area of the image you want to subtract. Make sure the shape is sized and positioned correctly to cover the desired part of the image.
- Select Both the Shape and Image: Click on the image, then hold down the "Shift" key and click on the shape to select both objects.
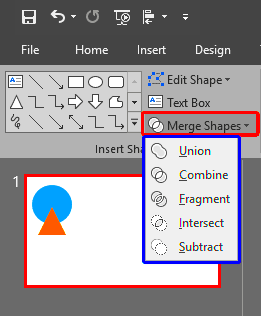
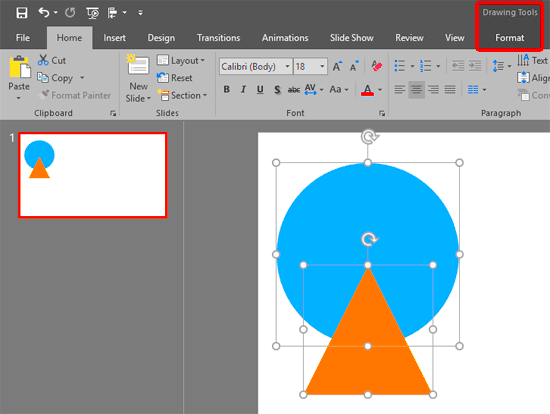
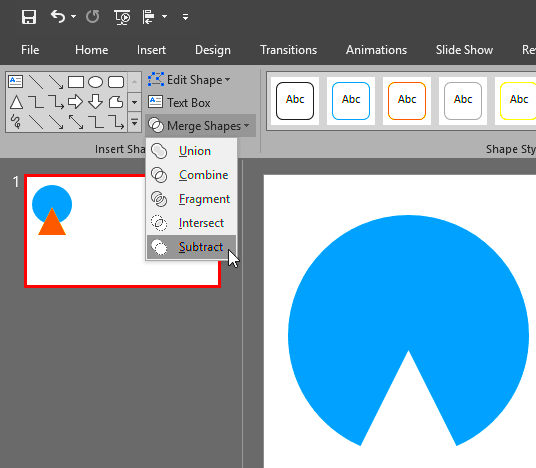
- Use the Merge Shapes Tool: With both the image and shape selected, go to the "Format" tab and look for the "Merge Shapes" button in the "Insert Shapes" group. Click it, and select the "Subtract" option from the dropdown menu.
- Adjust the Result: After subtracting, you may need to tweak the remaining image or shape. You can resize, reposition, or even add more shapes to achieve the effect you want.
That’s it! You’ve now subtracted an image in PowerPoint. It’s a simple process, but the results can make your slides stand out and appear more professional. Experiment with different shapes and combinations to see what works best for your presentation.
Using the Shape Tool to Subtract Images
The shape tool in PowerPoint is a versatile feature that lets you subtract parts of an image with precision. This tool is especially helpful when you want to cut out specific areas of an image, such as creating custom frames or isolating parts of a picture. Using the shape tool is simple, and once you get the hang of it, you can produce some impressive visuals.
Here’s how you can use the shape tool to subtract images in PowerPoint:
- Insert the Image: First, insert the image you want to work with by going to the "Insert" tab, selecting "Pictures," and choosing your image file.
- Choose the Shape: Next, go to the "Insert" tab again and click on "Shapes." You’ll find a variety of shapes like rectangles, circles, and freeform shapes that can help you focus on the part of the image you want to subtract.
- Draw the Shape Over the Image: Once you’ve selected the shape, draw it over the area you want to remove from the image. Resize and position the shape as needed to cover the part of the image you want to subtract.
- Merge the Shape and Image: After selecting both the image and the shape (hold down "Shift" to select multiple objects), go to the "Format" tab and click on "Merge Shapes." From the dropdown, select "Subtract." This will remove the area of the image that overlaps with the shape.
Using the shape tool not only helps you remove unwanted parts of the image but also enables you to experiment with different shapes to create custom effects. Whether you’re aiming for a clean cutout or a creative design, the shape tool in PowerPoint makes it easy to subtract images and enhance your presentations.
How to Refine Subtracted Images for Better Visuals
Once you've subtracted parts of an image, you might need to refine the result to ensure it looks polished and seamless. Refining your subtracted images is crucial for maintaining the visual appeal and flow of your presentation. Here are some techniques to make your subtracted images look their best:
- Adjust the Image Position: After subtracting, your image may need to be repositioned to better align with other elements in your slide. Simply click and drag the image to the desired location.
- Use the "Format" Options: PowerPoint offers several formatting options that can help refine your image. You can adjust the brightness, contrast, or apply artistic effects to enhance the visual appeal of your subtracted image.
- Resize the Image: Sometimes, resizing the subtracted image can help it fit better with the overall design. Ensure that the image remains proportional, and don’t stretch it too much, as that can cause distortion.
- Use Shadows or Borders: Adding shadows or borders to your subtracted image can create a more defined look, making the image pop out of the slide. You can find these options under the "Picture Format" tab.
- Layering and Transparency: If you’ve subtracted an image to create a more complex visual, consider using layering or adjusting the transparency of certain elements. This helps in blending the image more naturally with the background or other graphics.
By refining your subtracted images, you ensure that the final result is professional, cohesive, and visually appealing. Don’t be afraid to play around with different options until you find what works best for your presentation.
Common Mistakes to Avoid While Subtracting Images
While subtracting images in PowerPoint is an easy and effective way to enhance your slides, it’s easy to make a few mistakes along the way. Here are some common pitfalls to avoid when using the image subtraction tool:
- Not Aligning Shapes Properly: A common mistake is not aligning the shape perfectly with the part of the image you want to subtract. This can result in uneven cuts or areas that are missed entirely. Take your time to position the shape precisely.
- Overcrowding the Slide: While it’s tempting to add multiple images and effects, overcrowding your slide can make it look cluttered. Subtract images strategically and leave some space for other elements to shine.
- Using Too Many Subtracted Images: Subtracting images can be a great creative tool, but using it too often can overwhelm your presentation. Stick to subtracting only the most important elements to maintain focus and clarity.
- Forgetting to Check Image Quality: Subtracting parts of an image can sometimes lead to pixelation or loss of quality. Make sure the original image has a high resolution so that it doesn't become blurry after subtraction.
- Not Considering the Background: When subtracting an image, it’s essential to think about the background. A cutout image might look odd if it’s placed on a busy or distracting background. Choose simple backgrounds that complement your subtracted images.
Avoiding these common mistakes will help you create clean, professional-looking slides. With practice, you’ll get better at using image subtraction to enhance your PowerPoint presentations without falling into these traps.
Advanced Techniques for Creative Effects
If you're already comfortable with basic image subtraction in PowerPoint, it’s time to take your skills to the next level with some advanced techniques. These creative effects will help you create unique and eye-catching slides that stand out during your presentations.
Here are a few advanced techniques you can try:
- Combining Multiple Shapes: Instead of subtracting a single shape, try combining multiple shapes to create more complex subtractions. For example, you can layer several circles, rectangles, or freeform shapes over an image, subtracting different areas to create intricate designs.
- Using Gradient Fills for Smooth Transitions: After subtracting part of an image, use gradient fills to add smooth transitions between the remaining parts of the image and the background. This creates a more professional, seamless effect and makes the subtraction less noticeable.
- Layering Multiple Images: You can create stunning visual effects by subtracting different layers of images from each other. For example, you could subtract one image from another to form a unique pattern or design, and then apply transparency to make the effect more subtle.
- Using Subtracted Images as Frames: After subtracting part of an image, you can use the remaining pieces as a frame or border for another image. This is a creative way to highlight specific parts of a picture while keeping the design fresh and interesting.
- Animating Subtracted Images: PowerPoint allows you to add animations to your images. After performing an image subtraction, apply motion effects, like fade-ins or zooms, to make the transition even more dynamic during your presentation.
These advanced techniques help you push the boundaries of PowerPoint’s image editing features, allowing you to create more sophisticated, professional presentations. Experiment with these ideas and find the ones that work best for your needs!
FAQ: Subtracting Images in PowerPoint
If you’re new to subtracting images in PowerPoint, you might have some questions. Here are some frequently asked questions to help clear up any confusion:
- 1. What is the "Subtract" option in PowerPoint?
- The "Subtract" option is part of the "Merge Shapes" tool in PowerPoint. It allows you to remove parts of an image by overlapping it with a shape, leaving only the portion of the image that doesn't intersect with the shape.
- 2. Can I subtract multiple shapes from an image?
- Yes! You can layer multiple shapes on top of an image and subtract them all at once. Just make sure to select all shapes and the image before using the "Merge Shapes" tool.
- 3. Will subtracting images reduce their quality?
- Subtraction itself doesn’t affect the image quality, but if you stretch or distort the image after subtracting, it may lead to pixelation or blurriness. Always use high-resolution images to maintain clarity.
- 4. How can I undo a subtraction?
- If you make a mistake, you can easily undo the subtraction by pressing "Ctrl + Z" (Windows) or "Cmd + Z" (Mac). This will revert the image to its original state before the subtraction.
- 5. Can I subtract images in older versions of PowerPoint?
- The "Subtract" function is available in PowerPoint 2013 and later versions. If you're using an older version, you might not have access to this feature.
Hopefully, these answers help you feel more confident when working with image subtraction in PowerPoint. If you run into any other issues, don’t hesitate to experiment or look for additional tutorials online!
Conclusion: Enhancing Presentations with Image Subtraction
In conclusion, subtracting images in PowerPoint is a simple yet powerful tool that can elevate your presentations and add a creative touch to your slides. Whether you're aiming for a clean and professional design or looking to experiment with unique visual effects, mastering image subtraction can help you stand out.
To recap, here are the key benefits of using image subtraction:
- Custom Visuals: You can create personalized graphics tailored to your specific needs.
- Increased Creativity: The technique opens up a world of possibilities for creative expression.
- Simple Process: Once you know the steps, image subtraction is quick and easy to implement.
- Improved Visual Appeal: Subtracting parts of images allows you to focus attention on important elements and make your presentation more engaging.
By applying the techniques we've discussed, you can improve your PowerPoint presentations, making them more dynamic and visually appealing. So, next time you're creating a slide deck, try subtracting images to add a creative flair to your designs. Happy designing!

 admin
admin


