When working on a Google Slides presentation, adjusting the opacity of images can make a huge difference in the overall look and feel of your slides. Opacity is simply how transparent or opaque an image is, and changing it can help you create professional, polished presentations that keep your audience focused on your content. By learning how to control opacity, you can add subtle visual effects that enhance your message and design without overwhelming the viewer. In this guide, we'll show you how to adjust image opacity in Google Slides and explore its benefits.
What Is Image Opacity?

Image opacity refers to the level of transparency an image has. An
Here’s how opacity affects your images:
- 100% Opacity: The image is fully visible, with no transparency.
- 50% Opacity: The image appears faded and blends somewhat with the background.
- 0% Opacity: The image is completely invisible, making it transparent.
Adjusting opacity can be a useful tool when you want to place text over images or add visual interest to your slides without distracting from the main content.
Why Adjust Image Opacity in Google Slides?

Adjusting image opacity in Google Slides is more than just a design choice—it’s a way to make your presentations more engaging and professional. Here are a few reasons why you might want to adjust image opacity in your slides:
- Improve Text Readability: If you have text on top of an image, reducing the opacity of the image can make the text stand out more clearly without losing the visual impact of the background.
- Create a Professional Look: Proper use of opacity can make your presentation look more polished and cohesive, as it ensures that images do not overwhelm the content.
- Highlight Key Elements: By adjusting opacity, you can make important visual elements stand out, such as logos or key images, without making them too loud or distracting.
- Design Flexibility: Changing opacity allows for more creative freedom, enabling you to blend images smoothly into the background or add subtle effects to your slides.
Ultimately, adjusting image opacity gives you the flexibility to fine-tune the design of your slides and ensure that everything looks just right.
Step-by-Step Guide to Adjust Image Opacity

Adjusting image opacity in Google Slides is a simple process, and you don’t need any advanced skills to do it. In this step-by-step guide, we’ll walk you through how to easily modify the opacity of an image, giving your slides a professional touch in just a few clicks. Let’s dive in!
Follow these steps to adjust the opacity of an image in Google Slides:
- Insert the Image: First, make sure you’ve added the image you want to adjust. To do this, click on the "Insert" tab in the toolbar, select "Image," and choose where to upload your image from.
- Select the Image: Click on the image you want to modify. A blue border will appear around it, showing that the image is selected.
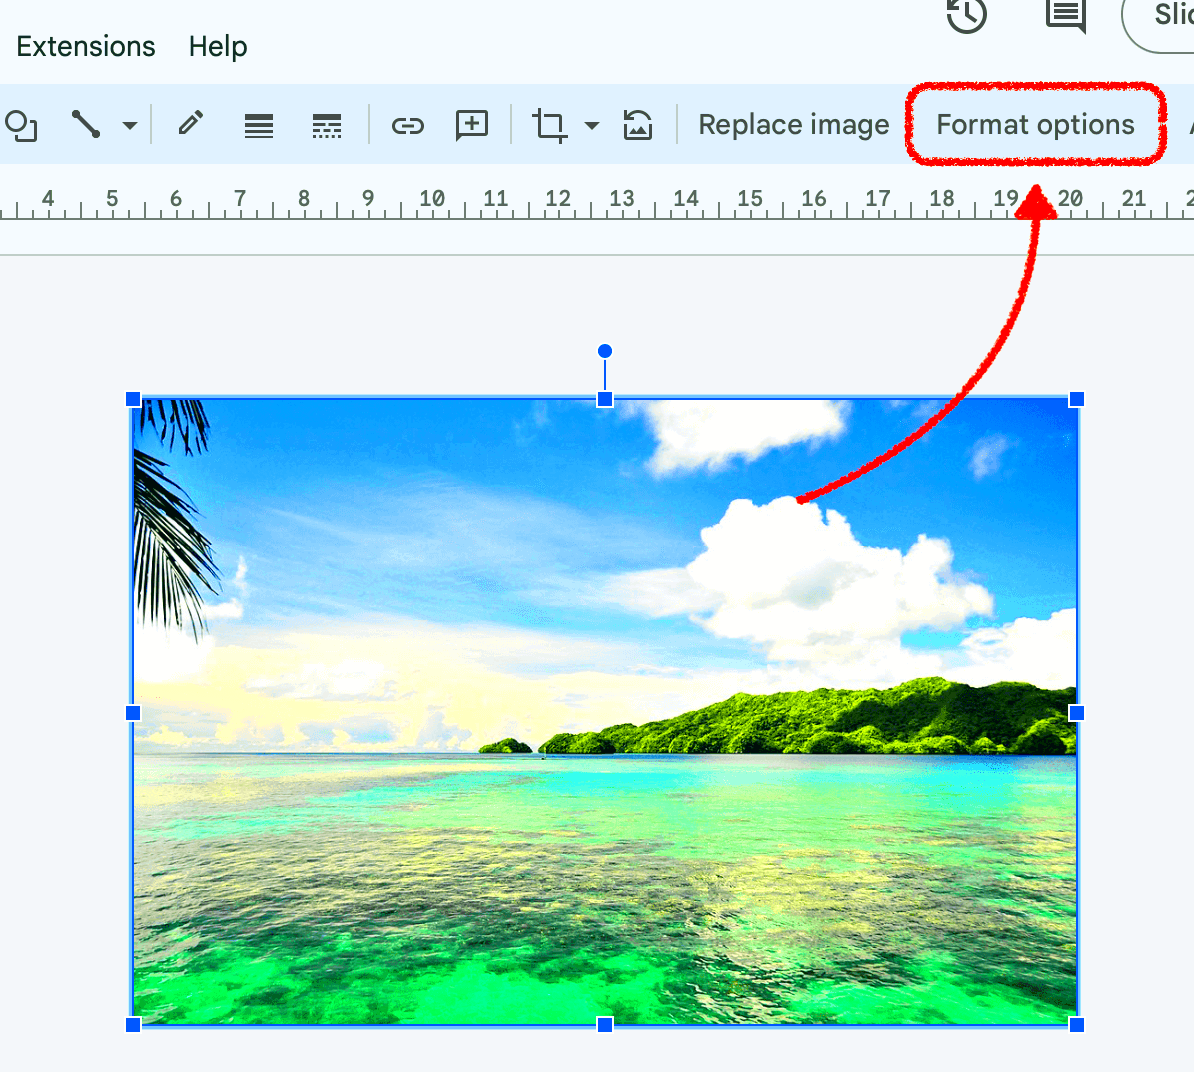
- Open the Format Options: With the image selected, right-click on it and choose “Format options” from the menu. This opens a sidebar where you can adjust various settings, including opacity.
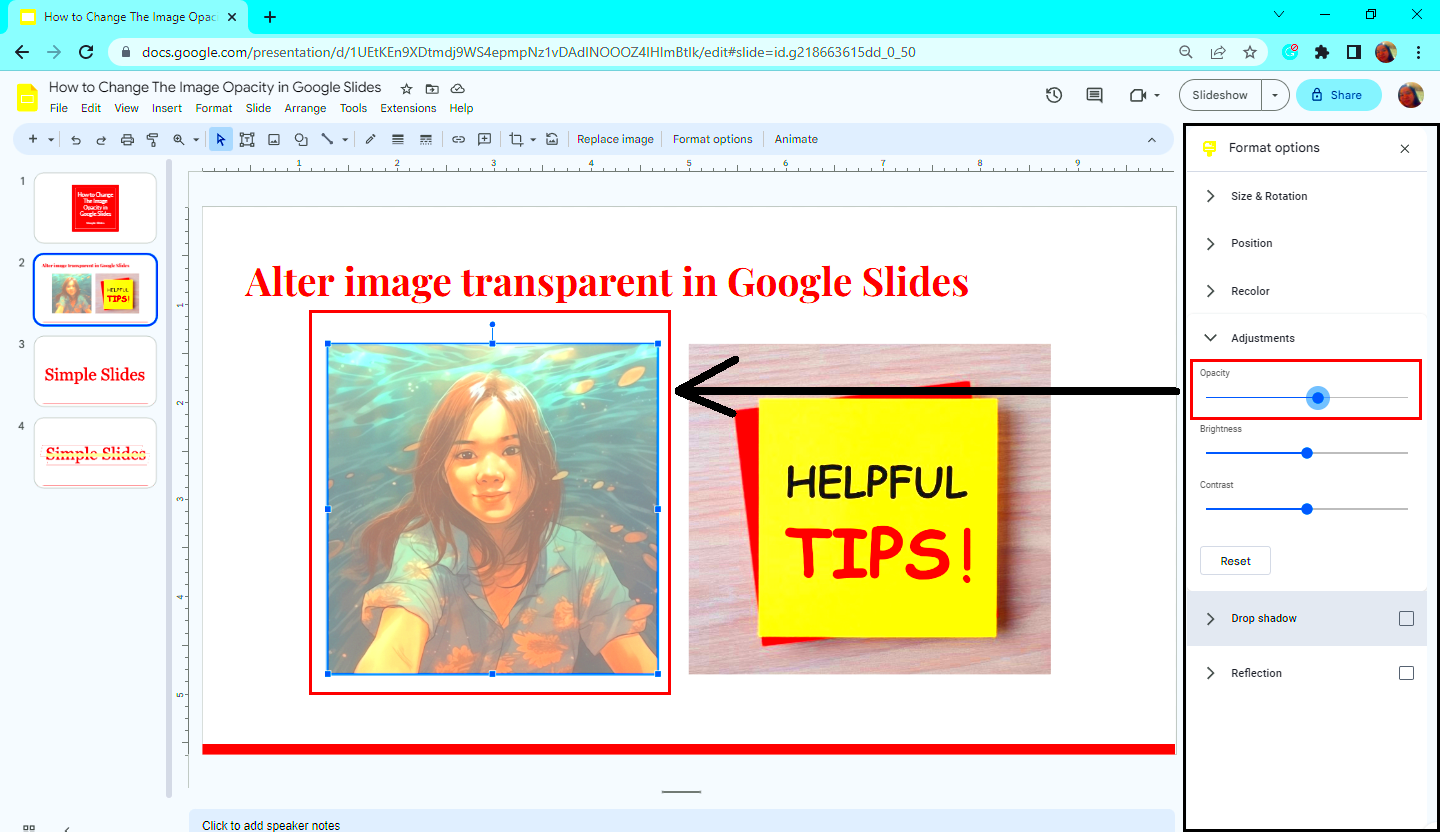
- Adjust the Opacity: In the Format options sidebar, look for the “Adjustments” section. Here, you’ll find a slider labeled “Transparency.” Move the slider left or right to adjust the opacity of your image. Sliding to the left will make the image more transparent, while sliding to the right will make it more opaque.
- Finalize Your Changes: Once you’re satisfied with the opacity level, simply click anywhere outside the sidebar to close it. Your image will now have the desired transparency effect!
That’s it! In just a few steps, you’ve adjusted the image opacity to enhance your presentation’s design.
Using the Transparency Tool in Google Slides
The Transparency tool in Google Slides is a powerful feature that allows you to control the opacity of your images, text, and shapes. By using this tool, you can create visually appealing slides that allow background images to subtly show through, or ensure that text is easy to read over images without too much distraction.
Here’s how to use the Transparency tool to adjust image opacity:
- Open Format Options: Select the image or object you want to modify. Right-click on it and choose "Format options" from the dropdown menu.
- Locate the Transparency Setting: In the "Format options" sidebar, you’ll find the “Adjustments” section. The “Transparency” slider is here, which lets you control how much of the image is visible.
- Adjust the Slider: Drag the transparency slider to the left for more opacity (making the image fully visible) or to the right to reduce opacity (making the image more transparent). As you adjust the slider, you’ll see the changes in real time.
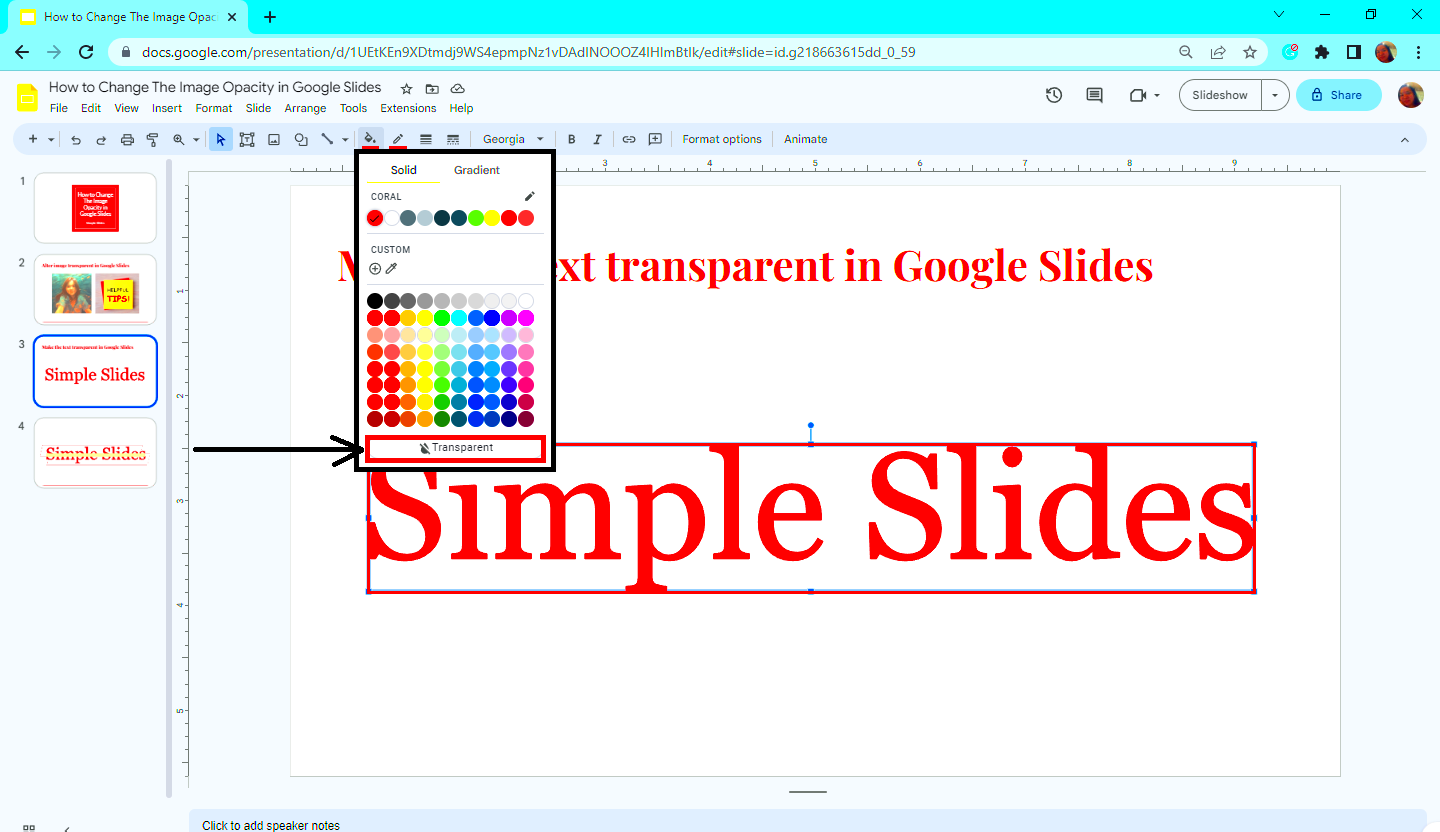
- Apply to Other Objects: The transparency setting can also be used for shapes, text boxes, and other elements on your slide. Just select the object, open “Format options,” and adjust the transparency in the same way.
One thing to note is that the Transparency tool can be used creatively not only for images but also for shapes and text boxes. It’s a great way to layer elements on your slides without cluttering the design.
Best Practices for Image Opacity in Presentations
Using image opacity effectively can make your presentations look polished and professional. But like any design tool, it’s important to use it thoughtfully. Here are some best practices to follow when adjusting image opacity in your slides:
- Keep It Subtle: In most cases, less is more. Adjusting opacity slightly can help blend the image into the background, but it’s best not to overdo it. Too much transparency can make your image almost invisible and distract from the message you want to convey.
- Ensure Text Readability: If you’re placing text over an image, reducing the image opacity can make your text stand out more. Just be sure the image doesn’t overwhelm the text. If the opacity is too high, it could make your text hard to read.
- Maintain Visual Balance: Balance your slides by ensuring that the opacity adjustment enhances the slide without drawing too much attention to the image. Your image should complement the content, not compete with it.
- Consider Contrast: When reducing image opacity, check the contrast between the background image and the text or other objects on your slide. If your image is too light or transparent, it could wash out the content.
- Use Transparency for Layering: If you’re working with multiple elements, adjusting the opacity of images or shapes can help you layer them in a visually appealing way. This is especially useful when creating creative designs or highlighting key information.
- Avoid Distracting Backgrounds: If your background image has too much detail, lowering its opacity can ensure it doesn’t distract from the main content of your slide.
By following these tips, you can effectively use image opacity to enhance the visual appeal and readability of your Google Slides presentations, creating slides that look both professional and engaging.
Common Problems When Adjusting Image Opacity
While adjusting image opacity in Google Slides is a simple task, there are a few common issues users often face. Whether you're working with a complex design or just trying to make small tweaks, understanding these challenges can help you avoid frustration. Below are some typical problems that arise when adjusting opacity, and how to fix them.
- Opacity Doesn’t Show as Expected: Sometimes, after adjusting the transparency slider, the changes may not appear immediately. This could be due to the image resolution or the way Google Slides renders images. Try clicking outside the image or slide, and check again to see the effect.
- Text Becomes Hard to Read: When using transparent images as backgrounds, text can sometimes get lost, especially if the image has too much color or pattern. To resolve this, reduce the opacity slightly until the text is more readable. You can also add a semi-transparent text box behind the text to improve contrast.
- Image Appears Blurry: If your image becomes blurry after adjusting opacity, it could be due to the image file itself. Low-resolution images often lose quality when transparency is added. Try using a higher resolution image to maintain clarity.
- Background Doesn’t Blend Properly: Achieving a smooth blend between your image and background can be tricky. If the image’s opacity makes it too faint, it might not integrate well with the background. In this case, try adjusting both the opacity and contrast to balance the visual effect.
- Opacity Changes Aren’t Saving: Sometimes, the changes you make don’t save automatically, especially if there’s a connection issue. Always check that your internet connection is stable and give the slide a moment to sync.
By being aware of these common issues and knowing how to troubleshoot them, you can easily achieve the desired results when adjusting image opacity in Google Slides.
FAQ
Here are some frequently asked questions about adjusting image opacity in Google Slides. These answers should help clarify any doubts you may have.
- Can I adjust opacity for all objects in Google Slides?
Yes, you can adjust the opacity for images, shapes, and text boxes in Google Slides. This flexibility allows you to control how visible or transparent different elements are, creating a more cohesive design. - How do I adjust opacity for multiple images at once?
Unfortunately, Google Slides doesn’t currently support adjusting the opacity for multiple images simultaneously. You’ll need to adjust each image individually, but once you get the hang of it, it’s a quick process! - What happens if I set opacity to 100%?
If you set the opacity to 100%, your image will be fully visible with no transparency. It’s the default setting for images, so adjusting the opacity below 100% will make it more transparent. - Can I change the opacity of background images?
Yes, you can adjust the opacity of background images in Google Slides. Simply insert your image as the background and use the transparency slider under the "Format options" to adjust it. - Does opacity affect print quality?
No, opacity settings in Google Slides will not affect print quality. When printing your presentation, images will be rendered with full opacity, regardless of how transparent they appear on screen.
Conclusion
Adjusting image opacity in Google Slides is a simple but powerful tool that allows you to create more professional and visually appealing presentations. Whether you're using transparency to improve text readability, create visual emphasis, or just add some creative flair, understanding how to control opacity gives you greater flexibility in your design work.
By following the step-by-step instructions, troubleshooting common problems, and adhering to best practices, you can use image opacity effectively to enhance your Google Slides presentations. Don't be afraid to experiment with different opacity settings until you find the look that best suits your message and style. Happy presenting!

 admin
admin


