Flipping an image in PowerPoint is a simple and effective way to enhance your presentations. Whether you need to mirror an image, create a reflection effect, or adjust the layout for better alignment, PowerPoint offers easy tools to flip images quickly. This feature helps make your visuals more dynamic and visually appealing, without the need for complex graphic software. In this guide, we will walk you through the process of flipping images, explain why you might need to do it, and share tips for optimizing your
Why Flip an Image in PowerPoint?

Flipping images can be useful in a variety of scenarios. Here are some common reasons you might want to flip an image in PowerPoint:
- Mirroring for Symmetry: Flipping an image can create a mirror effect, which is great for adding balance to your slide design.
- Reflection Effects: By flipping images, you can make them appear as though they are reflected in water or a mirror, adding a professional touch to your presentation.
- Aligning Images: Sometimes, flipped images work better within the overall layout of your slide, making the presentation look more organized.
- Changing the Focus: Flipping can alter the way the image is perceived. You may want to change the perspective of a photo or graphic to make it fit the context better.
Overall, flipping images can help you adjust the visual flow and balance in your slides, ensuring that your presentation is both engaging and effective.
Also Read This: How to Remove Getty Images Watermark Online Legally
Steps to Flip an Image Horizontally in PowerPoint

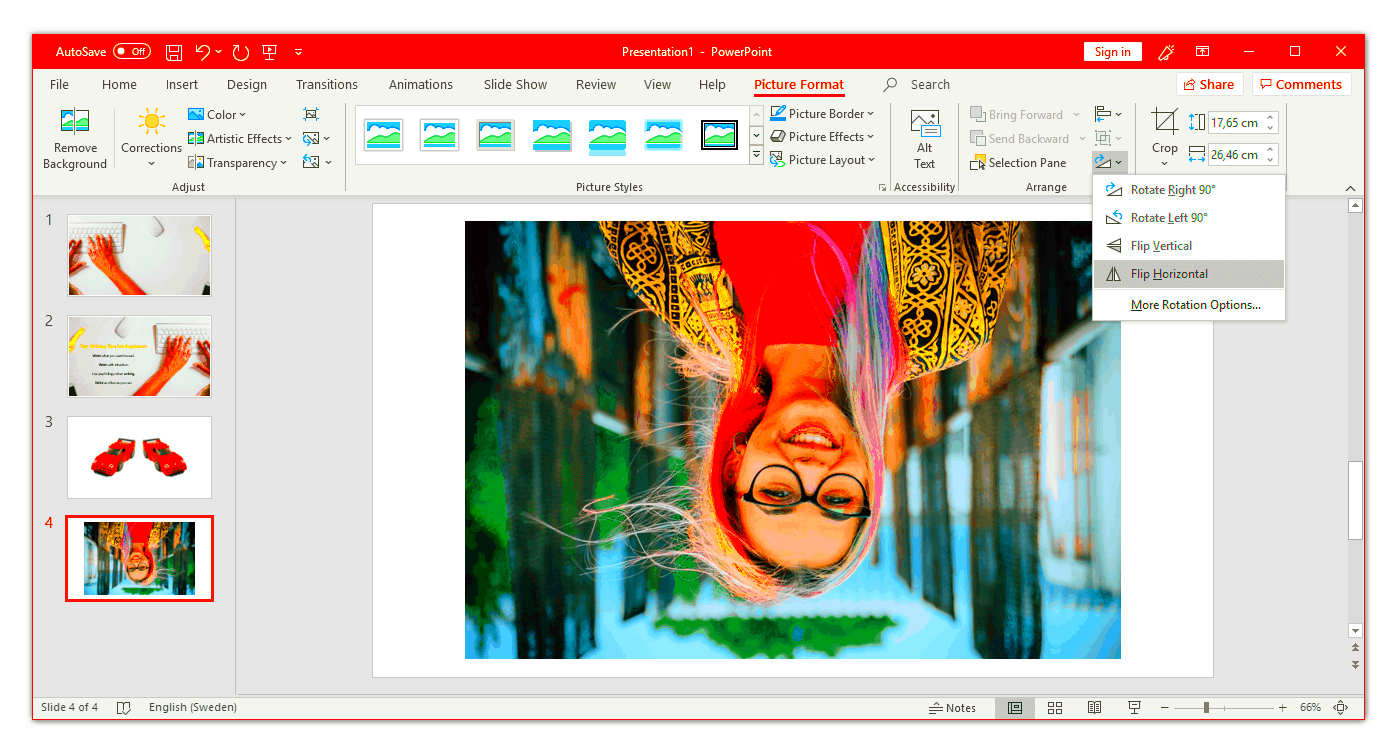
Flipping an image horizontally is simple and can be done in a few easy steps. Here’s how to do it:
- Step 1: Select the image you want to flip by clicking on it.
- Step 2: Go to the "Picture Format" tab at the top of PowerPoint.
- Step 3: In the "Arrange" group, click on the "Rotate" button.
- Step 4: From the dropdown menu, select "Flip Horizontal."
After completing these steps, your image will be flipped horizontally. This is useful for creating symmetrical designs or mirroring an image for a balanced layout.
Tip: If you want to undo the flip, simply press "Ctrl + Z" or use the "Undo" button in the toolbar.
Also Read This: How to download Getty Images without watermark for free
Steps to Flip an Image Vertically in PowerPoint
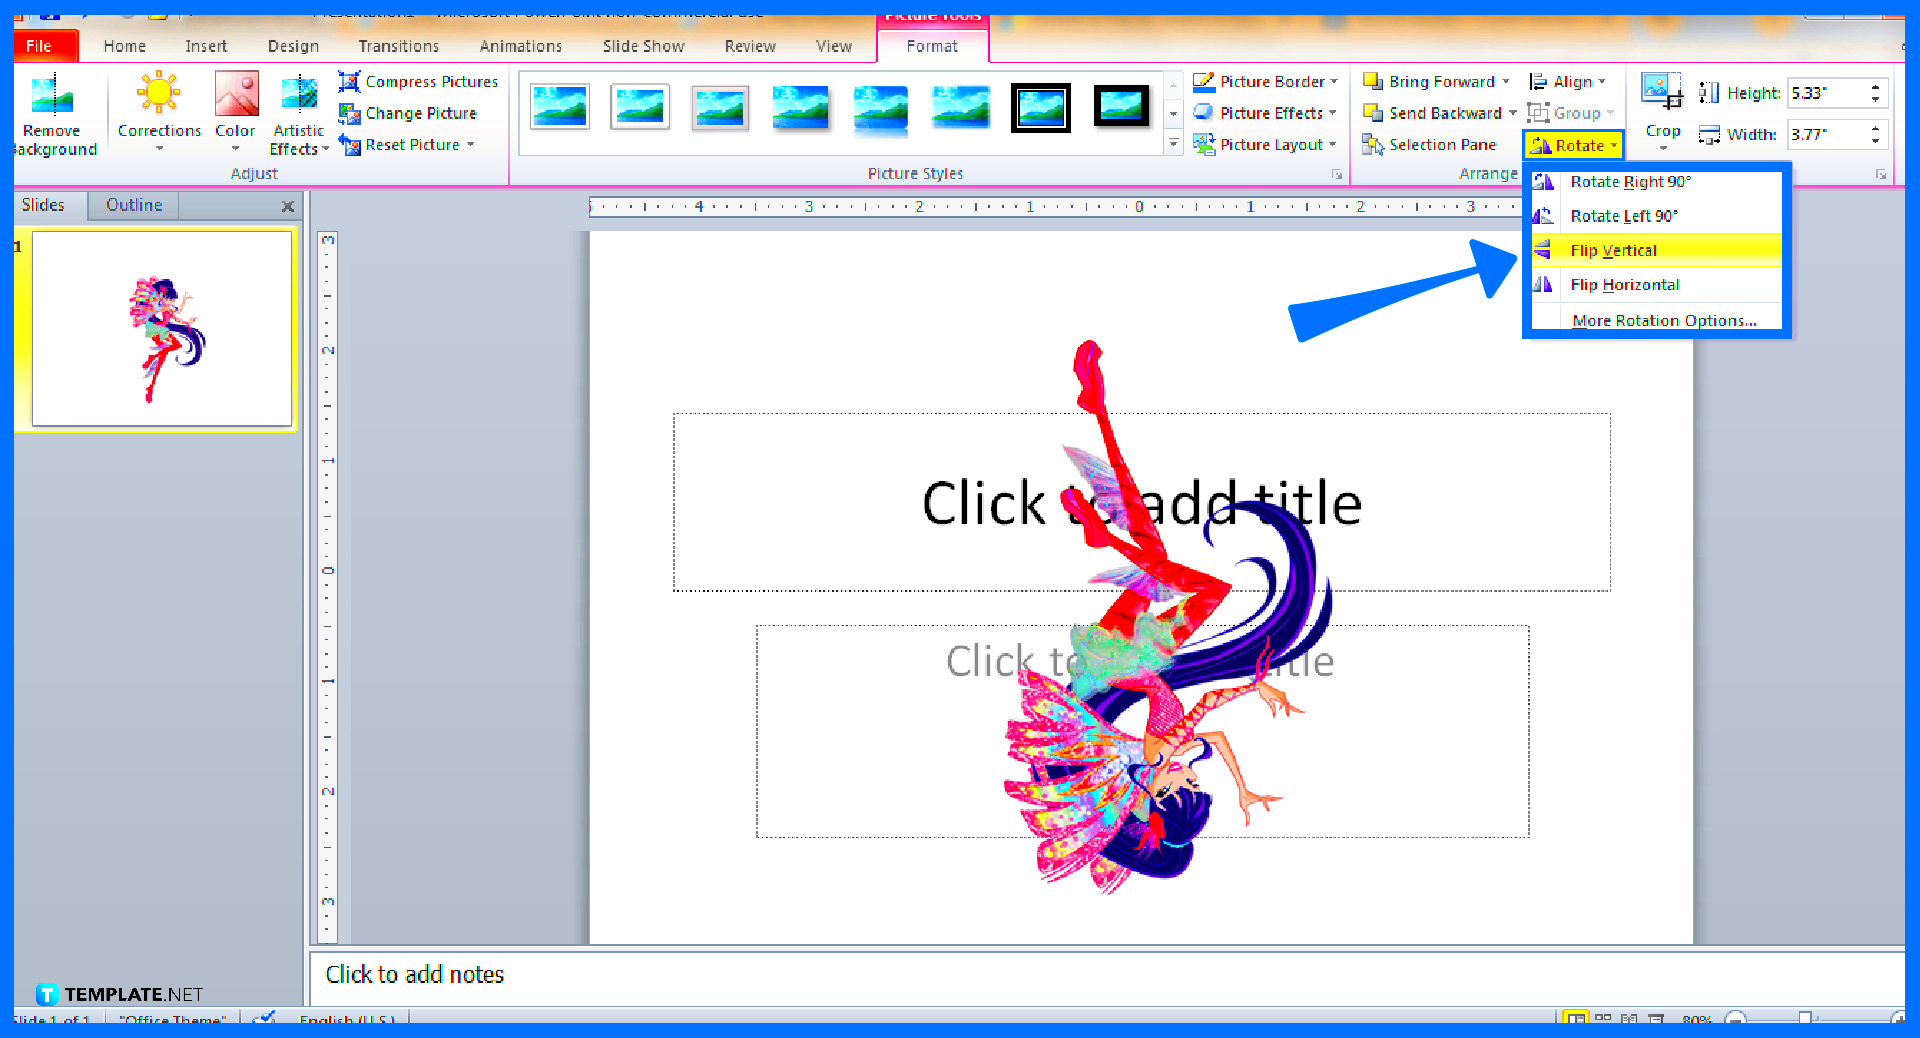
Flipping an image vertically in PowerPoint is just as easy as flipping it horizontally. Vertical flips are useful when you want to mirror an image upside down or create interesting design effects. Here's a step-by-step guide to flipping an
- Step 1: Click on the image you want to flip. This will select the image on your slide.
- Step 2: Open the "Picture Format" tab in the PowerPoint ribbon, which appears once your image is selected.
- Step 3: Look for the "Rotate" button within the "Arrange" group on the toolbar.
- Step 4: Click the "Rotate" button and select "Flip Vertical" from the dropdown options.
Once you complete these steps, your image will be flipped upside down. This is great for creating reflection effects, such as an image reflecting off a surface like water. You can also use vertical flips to change the direction of objects or text within an image.
Tip: If you need to adjust the flipped image further, you can move it around the slide or resize it to fit your layout properly.
Also Read This: How to Save Getty Images Without Watermark on Tumblr
Using the Flip Option in PowerPoint's Picture Tools
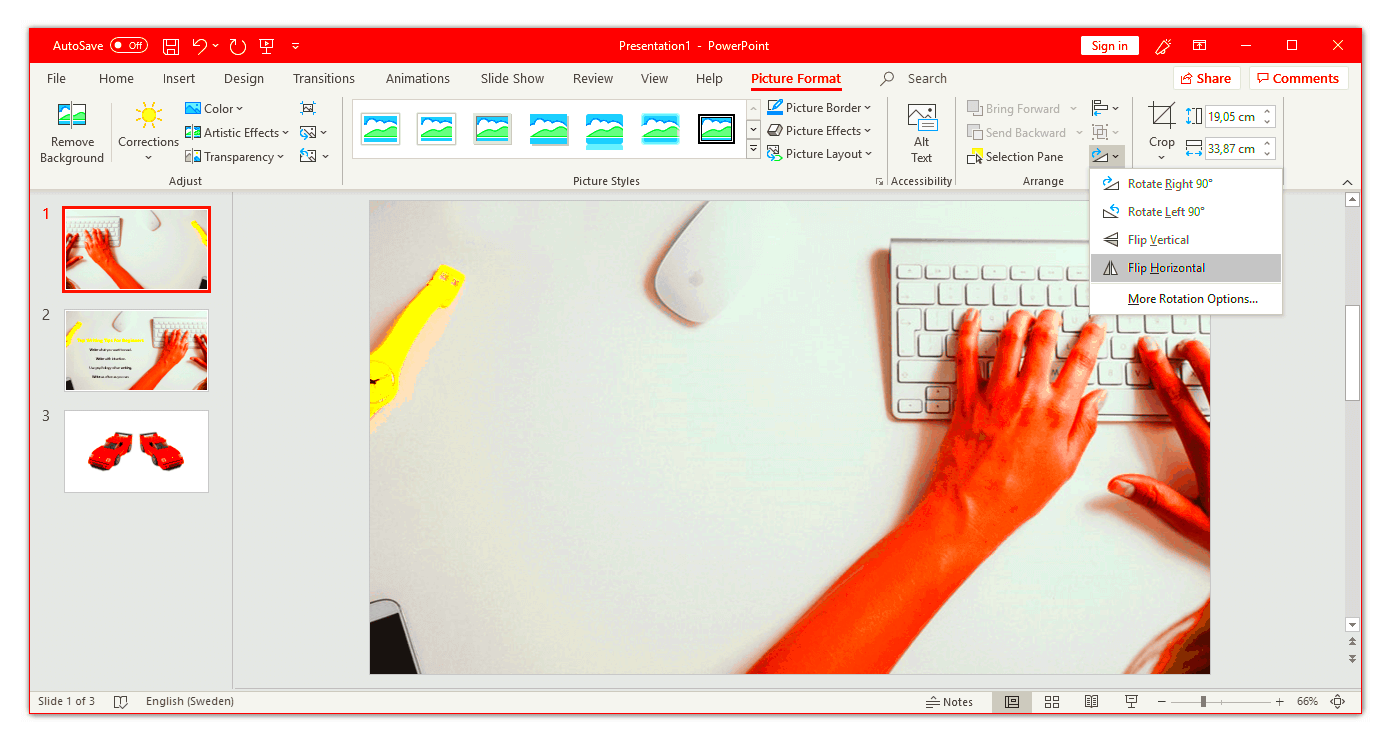
PowerPoint provides an easy-to-use "Flip" option under the "Picture Tools" tab, which allows you to flip images either horizontally or vertically. This feature is available when you select any image on your slide. Here's how to access and use the Flip options:
- Step 1: Select the image you want to flip by clicking on it.
- Step 2: Navigate to the "Picture Format" tab on the ribbon, which appears when an image is selected.
- Step 3: In the "Arrange" group, click the "Rotate" button to display the rotation options.
- Step 4: From the dropdown menu, you can choose either "Flip Horizontal" or "Flip Vertical" depending on your needs.
The "Flip" options in PowerPoint are a quick and simple way to adjust the orientation of your images, whether you’re designing for symmetry or creating a special effect.
Bonus Tip: If you want to rotate the image at a specific angle, the "Rotate" dropdown also offers additional options like "Rotate Right 90°" or "Rotate Left 90°." These options can come in handy for more advanced image adjustments.
Also Read This: Why 123RF Image Quality Stands Out in the Industry
Additional Image Editing Options in PowerPoint
In addition to flipping, PowerPoint offers a range of other image editing options that can help enhance your presentation. These tools are all available under the "Picture Format" tab. Here are some key image editing options you can use:
- Crop: You can crop the image to remove unwanted areas or focus on a particular part of the picture. To crop, select the image, click "Crop" in the "Picture Format" tab, and drag the crop handles to adjust.
- Adjust Brightness and Contrast: If your image looks too dark or too bright, you can adjust its brightness and contrast. Click "Corrections" in the "Picture Format" tab, then choose the best option for your image.
- Apply Picture Styles: PowerPoint allows you to apply preset styles to your image, such as soft edges, shadows, and reflections. Simply select the image and choose a style from the "Picture Styles" gallery in the "Picture Format" tab.
- Remove Background: If you want to remove the background of an image, PowerPoint makes it easy. Select the image, click "Remove Background," and PowerPoint will automatically detect the background to remove. You can also manually adjust the selection.
- Artistic Effects: PowerPoint includes a variety of artistic effects that can give your images a unique look. These effects include pencil sketches, blur, and other visual styles, which can be accessed by clicking "Artistic Effects" under the "Picture Format" tab.
Tip: Combining these tools—like flipping an image, adjusting brightness, and applying an artistic effect—can make your presentation more engaging and visually interesting.
Also Read This: Mastering Image Cropping in Keynote
Common Mistakes to Avoid When Flipping Images
Flipping images in PowerPoint is a quick and easy way to adjust your visuals, but there are a few common mistakes that can affect your design and presentation. By being mindful of these mistakes, you can ensure that your images look professional and align with your slide layout. Here are some pitfalls to avoid:
- Not Checking Image Quality After Flipping: Flipping an image can sometimes distort it or reduce its quality, especially if it's a low-resolution image. Always check that the image still looks sharp and clear after flipping.
- Flipping Text or Logos: If your image contains text or logos, flipping it may cause the text to appear backwards or unreadable. In most cases, it's better to avoid flipping these types of images unless you plan to adjust the text separately.
- Overusing Flips for Decorative Purposes: While flipping can be a creative tool, overusing it can make your presentation look cluttered or confusing. Use flips strategically to enhance your message rather than distract from it.
- Not Aligning the Flipped Image Properly: After flipping, the image may need repositioning on the slide. Make sure to align it correctly to maintain a neat, balanced layout. Misalignment can make your slide look unprofessional.
- Flipping Only Part of an Image: If your image contains multiple objects or elements, flipping the entire image may cause some parts to look out of place. It's important to consider whether flipping the whole image will disrupt the design.
By being aware of these common mistakes, you can avoid them and create a more polished and effective presentation with flipped images.
Also Read This: Looking for Reliable Pinterest Downloader for Picture? Here’s the One at No Cost!
Frequently Asked Questions (FAQ)
Here are answers to some of the most common questions about flipping images in PowerPoint:
- Can I flip an image back to its original position?
- Yes, flipping an image is reversible. You can simply use the "Undo" button (Ctrl + Z) to return the image to its original orientation or re-flip it to the other direction.
- Will flipping an image affect its quality?
- Flipping an image generally does not affect its quality. However, if the image is low-resolution or highly compressed, flipping may cause some pixelation or blurring.
- Can I flip just part of an image in PowerPoint?
- No, PowerPoint flips the entire image. If you need to flip only part of the image, you would have to use a photo editing tool outside of PowerPoint to split the image into parts and flip them separately.
- Why does my flipped image look blurry?
- Blurriness after flipping can occur if the image was originally low resolution. Always use high-quality images to ensure they remain clear after flipping.
- Can I flip text in PowerPoint?
- Text itself cannot be flipped directly, but you can flip the text box. However, be careful as flipping text can make it hard to read.
Conclusion
Flipping images in PowerPoint is a simple yet effective way to improve the design and layout of your presentations. Whether you’re using it to create symmetry, adjust the orientation, or add a creative effect, the flip tool is a valuable feature to enhance your slides. Just be sure to avoid common mistakes like flipping images with text, misaligning your flipped images, or overusing this effect. By following the steps in this guide and keeping these tips in mind, you can make the most of flipping images in PowerPoint and create more engaging, professional-looking presentations.

 admin
admin


