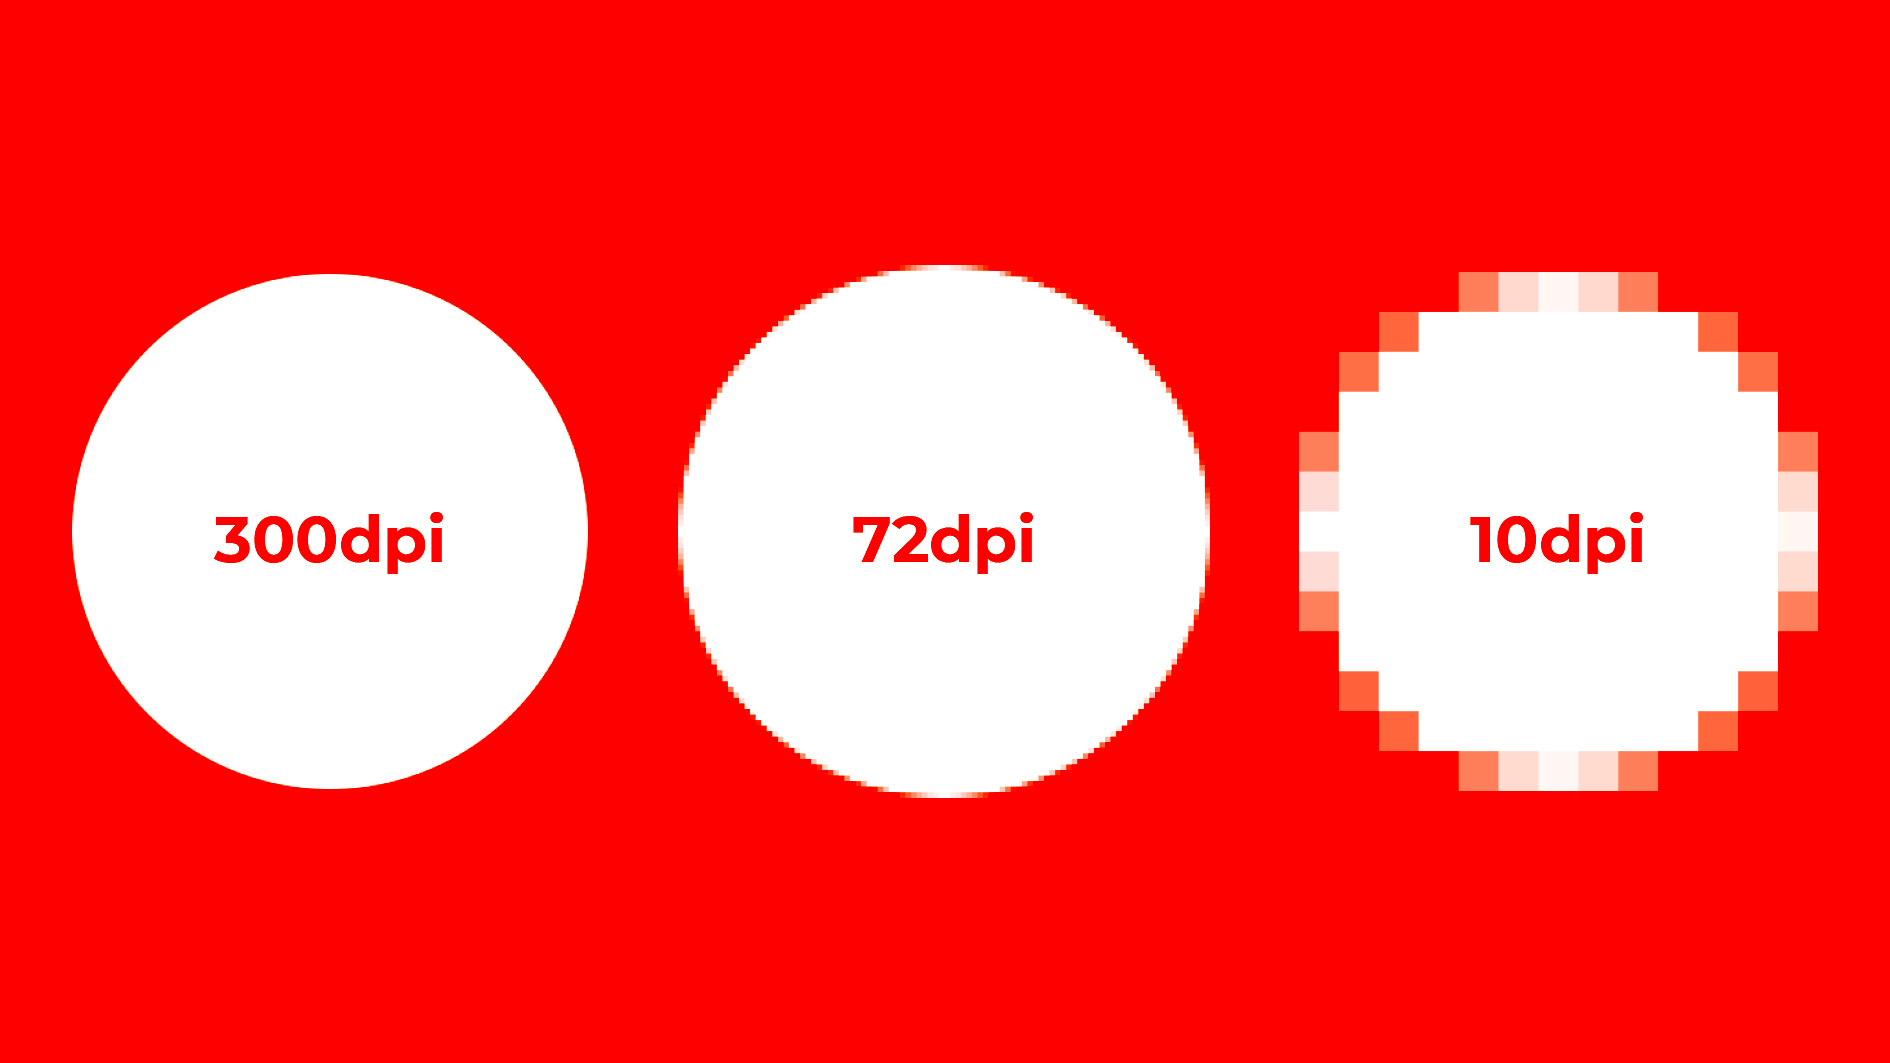
Image resolution refers to the level of detail an image holds. It's one of the most important factors that determine how sharp or clear an
High-resolution images are critical for clarity and professional quality. A low-resolution image may look blurry or pixelated, especially when enlarged. In contrast, images with higher resolution maintain their sharpness, making them suitable for various applications like printing flyers, brochures, or high-definition screens. However, a high-resolution image can also lead to larger file sizes, which might not always be practical for web use.
How to Check Image Resolution on Your Computer

Checking the resolution of an image on your computer is simple and can be done in just a few steps. Here’s how you can do it on both Windows and Mac systems:
- On Windows:
- Right-click the image file and select "Properties".
- In the "Details" tab, scroll down to see the image’s resolution listed under "Image" or "Dimensions".
- On Mac:
- Right-click the image and select "Get Info".
- Under the "More Info" section, you’ll find the resolution listed as "Dimensions".
It’s also helpful to know the image's pixel dimensions (width x height) and the DPI or PPI, especially when working with print projects.
Also Read This: How to Sell Photos on Depositphotos: A Comprehensive Guide
Using Online Tools to Check Image Resolution

If you don’t want to go through the steps of checking the resolution on your computer manually, there are several free online tools that can help you quickly check the resolution of your images. Here are a few options:
- Image Size Info: This simple tool allows you to upload an image, and it will display its resolution, dimensions, and file size.
- Get-Metadata: This tool provides detailed image metadata, including the resolution and DPI, once the image is uploaded.
- TinEye: Although primarily used for reverse image search, TinEye also shows you the resolution and dimensions of an image when you upload it.
These tools are especially useful when you're working with images from the web and need to quickly evaluate their resolution before using them in a project. Keep in mind that these tools usually display the image's resolution in pixels, which is perfect for digital use. If you're looking for print quality, remember to check the DPI as well.
Also Read This: Getting a Behance API Key – A Developer’s Guide to Behance’s API
Checking Image Resolution in Graphic Design Software
If you're working with graphic design software like Adobe Photoshop, Illustrator, or GIMP, checking image resolution is straightforward. These programs not only let you view the resolution but also give you the tools to adjust it according to your project needs. Knowing how to check and change the resolution in these programs can make a significant difference in the quality of your designs.
Here’s how to check image resolution in popular graphic design tools:
- Adobe Photoshop:
- Open the image in Photoshop.
- Go to the "Image" menu and select "Image Size".
- In the "Image Size" window, you'll see the current resolution (in PPI or DPI) displayed at the top.
- Adobe Illustrator:
- Open your image in Illustrator.
- Select the image, then click on the "Info" panel (Window > Info).
- You'll see the resolution listed under "PPI" for your rasterized images.
- GIMP:
- Open the image in GIMP.
- Go to "Image" in the top menu and select "Scale Image".
- Here, you'll see both the pixel dimensions and the resolution (PPI) displayed.
These programs also allow you to adjust the resolution, which is helpful if you need to prepare your image for a specific print size or digital project. Just keep in mind that increasing the resolution of a low-quality image won't improve its appearance—it can only stretch the pixels, potentially leading to blurriness.
Also Read This: Top Image Processing Job Opportunities in the USA
How Image Resolution Affects Print Quality
When it comes to printing images, resolution plays a crucial role in determining the final output quality. A high-resolution image ensures that your print will be sharp, detailed, and professional-looking. If your resolution is too low, your print may appear pixelated, blurry, or distorted, especially when printed at a large size.
Here’s how resolution impacts print quality:
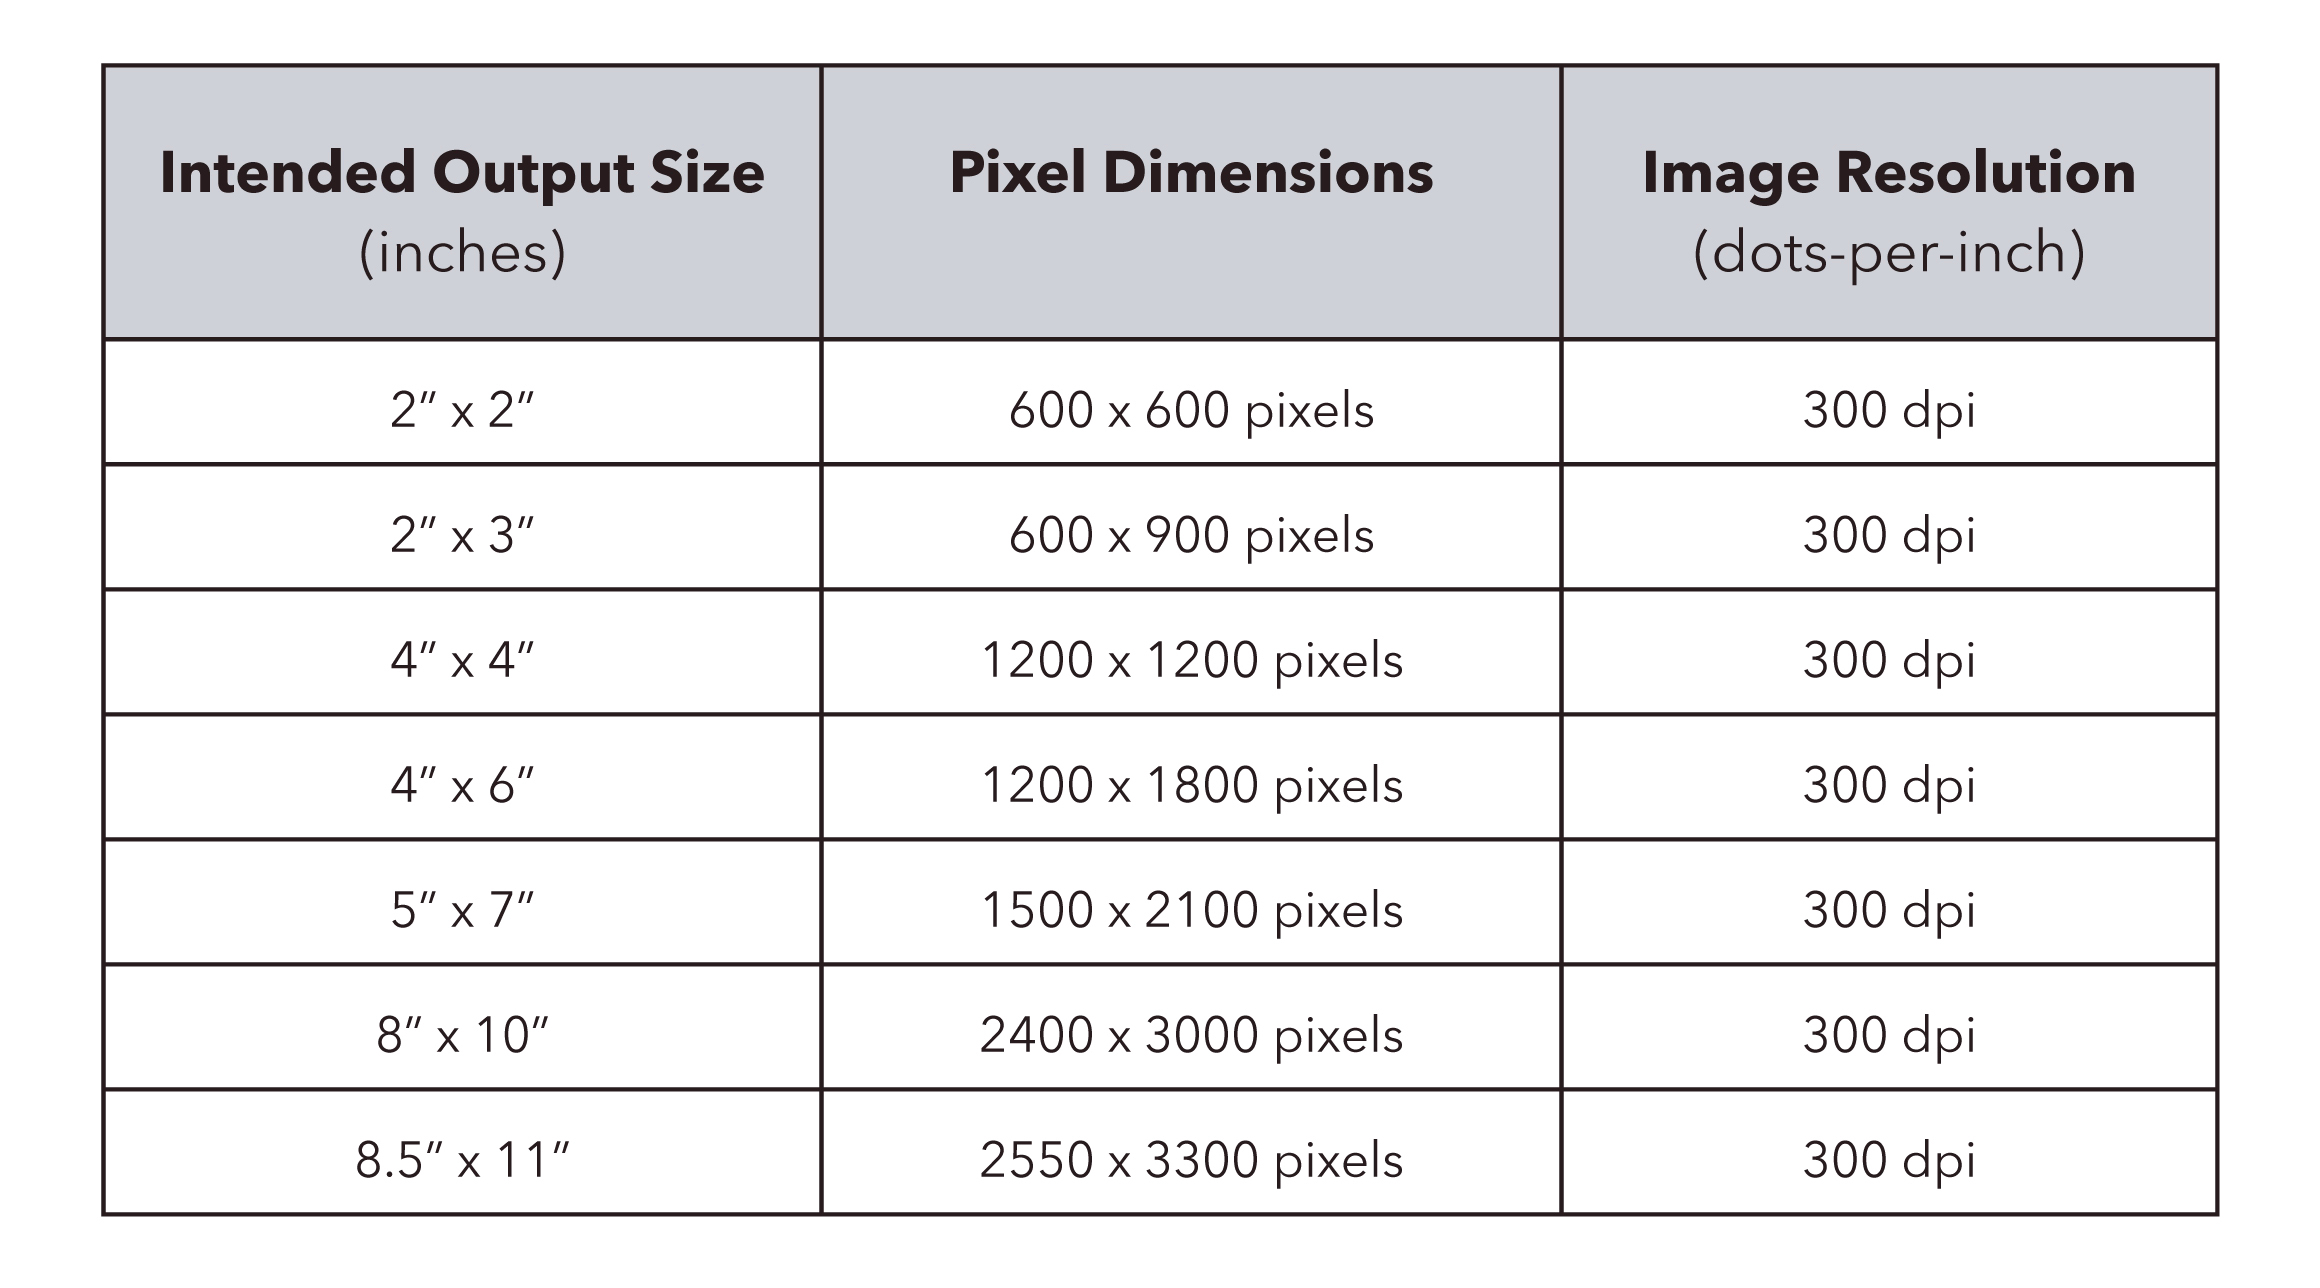
- DPI for Print: For print, resolution is typically measured in dots per inch (DPI). The higher the DPI, the sharper and more detailed your print will appear. For high-quality prints, a DPI of 300 is usually recommended.
- Image Size: The image’s resolution needs to match its print size. For example, a 6-inch by 4-inch image at 300 DPI would require a resolution of 1800 x 1200 pixels. If you enlarge the image beyond its native resolution, it may lose sharpness.
- File Size: High-resolution images tend to have larger file sizes, which means more storage space is needed. However, this is often a tradeoff for the better print quality you’ll get.
In summary, if you're printing something like a business card, flyer, or poster, always ensure that your image resolution is high enough for the intended print size. A low-resolution image won’t be able to hold up under the scrutiny of print and will likely result in a poor final product.
Also Read This: Posting Shutterstock Images on Instagram: Understanding Copyright and Usage Policies
What to Do if Image Resolution is Too Low
If you find that an image has low resolution, there are a few options available to improve its quality, though each comes with its limitations. The best course of action depends on the purpose of the image and how much editing you're willing to do.
Here are some strategies for dealing with low-resolution images:
- Resize and Resample the Image: You can increase the resolution in graphic design software by resampling the image. In Photoshop, for example, you can go to "Image Size" and increase the resolution. However, this doesn’t add new detail to the image—it may only make the pixels more spread out, which can lead to a blurry result.
- Use AI-Based Image Upscalers: Several tools like Topaz Gigapixel AI or Let’s Enhance use artificial intelligence to upscale images and add detail while minimizing quality loss. These tools can be a good option when enlarging low-res images for digital use.
- Find a Higher-Resolution Version: If the image is important and needs to be high quality, your best bet might be to look for a higher-resolution version of the image. Stock photo websites often offer different versions of the same image in varying resolutions.
- Vectorization: If the image is a logo or simple graphic, you can convert it into a vector file (e.g., using Adobe Illustrator). This way, you can scale the image up without losing quality, as vectors are resolution-independent.
Ultimately, the best solution will depend on the type of image and how it will be used. For digital purposes, AI upscaling may be enough. For printing, however, you’ll likely need to start with a higher-resolution image or vectorize the image for the best results.
Also Read This: How to View Getty Images Without Watermark
Best Practices for Maintaining High-Resolution Images
Maintaining high-resolution images is essential for ensuring that your visuals retain their clarity and sharpness, whether for print or digital use. The process involves not only creating high-quality images but also managing them carefully to avoid quality degradation. Following the right practices can help you preserve image resolution and make sure your projects look their best.
Here are some best practices for maintaining high-resolution images:
- Use the Right File Format: Different file formats have different ways of handling image quality. For high-resolution images, use formats like TIFF or PNG for lossless quality. JPEG is suitable for web use but may lose quality with repeated edits.
- Avoid Resizing Images Frequently: Each time you resize an image, especially downscaling, you lose pixel data. To maintain image quality, try to keep the original size as much as possible.
- Work in a Non-Destructive Editing Program: Software like Adobe Photoshop allows you to work in non-destructive ways, meaning the original image is not altered. Always keep a copy of the original high-resolution image and make adjustments in layers or adjustment layers.
- Save Your Work in High-Resolution: When saving images for projects, always ensure that you’re saving in the highest possible resolution and quality settings. For web use, optimize for file size without compromising too much on resolution.
- Keep Backups: Backup your original high-resolution files in cloud storage or an external hard drive. Accidental deletion or file corruption can be devastating, especially for valuable images that need to be preserved in their original quality.
By following these simple yet effective practices, you’ll ensure that your high-resolution images remain sharp and professional-looking for years to come.
Also Read This: how to open a jpeg image on iphone
Frequently Asked Questions
Here are some common questions about image resolution and how to maintain or improve it:
- What is the ideal resolution for print?
For high-quality prints, aim for a resolution of 300 DPI (dots per inch). This ensures that your image will look sharp and clear even in large formats, like posters or banners.
- Can I increase the resolution of a low-quality image?
You can increase the resolution in software like Photoshop or GIMP, but it won't add detail to the image. The image may appear blurry if you try to enlarge it too much. Using AI-based upscaling tools can help in some cases.
- How do I check if an image is high-resolution?
You can check an image’s resolution by looking at its dimensions (in pixels) and DPI or PPI. For print, a minimum of 300 DPI is typically considered high-resolution. For digital use, 72 PPI is standard, but higher values provide better clarity on high-definition screens.
- What is the difference between PPI and DPI?
PPI (pixels per inch) refers to the number of pixels in an image, often used in digital contexts. DPI (dots per inch) refers to the number of dots a printer can produce, and it's a measure used primarily for print. Both affect the sharpness of an image, but DPI is more critical for print quality.
- Can I reduce the resolution of an image for web use?
Yes, reducing the resolution for web use can help decrease file size and improve loading times. A resolution of 72 PPI is standard for web images, but ensure that your image still looks clear on modern, high-resolution screens.
Conclusion
In conclusion, checking and maintaining high-resolution images is essential for ensuring that your visuals are of the highest quality, whether for digital projects or print. Knowing how to check resolution, understanding its impact on print quality, and following best practices for image management will help you achieve professional results every time.
While low-resolution images can often be improved using various techniques and tools, starting with high-quality images is always the best approach. Regularly monitor and manage your image resolutions to avoid the frustration of blurry or pixelated visuals later on. With the right knowledge and tools, you can confidently handle images for any project, knowing they’ll meet the quality standards you expect.

 admin
admin


