Mirroring images in PowerPoint can be a simple yet powerful way to enhance your presentations. Whether you are working on a creative project or need to adjust an image for better alignment, the ability to flip or mirror an image is a useful tool. It helps add balance to your slides and gives your presentation a professional look. In this guide, we’ll walk you through the process of mirroring images in PowerPoint, and show you why and how it can improve your visuals.
Why You Should Mirror Images in PowerPoint

Mirroring images in PowerPoint isn't just for aesthetics; it can be used to create symmetry, emphasize certain design elements, or enhance the flow of your presentation. Below are a few reasons why you might want to use this technique:
- Balance and Symmetry: Mirrored images can help create a balanced and symmetrical design, making your slide look more polished and professional.
- Visual Impact: Flipping an image can give it a new perspective, grabbing the viewer’s attention in a unique way.
- Aligning with Text: When placing text alongside images, mirroring helps achieve a clean and harmonious layout by aligning the visual elements in a way that enhances readability.
- Creativity: By flipping images, you can add creativity to your slides, offering a fresh perspective that adds interest and style to your work.
Step-by-Step Guide to Mirroring Images in PowerPoint

Now that you know why mirroring images can be useful, let's dive into the steps of actually doing it in PowerPoint. It's a simple process, and with just a few clicks, you can flip any image to achieve the desired effect.
- Insert Your Image: Open your PowerPoint presentation, click on the slide where you want the image, and go to the Insert tab. Select Pictures, then choose the image you want to mirror.
- Select the Image: Click on the image to select it. You should see small handles appear around the edges of the image.
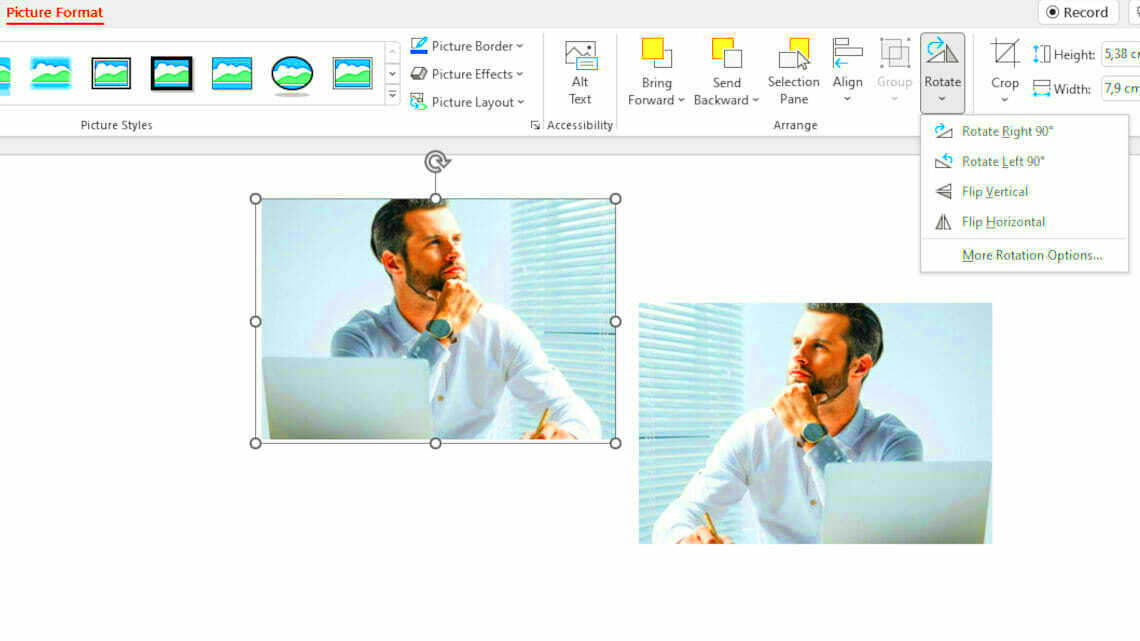
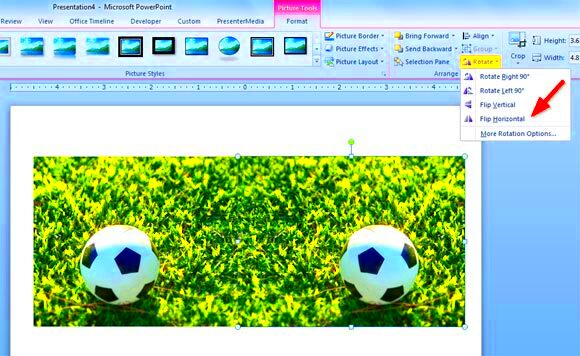
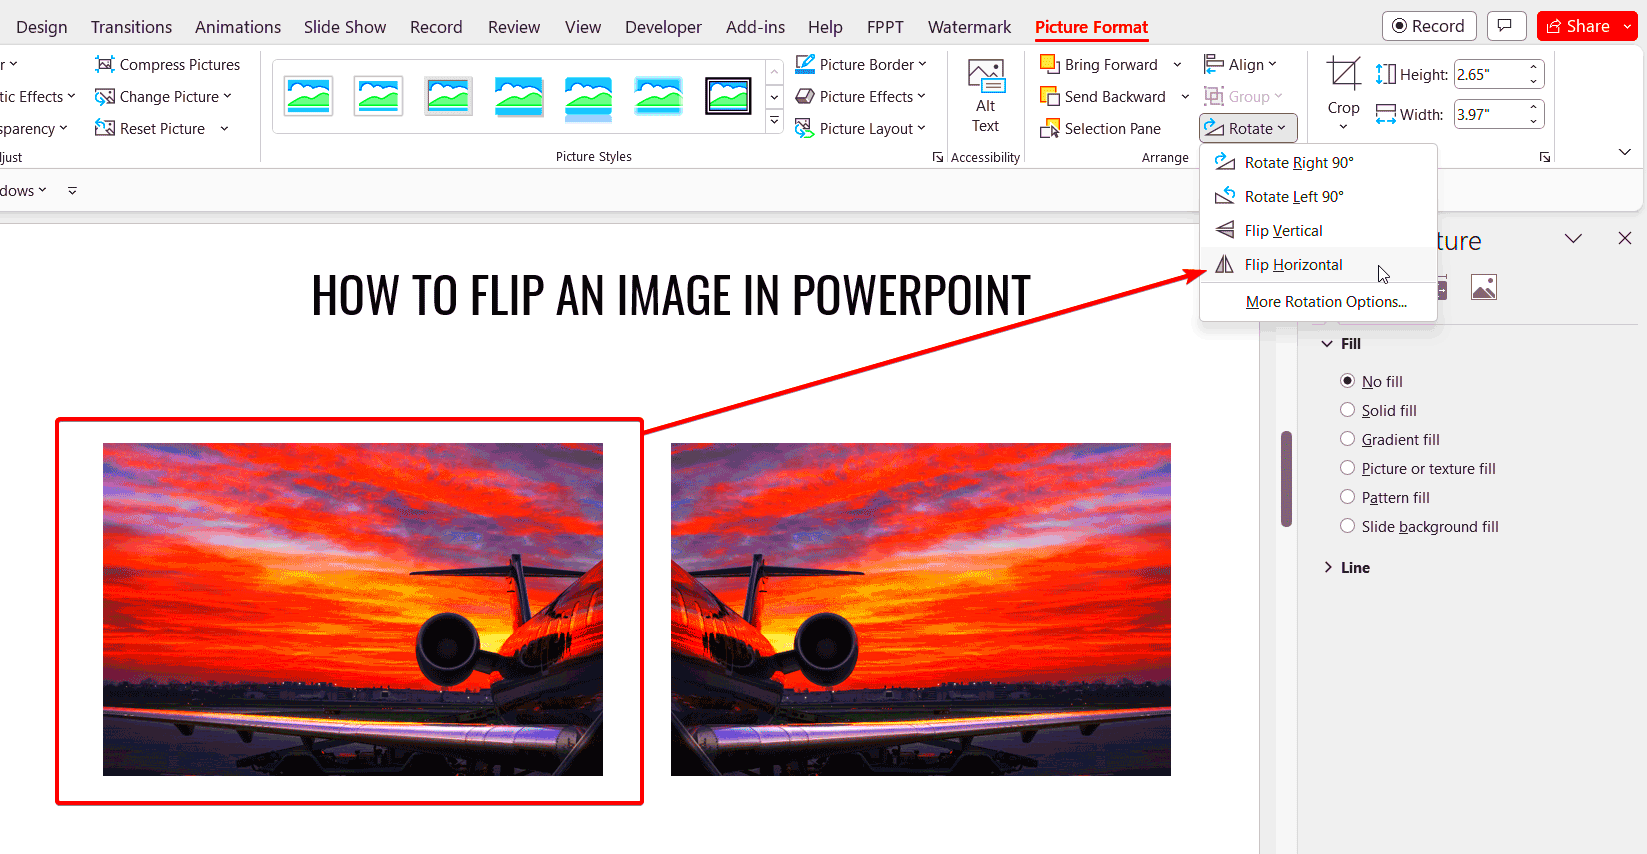
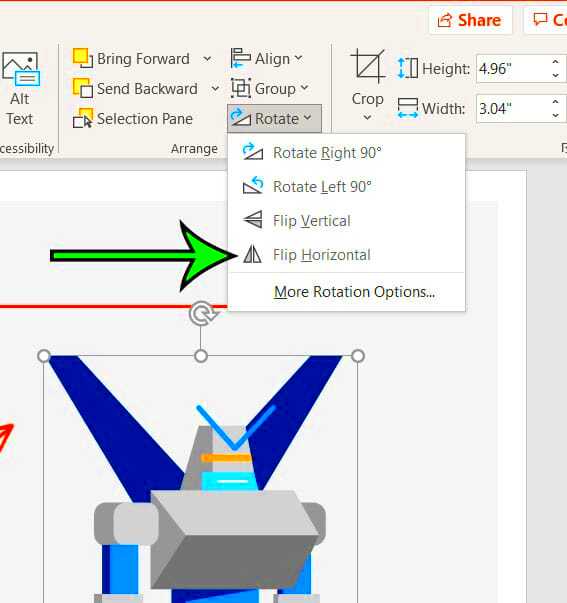
- Use the Flip Tool: With the image selected, go to the Format tab in the ribbon. In the Arrange group, you’ll find the Rotate button. Click on it, and a dropdown menu will appear. Here, you’ll see the options for Flip Vertical and Flip Horizontal.
- Choose Your Flip Option: Select Flip Horizontal to mirror the image from left to right, or Flip Vertical to flip it upside down. The image will instantly adjust.
- Adjust the Image: After flipping, you may need to reposition the image on your slide. Click and drag the image to move it, or use the resizing handles to adjust its size as needed.
- Fine-Tune the Alignment: If necessary, adjust other elements around the image, such as text or other objects, to ensure everything aligns properly and maintains a clean layout.
And that’s it! You've successfully mirrored an image in PowerPoint. With this simple process, you can now enhance your presentations with visually engaging effects.
Using the Flip Option to Mirror Images

The Flip option in PowerPoint is a quick and easy way to mirror an image. This feature is perfect for achieving that symmetrical look or making your visuals stand out with just a couple of clicks. PowerPoint offers two primary flip options: Flip Horizontal and Flip Vertical. Let’s take a closer look at how these work and when to use each:
- Flip Horizontal: This option mirrors the image along the vertical axis, flipping it left to right. It's often used to create a reflection effect or to reverse an image that may have an awkward orientation.
- Flip Vertical: This option mirrors the image along the horizontal axis, flipping it upside down. It can be useful for creating a reflection effect, such as mirroring a body of water or creating a dramatic change in perspective.
To use the flip option, follow these simple steps:
- Select the image you want to mirror by clicking on it.
- Navigate to the Format tab in the PowerPoint ribbon.
- Click on the Rotate button in the Arrange group.
- From the dropdown menu, choose either Flip Horizontal or Flip Vertical based on your preference.
- Your image will be instantly mirrored, and you can adjust it further as needed.
The Flip option is a great starting point for simple mirroring effects. It's fast, effective, and can be used in various creative ways to enhance your presentation’s visuals.
Rotating Images for Mirroring Effect
While flipping an image horizontally or vertically works well for most mirroring effects, sometimes you might want to rotate the image to achieve a different look or to better align it with other elements on the slide. Rotating can also help you create a mirror-like effect that goes beyond just flipping the
Here’s how to use rotation to mirror your image in PowerPoint:
- Basic Rotation: Select your image, and use the rotation handle (a circular arrow) at the top of the image to rotate it manually. This works well if you want to create a slight tilt or angle in the mirrored effect.
- Rotation via Options: If you want more control over the rotation, go to the Format tab, select the Rotate button in the Arrange group, and choose a specific angle like Rotate Right 90° or Rotate Left 90°.
- Custom Rotation: For more precision, you can click on More Rotation Options and enter a specific angle in the Rotation box. This option is ideal when you need exact alignment or a specific visual effect.
Rotating images can be especially useful when you want to create a mirrored effect at an angle or give your presentation a dynamic, non-traditional look. Combined with flipping, rotation can help you achieve stunning visual effects with minimal effort.
Adjusting Image Position After Mirroring
After mirroring your image, it’s important to adjust its position on the slide to make sure it fits seamlessly with other elements. The way you position your mirrored image can affect the overall layout and visual appeal of your slide. Here’s how to fine-tune the image’s position:
- Use the Alignment Tools: PowerPoint has built-in alignment tools that can help you position your image perfectly. To access these, select your image and then go to the Format tab. Click on the Align button and choose options like Align Left, Align Center, or Align Right for perfect alignment with the slide or other objects.
- Manual Positioning: If you prefer, you can manually drag the image to position it where you want it. Use the mouse to click and drag the image to the desired location, or use the arrow keys for more precise adjustments.
- Use Guides and Gridlines: To make sure your mirrored image is positioned symmetrically or in line with other objects, enable the Gridlines and Guides under the View tab. These visual aids help you align elements more easily.
- Adjusting Image Size: After mirroring, you might also want to adjust the image’s size. Use the corner handles to resize the image proportionally or the side handles to stretch or compress it as needed.
Proper image positioning can make a huge difference in how your mirrored images blend with the rest of your slide. Take your time to experiment with different positions until everything looks just right!
Common Mistakes to Avoid When Mirroring Images
Mirroring images in PowerPoint is a straightforward task, but there are a few common mistakes that can lead to awkward or unprofessional-looking slides. Let’s go over these mistakes and how you can avoid them:
- Not Maintaining Image Proportions: When flipping an image, it’s important to ensure that the proportions are preserved. Sometimes, when resizing after flipping, the image can become distorted. To avoid this, always use the corner handles to resize the image proportionally and avoid stretching it out of shape.
- Ignoring Image Alignment: After mirroring, the image may not automatically align with the other elements on your slide. Always double-check the alignment of the mirrored image and adjust it so that everything looks balanced and neatly arranged. PowerPoint’s alignment tools can help you with this.
- Overusing Mirrored Images: While flipping images can be effective, overuse can make your presentation feel repetitive or too busy. Avoid mirroring every image on a slide; instead, use this technique sparingly for emphasis or creativity, ensuring that it adds value to your message.
- Flipping Text: If your image includes text, be careful when mirroring. Flipping an image with text may result in reversed or unreadable words, which can confuse your audience. Always check to ensure that any text within an image remains clear and readable after flipping.
- Not Considering the Context: Sometimes, flipping an image can change its meaning or visual message. For instance, flipping an image of a person could make them appear to face the wrong way. Always consider how the mirrored image fits within the overall context of your presentation.
By avoiding these common mistakes, you can ensure that your mirrored images enhance your presentation rather than detract from it. Take the time to review each element carefully for a polished and professional result.
FAQ
Here are some frequently asked questions about mirroring images in PowerPoint:
- Can I mirror a video in PowerPoint?
Yes, you can mirror a video in PowerPoint the same way you mirror an image. Just select the video, go to the Format tab, and choose Flip Horizontal or Flip Vertical from the Rotate options.
- How do I undo a flip in PowerPoint?
If you accidentally flip an image and want to undo it, simply press Ctrl + Z on your keyboard or use the Undo button in the PowerPoint ribbon to reverse the action.
- Can I mirror multiple images at once?
Unfortunately, PowerPoint doesn’t have an option to flip multiple images simultaneously. You will need to flip each image individually, but you can align them quickly using the alignment tools to keep them consistent.
- Will flipping an image affect its quality?
No, flipping an image in PowerPoint does not affect the image’s resolution or quality. The image will remain the same unless you resize or compress it after flipping.
- Can I flip an image more than once?
Yes, you can flip an image multiple times. If you flip an image horizontally and then vertically, it will return to its original orientation, but you can experiment with various combinations for different effects.
Conclusion
Mirroring images in PowerPoint is a simple yet effective tool that can enhance the visual appeal and symmetry of your slides. Whether you use it to create balance, emphasize a point, or add creativity, the flip options and rotation tools in PowerPoint provide all the flexibility you need to achieve the desired effect. Remember to avoid common mistakes like distorting the image or misaligning it with other elements, and use mirroring sparingly to keep your presentation fresh and professional. By following the steps outlined in this guide, you’ll be able to create more polished and engaging presentations that capture your audience’s attention.

 admin
admin


