Procreate is an excellent digital art tool, offering powerful features for both beginners and professionals. One of the essential functions you'll frequently use is the ability to select parts of an image. This allows you to isolate certain areas for editing, coloring, or transforming without affecting the rest of your artwork. Whether you're cropping, blending, or applying effects, understanding how to effectively select parts of an image in Procreate is crucial. Let’s dive into how you can easily master this feature for a seamless art creation experience.
Getting Started with Procreate Tools

Before you can start selecting parts of an image in Procreate, it’s important to familiarize yourself with the tools available. Procreate offers a range of brushes, editing features, and selection tools that will help you work efficiently. Here's a quick rundown of essential tools for selection:
- Brush Tool: Primarily for painting, but also useful for adding fine details to selected areas.
- Selection Tool: This is the tool we'll focus on for isolating parts of an image.
- Layer Tool: Layers are key to organizing your work. The selection tool allows you to work within specific layers.
- Transform Tool: Once you select an area, the transform tool can help you resize, rotate, or adjust the selection.
Now that you're familiar with the tools, let’s explore how to use them effectively to select parts of an image.
Using the Selection Tool in Procreate

The Selection Tool in Procreate is your go-to tool for isolating sections of your image. It allows you to draw around the area you want to work with and make adjustments without affecting the rest of the artwork. Here's how to use it:
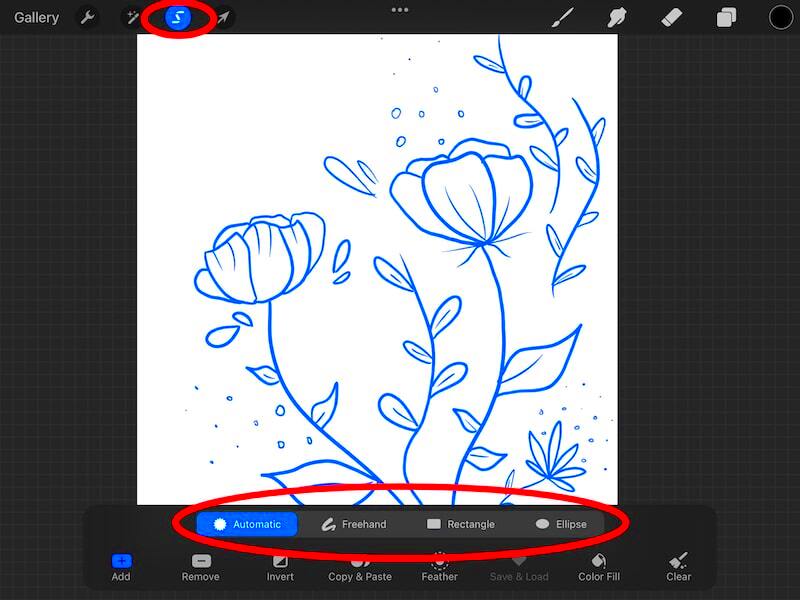
- Activate the Selection Tool: Tap the “S” icon from the top toolbar to activate the selection tool.
- Choose a Selection Mode: Procreate offers several modes for selecting areas, such as Freehand, Rectangle, and Ellipse. Select the mode that suits your needs.
- Draw Your Selection: For the Freehand mode, simply draw around the part of the image you want to select. For the Rectangle and Ellipse modes, tap and drag to create your selection.
- Refine Your Selection: Once you've made your selection, you can fine-tune it. Procreate offers handles that you can use to adjust the selection’s size or shape.
- Apply Changes: After selecting your area, you can apply changes such as coloring, transforming, or duplicating.
Mastering the Selection Tool will speed up your workflow, making it easier to edit and enhance specific parts of your artwork in Procreate.
Understanding Different Selection Modes
Procreate offers multiple selection modes, each designed for specific tasks, so it's important to know which one to choose depending on what you're working on. Each mode gives you different ways to isolate parts of your artwork for better editing and manipulation. Here’s a breakdown of the selection modes you’ll encounter in Procreate:
- Freehand: The most flexible selection mode. You can draw a custom shape around the area you want to select. It’s perfect for irregular shapes or when you need to make precise, curved selections.
- Rectangle: If you need a clean, straight-edged selection, the rectangle mode is your best choice. Simply tap and drag to create a rectangular selection, useful for cropping or isolating geometric areas.
- Ellipse: Like the rectangle mode, but for rounded selections. It’s perfect for selecting oval or circular areas in your design.
- Automatic: This mode allows you to select areas based on color or brightness. Simply tap on the color you want to isolate, and Procreate will automatically select all connected pixels with a similar color.
Each of these modes is suited for different editing needs. You can switch between them depending on whether you need sharp, clean edges or a free-form selection to capture more complex areas. Understanding how and when to use each mode will help you streamline your workflow in Procreate.
Adjusting the Selection Area in Procreate
Once you’ve made a selection in Procreate, the next step is often to refine it. Procreate gives you the flexibility to adjust the selected area, making sure it perfectly fits your needs. Here’s how to adjust the selection area:
- Resize: After making a selection, tap the “Adjust” icon (the four-way arrow). You can drag the corners or edges of your selection to resize it.
- Move: To reposition your selection, tap and hold inside the selected area, then drag it to the desired location.
- Invert: If you need to select everything except the chosen area, Procreate allows you to invert the selection. Tap the “Invert” button from the selection menu to do this.
- Expand or Contract: If you need to make the selection slightly larger or smaller, use the "Expand/Contract" option to adjust the selection's boundaries by a few pixels.
With these adjustment tools, Procreate gives you full control over your selections, whether you’re refining a small detail or adjusting the entire area for further editing. Fine-tuning selections can make a big difference in how clean and polished your artwork looks.
Working with the Freehand and Automatic Selection Options
Procreate’s Freehand and Automatic selection modes offer different ways to select parts of an image based on your needs. Understanding how to use each of these options will help you achieve better results. Let’s look at how to work with both of them:
- Freehand Selection: This mode is ideal when you need a precise, custom selection. To use it, select the “Freehand” mode from the selection tool, then draw around the area you want to isolate. The beauty of this tool is that you can create organic, non-linear selections that fit irregular shapes. If you make a mistake, you can undo and retry the selection until it’s just right.
- Automatic Selection: The Automatic mode is perfect when you need to select areas based on color or brightness. Tap on the part of the image you want to select, and Procreate will automatically choose all connected pixels that share similar characteristics. You can adjust the sensitivity of the selection by dragging the threshold slider, giving you control over how wide or narrow the selection is.
Both of these options have their strengths, and you can switch between them depending on your project’s needs. The Freehand mode gives you total flexibility, while the Automatic mode saves you time when working with solid areas of color. Experiment with both to find which suits your workflow best.
Refining Your Selection for Better Results
Refining your selection in Procreate is an important step to ensure that you achieve the best possible result. While the initial selection might be good, small adjustments can make a huge difference in precision and quality. Procreate gives you a variety of tools and options to fine-tune your selection and make it more accurate. Here’s how to refine your selection:
- Feathering: Feathering softens the edges of your selection, creating a smoother transition between the selected and non-selected areas. You can adjust the feathering effect to your liking by dragging the slider to increase or decrease the effect.
- Expand and Contract: If your selection is too small or too large, use the expand and contract options. These tools help you adjust the selection area by a small number of pixels, which can be useful for fitting the selection perfectly into your desired area.
- Adjust the Threshold: In Automatic selection mode, adjusting the threshold lets you control how similar the colors or tones have to be to be included in the selection. This is useful for selecting areas with gradients or subtle color shifts.
- Modify with Transform Tool: After making a selection, you can use the transform tool to rotate, scale, or distort your selection to better fit your design needs.
Refining your selection ensures that the final result is sharp, precise, and looks polished. With Procreate’s options for fine-tuning, you can easily take your selections to the next level, whether you’re working on complex artwork or simpler designs.
FAQ
Here are some frequently asked questions to help clarify any doubts you might have when using the selection tool in Procreate:
- Can I select multiple areas at once? Yes, you can select multiple areas in Procreate by creating separate selections and working with each one individually. However, you cannot combine selections directly without using layer options.
- How do I deselect a selection? To deselect an active selection, simply tap the screen outside of the selection area or press the "Selection" button again to cancel the active selection.
- Can I select a part of an image and copy it? Absolutely! After selecting an area, you can cut, copy, or duplicate the selection by using the transform tool or by pasting it onto a new layer.
- How do I improve my selection accuracy? Use the zoom feature for more precise control, especially when making freehand selections. Also, adjusting the threshold in Automatic selection mode can help improve accuracy for complex color selections.
- What if my selection doesn’t look perfect? Don’t worry! You can always refine the selection using the feathering, expand/contract, or transform tools until it looks just right.
Conclusion on Selecting Part of an Image in Procreate
Learning how to select parts of an image in Procreate is an essential skill that opens up endless creative possibilities. Whether you’re isolating areas to adjust colors, resize sections, or transform specific parts of your artwork, mastering the selection tool will make your work more efficient and precise. From the freehand selection to automatic color-based selection, Procreate gives you the flexibility to work with your images in any way you see fit.
Refining your selections through feathering, adjusting the threshold, and using the transform tool further enhances the control you have over your design. And with a little practice, you’ll become faster and more accurate in selecting parts of your images, making your overall workflow smoother.
With these tips and techniques in mind, you’ll be able to create clean, professional-looking artwork every time. Don’t be afraid to experiment with different selection modes and adjustment tools to see what works best for you. Happy creating!

 admin
admin


