Resizing images is a common task in image editing, and GIMP makes it simple. Whether you're preparing images for a website, social media, or print, knowing how to resize them effectively can improve your workflow and enhance your projects. In this guide, we'll explore the essentials of resizing
Understanding Image Resolutions and Sizes

Before diving into the resizing process, it's important to grasp a few key concepts related to image resolution and size:
- Image Resolution: This refers to the amount of detail an image holds, typically measured in pixels per inch (PPI). Higher resolutions mean more detail.
- Image Size: This indicates the dimensions of the image, usually expressed in width and height (e.g., 1920x1080 pixels).
- File Size: This represents the amount of storage space an image occupies, often measured in kilobytes (KB) or megabytes (MB).
When resizing, it's essential to balance these factors. Reducing the resolution or dimensions can decrease file size, but it may also impact image quality. Keep your target platform in mind, as different uses may require specific resolutions.
Also Read This: See How to Sell Vector Art on Shutterstock
Steps to Resize Images in GIMP

Follow these simple steps to resize images effectively in GIMP:
- Open Your Image: Launch GIMP and open the image you want to resize by clicking on File and selecting Open.
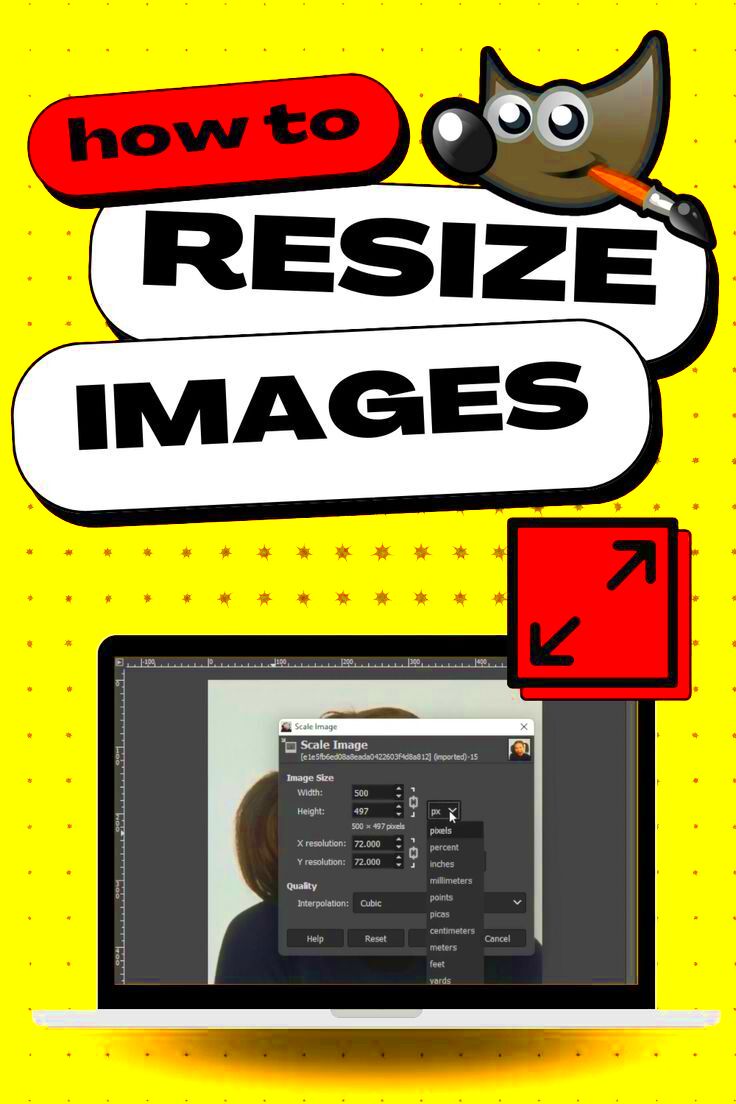
- Access the Scale Tool: Go to the menu and click on Image, then select Scale Image.
- Adjust Image Dimensions: In the Scale Image dialog, enter your desired width and height. Make sure to maintain the aspect ratio by clicking the chain icon next to the dimensions.
- Select Quality Options: Choose the quality settings that suit your needs. Higher quality may result in a larger file size.
- Apply Changes: Once you've made your adjustments, click Scale to apply the changes.
- Save Your Resized Image: Don’t forget to save your work! Click on File and then Export As to save the resized image in your desired format.
With these steps, you'll be able to resize images in GIMP quickly and efficiently. Practice makes perfect, so try resizing different images to get comfortable with the process.
Also Read This: How to Upload Photos to Google Images via Dailymotion
Using the Scale Image Feature
The Scale Image feature in GIMP is a powerful tool that allows you to resize images with precision. It’s user-friendly and packed with options, making it perfect for both beginners and experienced users. To access this feature, simply go to the Image menu and select Scale Image. This will open a dialog box where you can make all the necessary adjustments.
Here are the key options available in the Scale Image dialog:
- Width and Height: Enter your desired dimensions here. You can change the units (pixels, inches, etc.) using the drop-down menu.
- Aspect Ratio: To maintain the image's original proportions, make sure the chain icon is linked. If you unlock it, you can change the width and height independently.
- X and Y Resolution: These settings control the quality of your image. Higher values mean better quality but larger file sizes.
- Interpolation: This option affects how the image is resized. For best results, choose Cubic for a smoother look or NoHalo for images with sharp edges.
After adjusting your settings, simply click Scale to apply. With the Scale Image feature, you have the flexibility to resize images exactly how you need, ensuring they fit perfectly in your projects.
Also Read This: Discover and Utilize Culturally Inclusive Photos on Imago Images for Your Brand
Maintaining Image Quality When Resizing
Maintaining image quality during resizing is crucial, especially if you're working with high-resolution images or if your final output will be in print. Here are some tips to help you keep the quality intact:
- Use Higher Resolutions: Start with images that have higher resolutions. This gives you more flexibility when resizing down.
- Maintain Aspect Ratio: Always keep the aspect ratio locked to prevent distortion. This helps in preserving the image's natural look.
- Choose the Right Interpolation Method: As mentioned earlier, GIMP offers various interpolation methods. Using Cubic or Sinc (Lanczos3) generally results in better quality.
- Sharpen After Resizing: Sometimes, resizing can soften details. Consider applying a gentle sharpening filter after resizing to enhance clarity.
By following these steps, you can resize images without sacrificing quality. Remember, the goal is to get the right size while keeping your images looking their best.
Also Read This: Burn a CD from YouTube with This Step-by-Step Guide
Batch Resizing Images in GIMP
Batch resizing in GIMP is a fantastic way to save time, especially if you have multiple images to adjust. Instead of resizing each image individually, you can apply the same size settings to a batch of images all at once. Here's how to do it:
- Install the BIMP Plugin: First, download and install the BIMP (Batch Image Manipulation Plugin) for GIMP. This tool is essential for batch processing.
- Open BIMP: Once installed, open GIMP and go to File, then select Batch Image Manipulation....
- Add Images: Click on Add Images to select the images you want to resize. You can choose multiple files at once.
- Add the Resize Action: In the BIMP dialog, click on Add, then choose Resize. Here, you can set your desired width and height.
- Choose Output Options: Select your preferred output format and location for the resized images.
- Start the Batch Process: Finally, click on Apply to start resizing all selected images. GIMP will process them according to your settings.
This method is incredibly efficient and can significantly speed up your workflow, especially for projects that require consistent image sizes. Give it a try and see how easy batch resizing can be!
Also Read This: How to Upload Videos Longer Than 60 Minutes on Dailymotion
Common Issues and Troubleshooting Tips
While resizing images in GIMP is usually straightforward, you may encounter some common issues. Let’s explore these problems and how to solve them effectively.
- Image Quality Loss: If you notice your resized image looks blurry or pixelated, it might be due to a low-resolution source image. Always start with the highest resolution possible. If you're resizing down, be sure to select the right interpolation method to maintain quality.
- Incorrect Aspect Ratio: Sometimes, images may appear stretched or squished. This usually happens when the aspect ratio is not locked during resizing. To fix this, ensure the chain icon next to the width and height fields is linked in the Scale Image dialog.
- File Size Issues: After resizing, your image may still be too large for your needs. If you want to reduce the file size, consider saving it in a different format (like JPEG for photos) or adjusting the quality settings during export.
- Batch Resizing Errors: If you're using the BIMP plugin and it doesn't process your images correctly, double-check your settings. Make sure you’ve added the images properly and that the resizing action is configured correctly.
If you face any other issues, searching online forums or GIMP documentation can provide additional solutions. Troubleshooting can sometimes lead you to discover new features and tips you weren’t aware of!
Also Read This: How to Create Stunning Photo Videos with Music for YouTube
Conclusion
Resizing images in GIMP is a vital skill for anyone working with digital media. Whether you’re preparing images for a website, social media, or print, mastering this process can significantly enhance your workflow. Remember to pay attention to image quality, resolution, and the tools available to you in GIMP. With practice, you'll become more comfortable and efficient in resizing images while maintaining their visual appeal. So, dive into GIMP and start resizing your images with confidence!
FAQs about Resizing Images in GIMP
Here are some frequently asked questions regarding resizing images in GIMP to help you troubleshoot and enhance your understanding:
- Can I resize images without losing quality? Yes, as long as you start with a high-resolution image and use the appropriate settings in GIMP, such as the right interpolation method.
- What is the best format for saving resized images? It depends on the use case. JPEG is ideal for photographs, while PNG is great for images needing transparency.
- How do I maintain the aspect ratio when resizing? Keep the chain icon linked in the Scale Image dialog to automatically adjust the height and width together.
- Is it possible to resize multiple images at once? Yes, you can use the BIMP plugin for batch resizing, allowing you to apply the same settings to multiple images simultaneously.
- What should I do if my image looks stretched after resizing? Make sure you locked the aspect ratio when resizing. If it’s already stretched, you may need to revert to the original and resize again correctly.
If you have more questions or need assistance, the GIMP community and forums are great resources for support!

 admin
admin


