Adding images to comment boxes in Excel can enhance your spreadsheets by providing visual context to the data. This feature is particularly useful for adding logos, diagrams, or other graphics that can clarify your information. In this guide, we will walk through the steps needed to insert an image into a comment box, ensuring your Excel documents look professional and engaging.
Understanding Comment Boxes in Excel

Comment boxes in Excel are useful tools for providing additional information about specific cells. When you hover over a cell with a comment, a small box appears, displaying your notes. Here are some key points about comment boxes:
- Purpose: They allow you to annotate data without cluttering the spreadsheet.
- Visibility: Comments can be hidden or displayed, making them flexible for users.
- Collaboration: They are great for teamwork, as they let you leave feedback for others.
- Customization: You can format comments by changing their size, color, and font.
By inserting images, you can take your comments a step further, making them even more informative and visually appealing.
Also Read This: Tips and Tricks to Make Money Online Through Dailymotion
Preparing Your Image for Insertion
Before you insert an image into an Excel comment box, it's important to prepare the image properly. Here are some steps to follow:
- Choose the Right Image: Select an image that is relevant to your data. This could be a chart, logo, or any graphic that enhances understanding.
- Resize the Image: Make sure your image is not too large. Excel comment boxes are relatively small, so consider resizing the image to fit well within the box. A common size is around 100x100 pixels.
- Format the Image: Use image editing software to adjust the brightness, contrast, or cropping as needed. Ensure the image is clear and easy to understand.
- Save the Image: Save your image in a common format such as .png or .jpg for easy insertion. Make sure to note the location where you save the image, as you'll need to find it later.
By following these steps, you'll ensure that the image you insert looks professional and integrates well into your Excel comments.
Also Read This: Can You Livestream on Dailymotion? Everything You Need to Know
Inserting an Image into a Comment Box
Now that you've prepared your image, it's time to insert it into your Excel comment box. This process is straightforward and will help make your data more engaging. Here’s how to do it:
- Select the Cell: Click on the cell where you want to add a comment. This is the location where the comment will be linked.
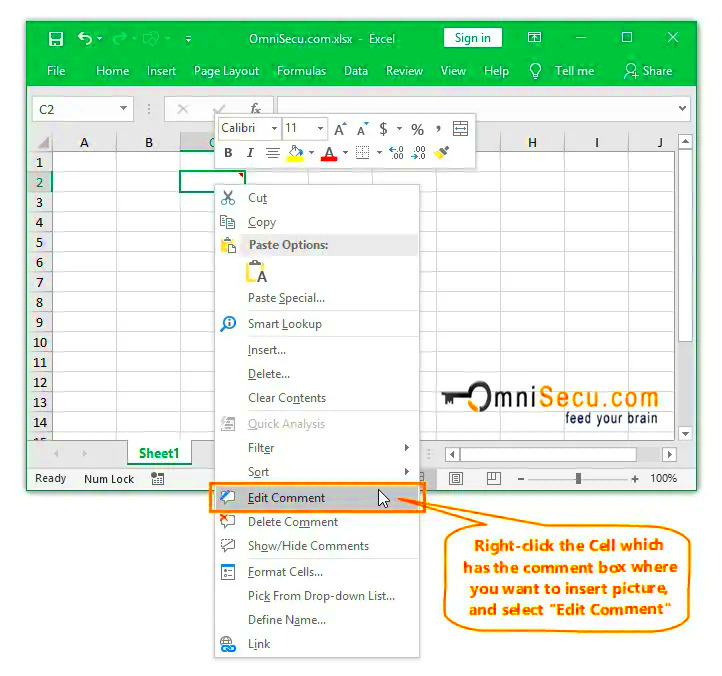
- Add a Comment: Right-click the selected cell and choose "Insert Comment" (or "New Note" in newer versions). A comment box will appear.
- Format the Comment Box: Resize the comment box if needed by dragging the edges to make space for the image.
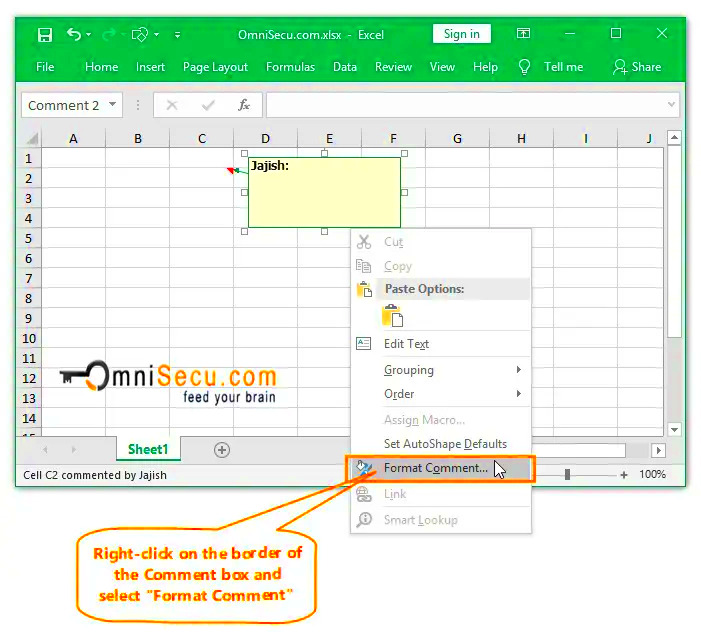
- Insert the Image: Right-click inside the comment box and choose “Format Comment.” Click on the “Colors and Lines” tab, then select “Fill Effects.” Here, you can choose “Picture” and then click “Select Picture.” Browse to find your prepared image and insert it.
- Adjust the Comment Box: Once the image is inserted, you might need to adjust the size of the comment box again to ensure the image fits nicely.
And just like that, you've added a visual element to your comment box, enhancing the information in your Excel sheet!
Also Read This: Are iStock Video Previews Equal in Quality to Purchased Videos
Resizing and Formatting the Image
After inserting your image, you may want to resize and format it to fit better within the comment box. Here are some tips:
- Resize the Image: To resize the image within the comment box, click on the image and use the corners to adjust its dimensions. Hold the Shift key while resizing to maintain the image's aspect ratio.
- Positioning: Make sure the image is centered or aligned according to your preference. This will make the comment visually appealing.
- Formatting Options: Right-click the comment box and choose “Format Comment” to access various formatting options. You can adjust the border style, add shadows, and change the background color.
- Test Visibility: Hover over the cell to ensure the image is clearly visible and not too cluttered. Adjust the size if necessary for optimal viewing.
With these adjustments, your image will enhance the comment box and provide clearer context for your data.
Also Read This: Is Storyblocks Footage Available in 24p Format for Video Projects
Saving Your Changes in Excel
After you've inserted and formatted your image, it’s essential to save your changes to avoid losing your work. Here’s how to do it effectively:
- Save Your Workbook: Click on “File” and then “Save” or simply use the shortcut Ctrl + S to save your changes. This ensures all your work, including the new images, is stored securely.
- Check File Format: If you plan to share your Excel file, make sure to save it in a compatible format, like .xlsx, which preserves all your comments and images.
- Backup Your Work: Consider creating a backup by saving a copy of your workbook. This is helpful if you’re working on important documents or making significant changes.
- Review Comments: Before finalizing, hover over your comment boxes to ensure everything looks good. This is a good time to double-check that your images are clear and properly formatted.
By saving your changes regularly, you’ll protect your work and ensure that your enhanced Excel comments are ready for presentation or sharing.
Also Read This: Can You Edit LinkedIn Posts and Messages?
Troubleshooting Common Issues
Sometimes, adding images to comment boxes in Excel can come with a few hiccups. Don’t worry; these issues are usually easy to fix. Here are some common problems you might encounter and how to resolve them:
- Image Not Appearing: If the image does not show up in the comment box, check if the image file is supported. Excel typically accepts formats like .jpg and .png. If the image is in a different format, consider converting it.
- Image Looks Blurry: Blurriness often happens if the image is resized too much. Ensure you start with a high-resolution image, and resize it carefully while maintaining the aspect ratio.
- Comment Box Size Issues: If the comment box is too small, you might not see the image clearly. Click on the edges of the comment box and drag to resize it. Ensure it accommodates the image comfortably.
- Image Not Centered: If your image is not positioned correctly, right-click on the comment box and choose "Format Comment." Use the formatting options to adjust the layout or alignment of your image.
- Excel Freezes or Crashes: If Excel becomes unresponsive after inserting an image, it might be due to a large file size. Try restarting Excel or reducing the image size before inserting it again.
By knowing these common issues and their fixes, you can make the process of adding images to Excel comments smoother.
Also Read This: Is YouTubing a Viable Career Choice for the Future
FAQs
Here are some frequently asked questions that can help clarify your doubts about inserting images into Excel comment boxes:
- Can I insert multiple images into one comment box? No, Excel only allows one image per comment box. If you need to add more visuals, consider creating additional comment boxes linked to different cells.
- What is the maximum size of an image I can insert? While there is no strict maximum size, keeping images under 1 MB is a good practice to ensure quick loading and smooth performance.
- Will my images show up when I share my Excel file? Yes, images inserted into comment boxes will appear when you share the file, as long as it is saved in a compatible format like .xlsx.
- How can I remove an image from a comment box? Right-click the comment box, select “Format Comment,” go to the “Colors and Lines” tab, and then click on “No Fill” to remove the image.
- Can I add text to my image in the comment box? Unfortunately, you cannot directly add text on the image within the comment box. You can add a caption by typing in the comment box before or after inserting the image.
These FAQs should help clarify your queries and guide you in using images effectively in Excel comments.
Conclusion
Inserting images into comment boxes in Excel is a simple yet effective way to enhance your spreadsheets. It allows you to provide visual context and makes your data more engaging and informative. By following the steps outlined in this guide, you can easily add images, resize and format them, and troubleshoot any issues that arise.
Remember, preparation is key. Choose the right images, ensure they are formatted correctly, and save your changes frequently. If you encounter any issues, the troubleshooting tips and FAQs can help you resolve them quickly. With practice, you’ll become proficient at enhancing your Excel comments with images, making your presentations and reports stand out.
So go ahead and start incorporating images into your Excel comments to make your data more visually appealing and easier to understand!

 admin
admin


