Full image printing is all about getting your pictures to cover the entire page without leaving any unsightly white borders. It’s a popular choice for photographers and artists who want their work to make a big impact. Whether you’re printing for a gallery display, creating a portfolio, or simply showcasing your favorite memories, understanding how to achieve this is essential.
When you print an image, it’s crucial to know the difference between standard printing and full bleed printing. Standard printing leaves a margin around the edges, while full bleed printing extends the image to the edge of the paper. To accomplish this, you must consider various factors like image resolution, printer capabilities, and paper size.
In the next sections, we’ll dive deeper into the importance of eliminating white borders and how to prepare your images for the best results.
Importance of Eliminating White Borders

White borders can significantly detract from the visual appeal of your images. Here’s why it’s essential to eliminate them:
- Professional Appearance: Images without borders look more polished and professional, making them suitable for displays, portfolios, and client presentations.
- Enhanced Focus: Removing borders helps draw attention to the image itself, allowing viewers to engage with the content without distractions.
- Increased Impact: Full bleed images create a more immersive experience, making your work stand out in galleries and exhibitions.
- Consistency: If you’re printing multiple images, keeping a consistent look by eliminating borders creates a cohesive display.
Also Read This: How to Download a Full Resolution Photo from Adobe Stock
Preparing Images for Printing
Before you hit print, there are several steps you need to take to ensure your images are ready:
- Choose the Right Resolution: Aim for a resolution of at least 300 DPI (dots per inch) for sharp and clear prints.
- Adjust the Image Size: Make sure your image dimensions match the size of the paper you plan to use. It’s often helpful to add extra space around the edges to allow for cropping.
- Use Color Profiles: Utilizing the correct color profile ensures that the colors in your print match what you see on your screen. Adobe RGB is commonly recommended for printing.
- Check Your Borders: If you want a true full bleed print, ensure that your image extends slightly beyond the paper size to account for trimming.
Taking these steps will set you on the right path to achieving stunning full image prints. Next, we will look into choosing the right printer settings to further enhance your printing process.
Also Read This: How to Cancel Adobe Stock Subscription: A Step-by-Step Guide
Choosing the Right Printer Settings
Selecting the right printer settings is crucial for achieving high-quality full image prints. Many printers offer various options that can greatly impact the final output, so it’s important to know how to adjust them to your advantage. Taking a moment to explore these settings can save you time and frustration later.
Here are some key settings to consider:
- Print Quality: Choose a high-quality setting, such as "Best" or "Photo," to ensure vibrant colors and sharp details.
- Paper Type: Match the printer’s paper setting to the type of paper you’re using (e.g., glossy, matte, fine art) for optimal results.
- Color Management: Opt for "Printer Manages Colors" if you’re using a color profile; otherwise, choose "Computer Manages Colors" for more control over the output.
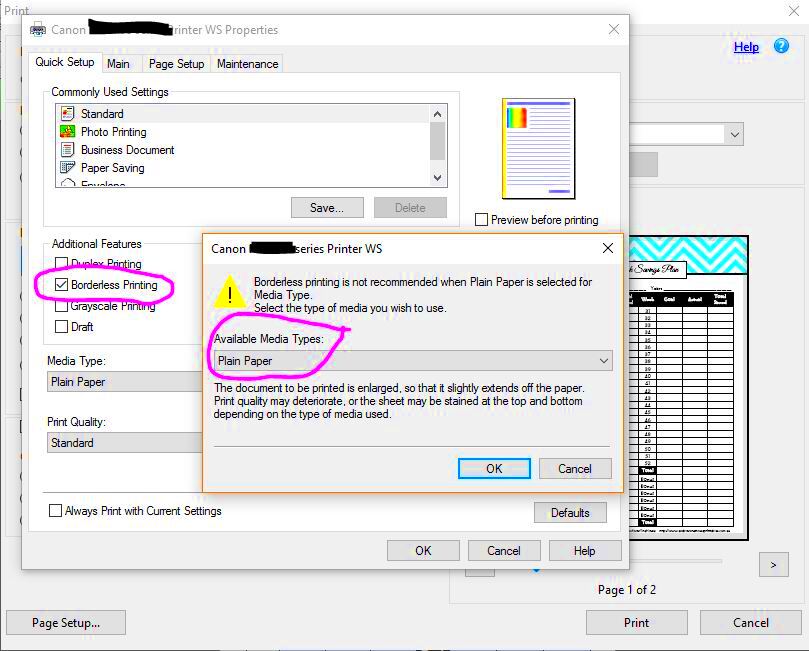
- Borderless Printing: If your printer supports it, enable the borderless printing option to ensure your image covers the entire page.
By adjusting these settings, you can achieve prints that truly reflect the quality of your images. Don’t forget to run a test print to check how everything looks before committing to larger prints.
Also Read This: How to Create an Outline for an Image in Canva
Using Quality Paper for Best Results
The type of paper you use plays a significant role in the quality of your prints. High-quality paper not only enhances the colors and details of your images but also ensures durability and a professional finish. Here are some options to consider:
| Paper Type | Best For | Finish |
|---|---|---|
| Glossy | Photos with vibrant colors | Shiny and reflective |
| Matte | Fine art prints | Smooth and non-reflective |
| Textured | Artistic prints | Textured feel for depth |
| Canvas | Gallery-style prints | Sturdy and artistic |
When selecting paper, look for options specifically designed for photo printing, as these will yield the best results. Investing in quality paper pays off by enhancing the overall appearance of your prints and making them last longer.
Also Read This: How to Make Sales in Adobe Stock
Techniques for Cropping Images
Cropping is a vital part of preparing your images for full bleed printing. The right crop can enhance composition, focus attention, and eliminate unwanted distractions. Here are some effective techniques to consider:
- Use the Rule of Thirds: Divide your image into a 3x3 grid and position key elements along these lines or at their intersections for a balanced composition.
- Maintain Aspect Ratio: Keep the original aspect ratio while cropping to avoid distortion. This is especially important if you're working with specific print sizes.
- Consider Negative Space: Don’t be afraid to leave empty space in your images. It can draw attention to your subject and create a more dynamic composition.
- Preview Before Finalizing: Always preview your cropped image at print size to ensure that important details aren’t cut off and the composition feels right.
By mastering these cropping techniques, you can ensure your images are not only ready for full bleed printing but also visually striking. In the following sections, we will discuss common issues you may encounter during the printing process.
Also Read This: How to Use Oil Paints on Canvas for Stunning Art
Common Issues with Full Image Printing
When it comes to full image printing, several common issues can arise that may impact the quality of your prints. Understanding these problems can help you troubleshoot effectively and ensure a smooth printing process. Let’s take a closer look at some frequent challenges and how to overcome them.
- Color Mismatch: One of the most frustrating issues is when the printed colors don't match what you see on your screen. This often occurs due to differences in color profiles. To avoid this, always use the same color profile for both your monitor and printer.
- Incorrect Sizing: If your image is not sized properly, you may end up with unwanted borders or cropped elements. Double-check your image dimensions and make sure they match your paper size before printing.
- Low Resolution: Printing low-resolution images can lead to pixelation. Always use high-resolution files (300 DPI or more) to maintain clarity and detail in your prints.
- Paper Jams: Sometimes, printers can jam when using thicker paper. Ensure that your printer is compatible with the type of paper you’re using and adjust the paper tray accordingly.
By being aware of these common issues, you can take proactive steps to prevent them, leading to successful full image prints that meet your expectations.
Also Read This: How to Add an Outline to an Image in Canva
FAQ about Printing Full Images
It’s common to have questions about full image printing, especially if you're new to the process. Here are some frequently asked questions that might help clarify your doubts:
- What is full bleed printing? Full bleed printing means that the image covers the entire page, with no white borders.
- Can I print full bleed on any printer? Not all printers support full bleed printing. Check your printer's specifications to see if it offers this feature.
- What type of paper is best for full image printing? Glossy and matte photo paper are popular choices for vibrant and professional results.
- How do I know if my image is ready for printing? Ensure your image has a resolution of at least 300 DPI and matches your desired print size.
If you have any other questions not covered here, don’t hesitate to explore forums or reach out to printing professionals for advice.
Conclusion on Printing Full Images
Printing full images without borders can elevate the presentation of your photography or artwork. By understanding the process and taking the necessary steps, you can achieve stunning results that truly showcase your vision. From selecting the right printer settings and quality paper to mastering cropping techniques, each aspect contributes to the overall quality of your prints.
Remember to troubleshoot common issues and consult FAQs when you encounter challenges. With practice and attention to detail, you'll be able to create beautiful, impactful prints that captivate viewers. So gather your best images, prepare them carefully, and enjoy the satisfaction of seeing your work come to life on paper!

 admin
admin


