Practicing how to print a bunch of photos on one page helps you reduce your paper usage and also get creative with the layout. If you need a project to flaunt, a collage of photos or just save some space; then combining
images is a skill that comes in handy. Below are simple ways and ideas to enable you print four pictures at once without much hassle. Choosing suitable pictures and setting everything correctly will be our next topics of discussion as we try to find the best option.
Choosing the Right Images for Printing

Printing layout generation is highly reliant on picture selection. Below are some suggestions that would aid in picking them:
- Quality Matters: Ensure that your images are high resolution (at least 300 DPI) to avoid pixelation.
- Relevance: Choose images that relate to the content or theme you want to convey.
- Variety: Mix different types of images, such as portraits, landscapes, or abstract designs, to make your layout more interesting.
- Color Harmony: Consider how the colors of the images work together. Complementary colors can enhance the overall look.
If you want to be sure that your finished print is professional and attractive, you must choose your
images wisely.
Setting Up Your Document for Four Images

Having made choices between
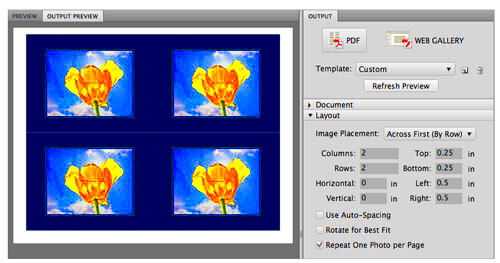
images now is an important moment when you can launch into the layout of your document. If you want to print four pictures on one paper sheet follow these instructions:
- Open Your Software: Start by opening a document in a program like Microsoft Word, Google Docs, or any graphic design software.
- Select Page Size: Choose the appropriate page size, typically A4 or Letter size.
- Create a Grid: Divide the page into four equal sections. You can use guidelines or tables for precision.
- Insert Images: Place your selected images into each section. Adjust the size if necessary, keeping the aspect ratio intact.
- Alignment: Make sure the images are aligned properly within their sections for a neat appearance.
Well, doing your paper right will aid in speeding the printing process and improving its outcome. You’re now prepared to go ahead and modify the dimensions as well as organization of pictures!
Adjusting Image Sizes and Layouts
After positioning your
images, the subsequent task is to vary their sizes and dispositions in order to achieve a professional appearance. It is crucial in this phase that ensures that your
images complement one another without congesting the page. Here are some useful hints:
- Maintain Aspect Ratio: When resizing images, hold the shift key (or select the option in your software) to keep the original proportions. This prevents images from looking stretched or squished.
- Uniform Size: Aim for images of similar dimensions. You can use a ruler or the dimensions provided in your software to ensure consistency.
- Alignment: Use alignment tools to center your images or distribute them evenly across the page. Most software has features like "align left," "align right," and "center" that can be very helpful.
- Spacing: Don’t forget to add some space between the images. A little margin can make a big difference and keeps the layout from looking cluttered.
So taking time to tweak your pictures rightly does make a pro print that really flaunts what you do.
Using Software Tools for Efficient Printing
Quite a number of computer programs exist for this task. The following are some of the most common ones:
| Software | Key Features |
|---|
| Adobe Photoshop | Advanced editing tools, layers, and templates. |
| Canva | User-friendly interface, drag-and-drop features, and pre-made layouts. |
| Microsoft Word | Easy image insertion, basic editing tools, and text options. |
| Google Slides | Collaboration features, easy sharing, and good layout options. |
Printing Options and Settings to Consider
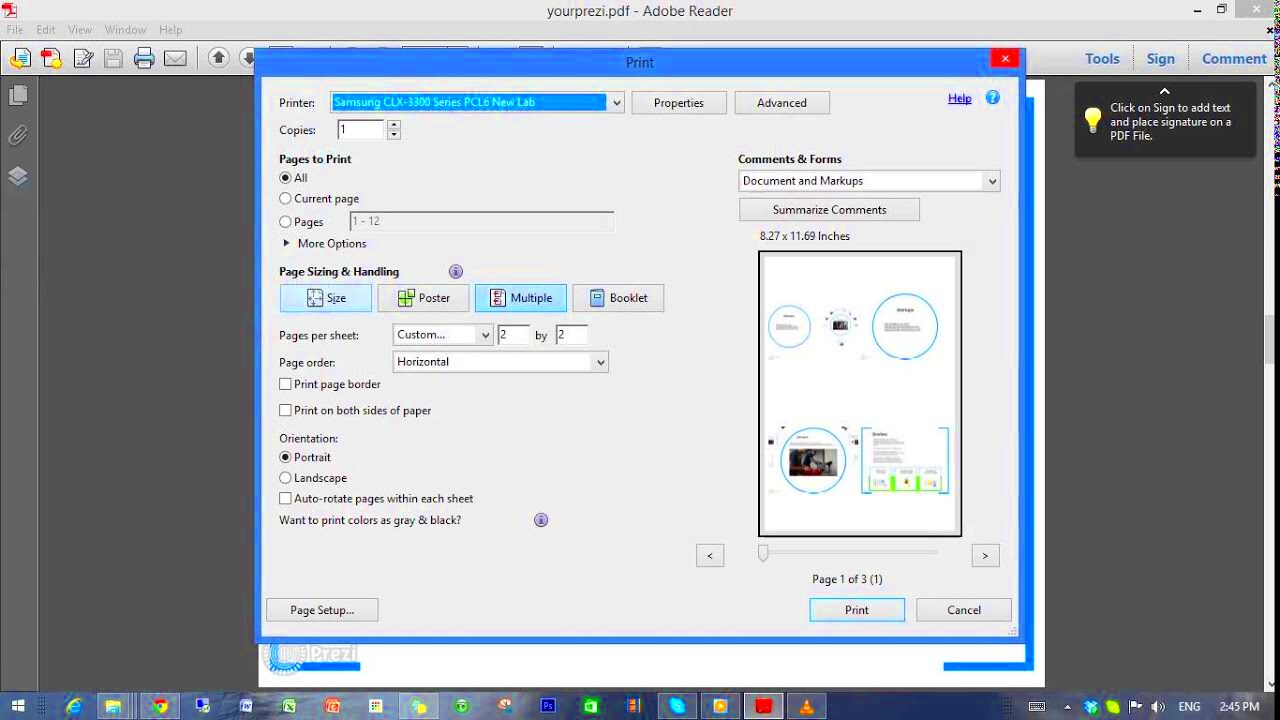
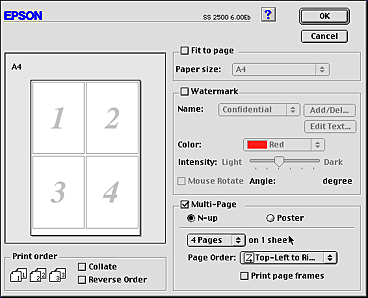
Ultimately, just prior to printing, it is very important for you to configure your printer settings accordingly if you want to get the most pleasing results. The following are some choices and parameters that are worth considering:
- Print Quality: Set your printer to the highest quality setting for the best color and detail.
- Paper Type: Select the type of paper you’re using (e.g., glossy, matte) in the printer settings. This affects how colors appear.
- Color Management: Make sure your color settings match the type of images you’re printing, whether they’re RGB or CMYK.
- Preview Before Printing: Always use the print preview feature to ensure everything looks right before you print. This can help you catch any mistakes.
Setting aside some time for tampering with these settings will help in maintaining the same pristine appearance of your end product as it was on display. With well organized work, you will have perfect prints!
Common Mistakes to Avoid While Printing
Though printing may seem simple at times, it is often riddled with common but avoidable mistakes that could result in disappointing outcomes. Knowing these traps can help one get the best possible printouts. Here are some errors to be wary of:
- Neglecting Image Resolution: Always check that your images are at least 300 DPI for quality prints. Low-resolution images can appear blurry or pixelated.
- Ignoring Color Settings: Failing to adjust color settings can result in unexpected hues. Make sure your images are in the right color mode (RGB for screens and CMYK for print).
- Skipping the Test Print: Always print a test page before printing your final project. This step can save you time and paper by catching issues early.
- Forgetting to Check Printer Ink: Running low on ink can affect print quality. Always ensure your printer has enough ink before starting your project.
- Overlooking Paper Type: Using the wrong paper can drastically change the look of your images. Choose the right paper type for your specific printing needs.
If you can’t avoid these common mistakes your printed
images will not appear as you wanted.
Benefits of Printing Multiple Images on One Page
Printing several images on a single sheet has its own unique benefits that could improve your assignments while conserving resources. Some of the main advantages include:
- Resource Efficiency: Save paper and ink by consolidating images, which is both cost-effective and environmentally friendly.
- Creative Presentation: Combining images allows for creative layouts and collages, making your work visually engaging.
- Easy Comparison: Printing images side by side makes it easier to compare different visuals, which is helpful for presentations and portfolios.
- Enhanced Visual Storytelling: A well-designed page can tell a story or convey a message more effectively than a single image.
- Quick Reference: Grouping images together provides a quick reference for projects, making it easier to review your work at a glance.
Due to several advantages, it’s a reasonable decision to print many photos for diverse undertakings ranging from crafts done at home to business assignments.
FAQs About Printing Multiple Images
Have inquiries regarding printing several pictures on a single page? Here are some of the most frequently asked questions aimed at resolving widespread worries:
- What is the best software for printing multiple images?
Software like Canva, Adobe Photoshop, and Microsoft Word are popular choices, each offering unique features for layout design.
- How can I ensure my images are high quality?
Always check the resolution of your images and ensure they are at least 300 DPI before printing.
- Can I use any type of paper for printing?
While you can use various paper types, choose the right one based on your project, such as glossy for photos or matte for documents.
- Is it necessary to use color management settings?
Yes, proper color management ensures that your printed colors match what you see on your screen.
- What if my printer is out of ink?
If your printer runs low on ink, it’s best to replace the cartridges before printing to avoid poor-quality prints.
You will be more equipped with the necessary skills to print diverse pictures effectively when you address these usual concerns.
Conclusion and Final Thoughts
The ability to print several photographs on one page is an asset which may improve both private and work related assignments. You can produce impressive prints that attract attention by picking the right images, adjusting sizes and layouts, as well as employing appropriate software tools. The whole process will be easy if you avoid usual mistakes, understand the pros of your approach and knowing responses to commonly asked questions. These tips will help you create wonderful results whether it is for a presentation, photo collage or just organizing your imagery. Embrace the art of printing many images at once and see how you realize your imagination through the paper!
 Printing layout generation is highly reliant on picture selection. Below are some suggestions that would aid in picking them:
 Having made choices between images now is an important moment when you can launch into the layout of your document. If you want to print four pictures on one paper sheet follow these instructions:
 admin
admin


