Image resizing is a fundamental skill for anyone working with digital images. It involves adjusting the dimensions of an image, which can be crucial for various reasons. Whether you want to reduce the size for faster loading times on your website, fit a specific space on social media, or enhance the quality for printing, knowing how to resize images is essential.
Here are a few key reasons why image resizing matters:
- Improved Loading Speed: Smaller images load faster, which enhances user experience on websites.
- Better Fit: Resizing allows images to fit perfectly in designated spaces, avoiding awkward cropping.
- Optimized Quality: Adjusting dimensions can help maintain the quality of the image for different platforms.
- Resource Management: Smaller image files take up less storage space, which is especially important for websites and applications.
Getting Started with Microsoft Paint
Microsoft Paint is a straightforward and accessible tool that comes pre-installed on Windows computers. It’s perfect for basic image editing, including resizing. The best part? You don’t need to be a tech wizard to use it!
Before diving into the resizing process, ensure you have the following:
- A Windows computer with Microsoft Paint installed.
- The image you want to resize saved on your computer.
Getting familiar with the Paint interface can make the process smoother. You’ll see options for drawing, coloring, and editing at the top, which are intuitive even for beginners.
Also Read This: How to Add a Description in Behance Writing Engaging Project Summaries
Opening Your Image in Microsoft Paint
Now that you’re ready to start, let’s open your image in Microsoft Paint. Follow these simple steps:
- Click on the Start menu at the bottom left of your screen.
- Type Paint in the search bar and hit Enter.
- Once Paint is open, click on File in the top left corner.
- Select Open from the dropdown menu.
- Browse your files and select the image you want to resize. Click Open.
Congratulations! Your image should now be displayed in Microsoft Paint, and you’re ready to start resizing. The interface is user-friendly, making it easy to navigate through the available options.
Also Read This: The Best Camera Gear for Travel Photography
How to Resize Images in Microsoft Paint
Resizing images in Microsoft Paint is a simple process, and you’ll be surprised at how quickly you can master it. Once you have your image open in Paint, follow these steps to resize it:
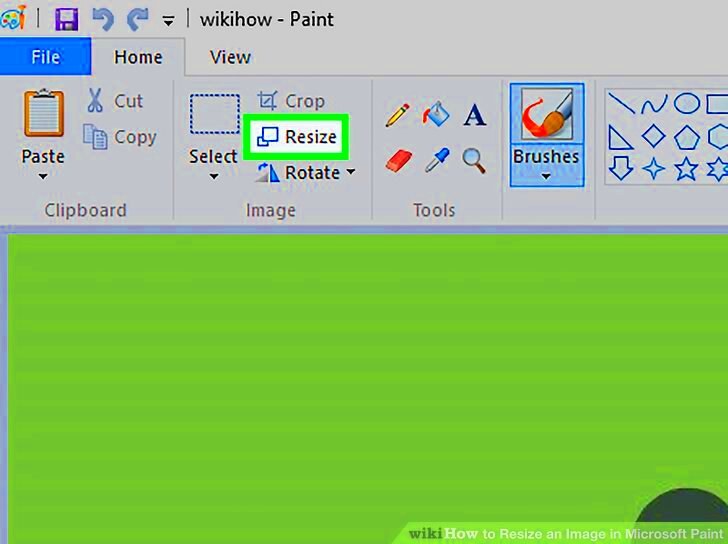
- Click on the Resize button in the toolbar, which you can find under the Home tab.
- A dialog box will appear with two options: Percentage and Pixels. Choose the one that suits your needs.
- If you select Percentage, you can enter a value that represents how much you want to reduce or enlarge the image. For example, entering 50 will reduce the image size by half.
- If you opt for Pixels, enter the desired width and height in the respective boxes. Make sure to maintain the aspect ratio by keeping the Maintain aspect ratio checkbox checked.
- Once you’ve entered your preferred size, click OK.
After resizing, you’ll see your image has changed dimensions. You can use the zoom feature to check if it still looks good. Remember, resizing can affect image quality, so it’s wise to preview before saving!
Also Read This: Logo Design in Illustrator Tutorials on Dailymotion
Saving Your Resized Image Correctly
Now that you’ve resized your image, it’s crucial to save it correctly to keep your changes. Here’s how to do it:
- Click on File in the top left corner.
- Select Save As to create a new file, ensuring you don’t overwrite the original image.
- Choose the format you prefer. Common options include:
- JPEG: Good for photos, compresses file size well.
- PNG: Great for images with transparency, maintains quality.
- BMP: Larger files, maintains high quality.
- Name your file and select the destination folder where you want to save it.
- Click Save.
It’s a good idea to keep a backup of your original image just in case you want to try resizing again or need to make further edits.
Also Read This: Making Images Transparent in Google Slides
Common Issues When Resizing Images
While resizing images in Microsoft Paint is straightforward, you may encounter some common issues. Here are a few challenges and how to handle them:
- Loss of Quality: When reducing image size too much, you might notice blurriness or pixelation. To avoid this, try resizing in smaller increments.
- Distorted Images: If the aspect ratio isn’t maintained, your image can look stretched or squished. Always ensure the Maintain aspect ratio option is checked.
- Not Enough Space: If you’re trying to save an image in a folder that’s full, you’ll get an error message. Make sure you have enough storage space.
- Wrong Format: Sometimes, the file format may not support certain features like transparency. Choose the right format for your needs.
By being aware of these potential issues, you can navigate the resizing process more smoothly and achieve the desired results without frustration.
Also Read This: Step-by-Step Guide to Applying Lipstick Perfectly with Dailymotion
Alternative Tools for Resizing Images
While Microsoft Paint is a great option for resizing images, there are many other tools out there that can offer additional features or a different user experience. Depending on your needs, you might find these alternatives useful:
- GIMP: A powerful, free image editor that allows for complex resizing and editing. It supports multiple layers and advanced features, making it a favorite among graphic designers.
- Photoshop: If you’re looking for a professional tool, Adobe Photoshop is the industry standard. It offers comprehensive resizing options, along with advanced editing tools, but it comes with a subscription fee.
- Canva: This online platform is user-friendly and great for resizing images for social media. It offers templates and design elements, making it perfect for non-designers.
- PicResize: An online tool that allows you to resize images quickly. You just upload your image, choose the size, and download the resized version without installing software.
- Fotor: Another online editor that lets you resize and edit images easily. It has a clean interface and various features, including templates and design tools.
Each tool has its own strengths, so consider what features are most important to you. Whether you need a quick resize or more complex editing, there’s an option out there to meet your needs!
Also Read This: How to Block YouTube on a School Chromebook
Frequently Asked Questions
As you dive into resizing images, you might have some questions. Here are a few frequently asked questions that can help clear up any confusion:
- Can I resize an image without losing quality?
- It’s possible to resize an image without losing quality by keeping the original dimensions and simply saving a copy. However, reducing size too much can lead to loss of quality.
- What’s the best format to save resized images?
- It depends on your needs. JPEG is great for photos, while PNG is ideal for images needing transparency. Choose BMP for high-quality images, although they are larger in size.
- Is there a way to batch resize images?
- Yes! Some tools like GIMP and Photoshop allow batch resizing, letting you adjust multiple images at once. Online tools like BulkResizePhotos also offer this feature.
-
CONCLUSION
- In conclusion, mastering image resizing is essential for anyone dealing with digital images, as it directly impacts loading speeds, visual quality, and resource management. Whether using Microsoft Paint or exploring alternative tools like GIMP, Photoshop, or online platforms, the ability to resize images effectively enhances user experience and ensures images fit designated spaces perfectly. By understanding the resizing process and potential pitfalls, users can achieve optimal results while preserving image quality. With practice, resizing images becomes a straightforward task that can greatly benefit various digital projects.
 admin
admin


