PowerPoint is a powerful tool for creating engaging presentations, and one way to enhance your slides is by subtracting images. This technique allows you to create unique visuals by combining and layering images creatively. Subtracting images can help focus your audience's attention and convey your message more effectively. In this post, we will explore how to subtract images in PowerPoint easily, even if you're a beginner.
Understanding the Subtraction Technique in PowerPoint
The subtraction technique in PowerPoint involves removing parts of an image to create new shapes or effects. This method can transform standard images into something visually appealing and tailored to your presentation's theme. Here are some key points to understand:
- Overlaying Images: By placing one image over another, you can select which parts to keep and which to remove.
- Using Shapes: PowerPoint allows you to use various shapes to define the area you want to subtract from the image.
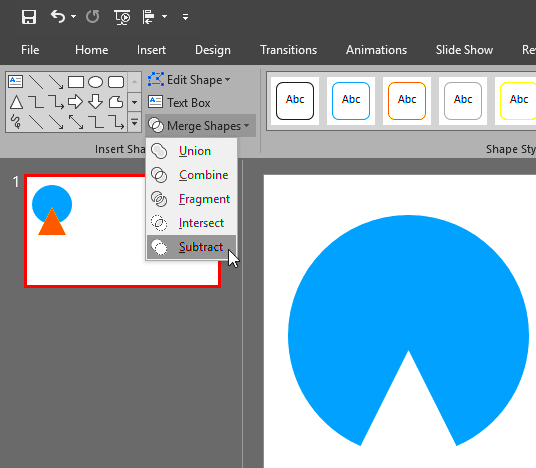
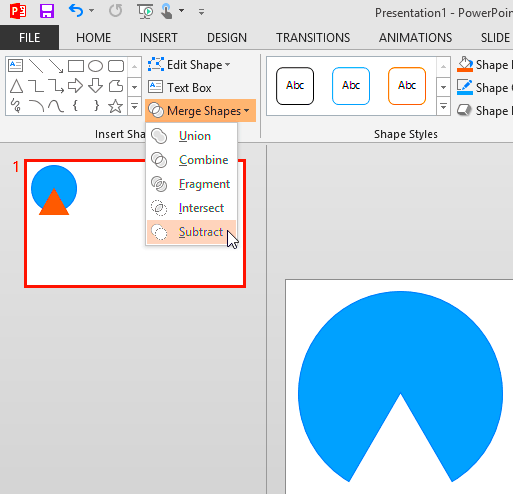
- Editing Tools: The ‘Merge Shapes’ feature in PowerPoint enables you to combine shapes and images seamlessly.
This technique not only enhances your design but also helps in creating custom graphics that resonate with your audience.
Also Read This: How to Buy Photos for Personal Use from Getty Images
Preparing Your Images for Subtraction
Before you start subtracting images in PowerPoint, it's essential to prepare your images properly. Here are some steps to ensure you're set up for success:
- Select High-Quality Images: Use images that are clear and high-resolution to maintain quality after editing.
- Choose Compatible Formats: Ensure your images are in a compatible format like PNG or JPEG.
- Plan Your Layout: Think about how you want your final image to look. Sketching a quick layout can be helpful.
- Gather Shapes: If you plan to use shapes for subtraction, have them ready in your PowerPoint slide.
By preparing your images and layout beforehand, you’ll make the process smoother and more efficient.
Also Read This: How to Delete Photos from Adobe Stock
Step by Step Guide to Subtract Images
Now that you've prepared your images, let’s dive into the step-by-step process of subtracting images in PowerPoint. Follow these simple steps to get started:
- Insert Your Images: Open PowerPoint and go to the slide where you want to work. Click on “Insert” in the menu, then choose “Pictures” to select your images from your computer.
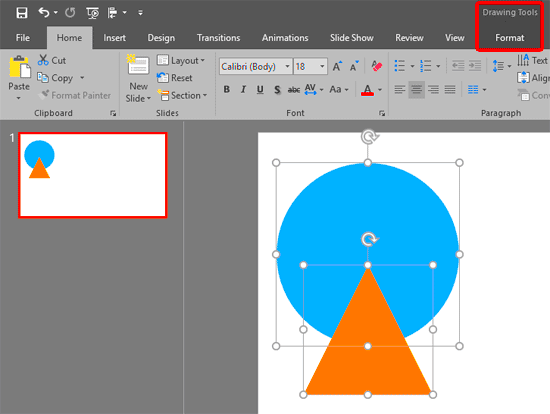
- Position Your Images: Drag and drop the images onto the slide. Make sure the image you want to subtract from is on the bottom layer, and the overlaying image is on top.
- Select Both Images: Click and drag your mouse to create a selection box around both images. Alternatively, you can hold down the “Shift” key and click on each image.
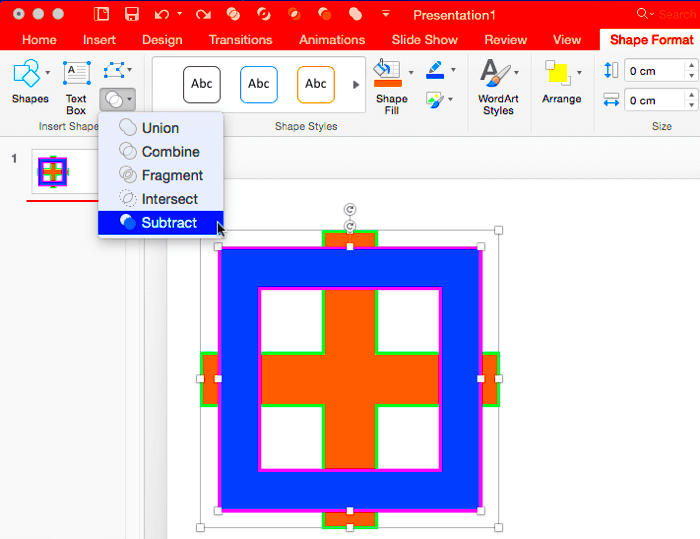
- Merge Shapes: With both images selected, go to the “Format” tab. Click on “Merge Shapes” and choose “Subtract” from the dropdown menu. This action will remove the area where the top image overlaps with the bottom image.
- Adjust as Needed: If you’re not happy with the result, you can always press “Ctrl + Z” to undo and try again. Feel free to reposition or resize your images as needed.
By following these steps, you can easily subtract images and create custom visuals that stand out in your presentation!
Also Read This: Beautiful Images of Snow Across the USA
Using Shapes to Subtract Images Effectively
Shapes play a crucial role in subtracting images effectively in PowerPoint. They allow you to define specific areas to keep or remove from your images. Here’s how to use shapes for subtraction:
- Choose the Right Shape: Start by inserting a shape that matches the area you want to keep. Go to the “Insert” tab, click on “Shapes,” and select a shape that fits your design.
- Position the Shape: Place the shape over the part of the image you want to keep. You can resize and rotate the shape to ensure it fits perfectly.
- Select Both the Shape and the Image: Click on the shape, then hold “Shift” and click on the image underneath it to select both elements.
- Merge Shapes: Again, navigate to the “Format” tab, click on “Merge Shapes,” and choose “Subtract.” This will remove the parts of the image outside the shape, giving you a clean, defined look.
Using shapes for subtraction not only provides precision but also adds creativity to your slides, allowing you to create unique visuals that capture attention.
Also Read This: How Do I Resize an Image in Paint for Simple Editing and Adjustments
Tips for Creating Clean Subtractions
Creating clean subtractions in PowerPoint can enhance the overall look of your presentation. Here are some tips to ensure your image edits are sharp and professional:
- Zoom In for Detail: Zooming in can help you see finer details. This makes it easier to position shapes and images accurately.
- Use High-Contrast Images: Images with high contrast between the foreground and background are easier to subtract. This clarity will help in achieving cleaner edges.
- Experiment with Different Shapes: Don’t hesitate to try various shapes for subtraction. Sometimes, a unique shape can make your visuals more interesting.
- Adjust Image Colors: Sometimes, adjusting the colors or applying effects can make the subtraction cleaner and more visually appealing. Use the “Format” options to experiment.
- Practice Makes Perfect: Don’t be discouraged if your first few attempts don’t turn out as expected. Keep practicing, and you’ll improve your skills over time.
By following these tips, you'll create stunning visuals that elevate your PowerPoint presentations and engage your audience more effectively.
Also Read This: 5 Reasons Why Likee is the Next Big Thing in Social Media
Troubleshooting Common Issues
While subtracting images in PowerPoint can be straightforward, you might encounter some common issues. Here’s a look at these challenges and how to resolve them:
- Images Not Aligning: If your images don’t align properly, try selecting both images and using the “Align” tool in the “Format” tab. This will help you center or align them as needed.
- Subtraction Doesn’t Work: Ensure both images are selected before attempting to merge shapes. If the merge doesn’t happen, check if both images are in the same layer. Sometimes, images behind others won’t interact correctly.
- Unwanted Edges or Artifacts: After subtraction, you might notice rough edges or unwanted artifacts. To fix this, use the “Format” tab to apply smoothing or cropping tools to clean up the edges.
- Loss of Image Quality: If the image quality decreases after subtraction, consider using higher-resolution images. This ensures that your visuals remain sharp, even after edits.
- Undoing Mistakes: If you make a mistake, don’t worry! Simply use the “Ctrl + Z” shortcut to undo your last action. You can also access the “Undo” button in the toolbar.
By being aware of these issues and their solutions, you can make your image subtraction process smoother and more effective.
Also Read This: How to Create Hot AI Images
Frequently Asked Questions
Here are some common questions people have about subtracting images in PowerPoint:
- Can I subtract images of different sizes? Yes, you can subtract images of various sizes. Just ensure they are aligned properly before merging.
- Is there a limit to the number of images I can subtract? There is no specific limit, but too many subtractions might make your slide look cluttered. Aim for clarity and focus.
- Can I use this technique on Mac? Absolutely! The process is similar on both Windows and Mac versions of PowerPoint.
- What if I want to revert back to the original image? If you want to revert, just use the “Undo” option or keep a copy of the original image before you start editing.
- Do I need advanced skills to subtract images? Not at all! Even beginners can master this technique with a bit of practice and patience.
These FAQs can help clarify your understanding and boost your confidence in using the subtraction technique in PowerPoint.
Conclusion on Subtracting Images in PowerPoint
Subtracting images in PowerPoint is a creative way to enhance your presentations. With the right techniques and some practice, you can easily create stunning visuals that capture your audience's attention and effectively communicate your message.
 admin
admin


