Once you've cropped your image in Figma, the next step is to adjust and refine it to ensure it fits perfectly within your design. This involves making small tweaks that can significantly enhance the visual appeal of your image. Figma offers several tools to help you fine-tune your cropped images easily.
Here are some useful techniques for adjusting and refining your cropped image:
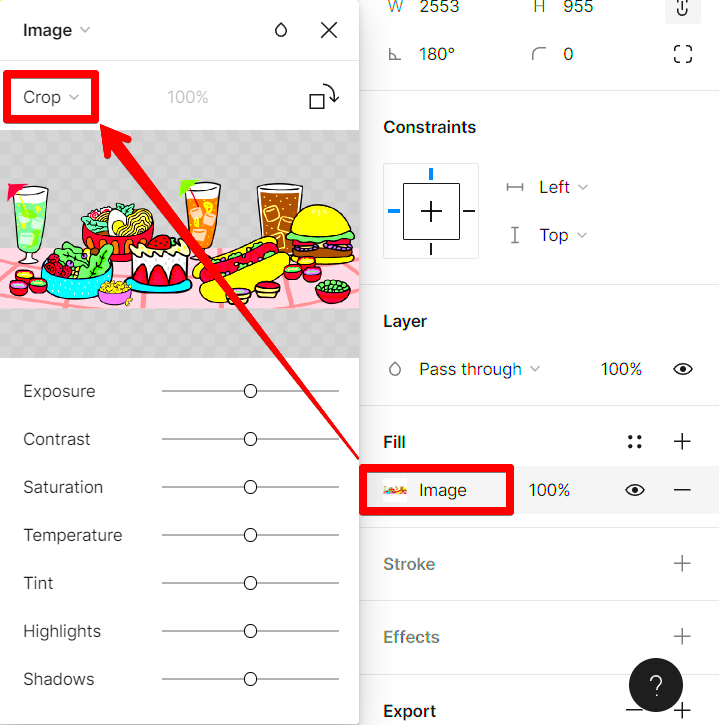
- Repositioning: Double-click on the masked image to move it around within the frame. This allows you to focus on the most important parts of the image.
- Scaling: You can scale the image up or down by clicking and dragging the corners of the image mask. Hold down the Shift key to maintain the aspect ratio.
- Rotation: If your image needs a little twist, select the image and use the rotation handle to adjust its angle for a more dynamic look.
- Adjusting Opacity: Sometimes, lowering the opacity of your cropped image can help it blend better with other design elements. Select the image and adjust the opacity in the right-hand properties panel.
- Adding Effects: Consider applying shadows or blurs to your image mask to create depth and visual interest. You can find these options in the effects section of the right panel.
By taking the time to adjust and refine your cropped image, you can create a more polished and professional design that effectively communicates your message.
Best Practices for Cropping Images in Figma
When it comes to cropping images in Figma, there are some best practices you should keep in mind to make the most of your designs. Following these tips can help you achieve a cleaner look and maintain the integrity of your visual content.
- Keep the Composition in Mind: Always consider the rule of thirds or other compositional techniques. Place focal points along the grid lines for a more balanced image.
- Maintain High Resolution: Ensure your images are high-resolution to avoid pixelation after cropping. Low-quality images can detract from your overall design.
- Use Consistent Aspect Ratios: If you’re working with multiple images, keep a consistent aspect ratio for a cohesive look across your design.
- Think About the Background: Pay attention to the background elements of your image. Cropping out distracting backgrounds can enhance the main subject.
- Preview Your Designs: Always preview your designs in various layouts and screen sizes to ensure that your cropped images look great everywhere.
By applying these best practices, you’ll enhance your design skills and produce images that not only look good but also serve their intended purpose effectively.
Common Mistakes to Avoid When Cropping Images in Figma
Cropping images can be a straightforward task, but there are some common pitfalls that can lead to less-than-ideal results. Being aware of these mistakes can save you time and improve the quality of your designs.
- Ignoring Image Quality: One of the biggest mistakes is using low-resolution images. Always opt for high-quality images to avoid pixelation when you crop.
- Over-Cropping: Cutting too much of the image can remove important details. Make sure to leave enough context for the viewer to understand the image.
- Neglecting Alignment: Failing to align cropped images with other elements can make your design look disorganized. Use Figma’s alignment tools for a cleaner layout.
- Not Utilizing Layers: Forgetting to use layers can lead to confusion, especially when you have multiple images. Organize your layers to keep track of cropped images easily.
- Forgetting to Save Changes: It’s easy to lose your work if you forget to save after making adjustments. Always save your project frequently to avoid losing your progress.
By avoiding these common mistakes, you’ll ensure that your image cropping in Figma enhances your designs instead of detracting from them.
Additional Tools and Plugins to Enhance Image Cropping
While Figma provides great built-in features for cropping images, there are several additional tools and plugins that can enhance your experience even further. These tools can streamline your workflow, offering more advanced options or simplified processes to achieve the perfect crop.
Here are some popular tools and plugins that can help you with image cropping:
- Cropper: This plugin allows for advanced cropping options, giving you more flexibility with image masking and adjustments. It's perfect for users who need precise control over their images.
- Image Tracer: If you're looking to convert images into vector graphics, this plugin is a fantastic option. It helps you trace images and crop them into vector shapes, offering a whole new level of design possibilities.
- Unsplash: This plugin integrates free, high-quality stock images right into your Figma project. When you find the perfect image, you can crop it easily without leaving the app.
- Artboard Plus: This tool simplifies the management of multiple artboards and images. You can easily crop, resize, and organize your images across different artboards.
- Figma Mirror: Although not strictly a cropping tool, this plugin allows you to preview your designs on mobile devices in real-time. This way, you can see how your cropped images look on smaller screens.
By integrating these tools into your Figma workflow, you can improve your image cropping and overall design process significantly, making your projects not only easier but also more visually appealing.
Frequently Asked Questions About Cropping Images in Figma
Many users have questions about the image cropping process in Figma. Let’s address some of the most common queries to help you navigate cropping with confidence.
- Can I crop an image without losing the original?
Yes! Figma's masking feature allows you to hide parts of the image without deleting them, so the original remains intact. - How can I adjust my cropped image later?
Simply double-click the masked image to enter edit mode. From there, you can reposition or resize the image within the frame. - Is there a way to crop multiple images at once?
You can group images and create a mask around them, but each image will need to be individually adjusted within the mask. - What happens if I resize my cropped image?
Resizing the mask will also resize the cropped image. Just remember to maintain the aspect ratio by holding the Shift key while dragging the corners. - Can I use Figma for batch cropping?
Figma doesn’t support batch cropping natively, but plugins like Cropper can help streamline the process for multiple images.
These FAQs should give you a clearer understanding of the cropping features in Figma and how to utilize them effectively for your design projects.
Conclusion: Mastering Image Cropping in Figma
Mastering image cropping in Figma is a valuable skill that can greatly enhance your design projects. Whether you are adjusting the focus of an image or creating a visually appealing layout, knowing how to effectively crop images is essential. Throughout this guide, we’ve covered everything from understanding the cropping features to refining your images, as well as best practices and common mistakes to avoid.
As you continue to practice and explore additional tools and plugins, you’ll find that cropping can be both an enjoyable and creative process. Remember, the key to great design is not just how well you crop an image, but how it fits into the overall vision of your project. So, take your time, experiment with different techniques, and let your creativity shine!
With the knowledge you’ve gained, you are well on your way to becoming a pro at cropping images in Figma. Happy designing!
 admin
admin


