Google Slides is an amazing software to generate slides. It falls under one of the applications of Google Workspace and helps team members work simultaneously on presentations. The application has various templates, animations, and transition effects that make it easy for anyone to come up with a captivating presentation without having much experience in designing slide shows. You can also reach your slides from anywhere since they are kept in the cloud. Here are some of its important highlights;
- Collaboration: Multiple users can edit slides simultaneously, making teamwork easy.
- Templates: A variety of pre-designed templates are available to kickstart your presentation.
- Animations: Add animations to your slides to grab your audience's attention.
- Integration: Easily integrate with other Google services like Drive, Docs, and Sheets.
- Sharing Options: Share your presentations with a simple link or export them in various formats.
To leverage the power of Google Slides and effectively save images whenever necessary, it is important to understand these characteristics.
Why You Might Need to Save Images from Google Slides

The following are some of the motives as to why one might wish to download pictures from their presentations in Google Slides:
- Reuse: You might want to use certain images in other presentations or documents.
- Backup: Saving images ensures you have a copy in case your original presentation is lost.
- Quality Control: Sometimes images in presentations may lose quality when shared; saving them separately can help maintain their original quality.
- Personal Projects: You might want to use images for personal projects like blogs or social media posts.
As a byproduct of images being saved you will be able to store them in a means that is amenable for organization and future retrieval.
Simple Steps to Save Images from Google Slides

It is very fast and straightforward to download images from Google Slides. Just adhere to these easy procedures:
- Open Your Presentation: Start by opening the Google Slides presentation from which you want to save images.
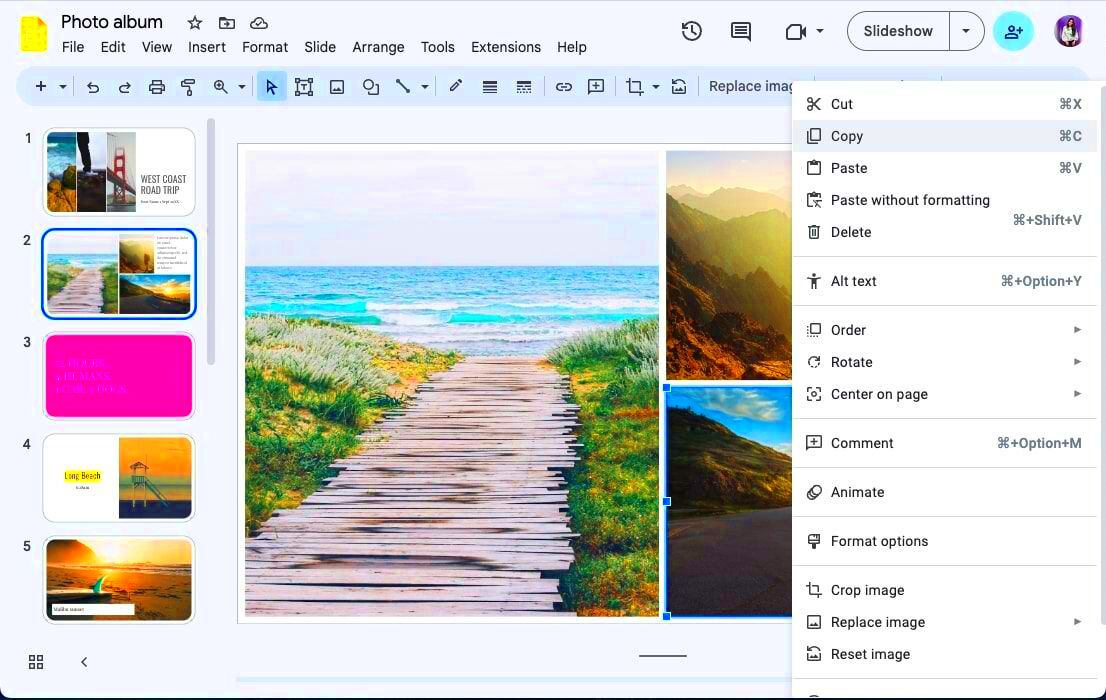
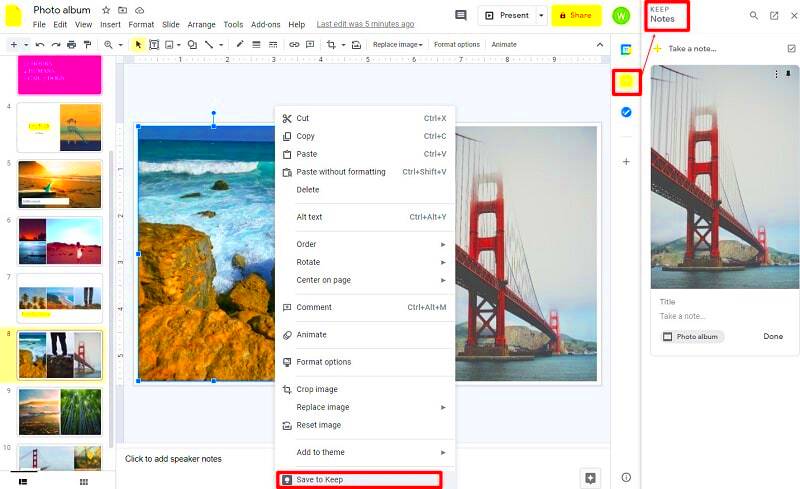
- Select the Image: Click on the image you want to save. Make sure it’s highlighted.
- Right-Click on the Image: This will bring up a menu with various options.
- Choose “Save to Keep”: From the menu, select "Save to Keep," which allows you to save the image directly to Google Keep.
- Download the Image: Go to Google Keep, right-click the image, and choose “Download.” This saves the image to your device.
- Alternative Method: You can also take a screenshot of the image if the above method doesn't work. Use the Snipping Tool or your device’s screenshot feature.
In conclusion, this is how to do it! By using the methods described above, you will be able to easily save images from your Google Slides presentations.
Using the Right Format for Your Images
Particularly, the right format of images is pivotal especially when saving from Google Slides. Different formats are designed to cater for different needs and an understanding of them goes a long way in ensuring image quality as well as compatibility. Some of the common types of image formats one might come across include:
| Format | Description | Best Used For |
|---|---|---|
| JPEG | A compressed format that reduces file size, making it great for web use. | Photos, images with many colors. |
| PNG | Offers lossless compression, preserving quality and supporting transparency. | Logos, graphics with sharp edges. |
| GIF | Supports animation and is limited to 256 colors. | Simple animations, short clips. |
| SVG | Scalable vector graphics that maintain quality at any size. | Icons, logos, illustrations. |
When saving images, it’s important to consider what the purpose of those images will be. For example, if you intend to use an image on a website, JPEG would be appropriate because it has a smaller file size. On the other hand, if you want your picture with transparent background then PNG would be your best option. Keep in mind that using correct format will improve not only visual quality but also loading speed of these images.
Tips for Organizing Your Saved Images
After you have downloaded pictures from Google Slides, ensuring they are arranged will assist you in saving effort and time in the future. Some real-life strategies to maintain your downloaded pictures organized include:
- Create Folders: Organize images into specific folders based on themes, projects, or dates. For example, you could have folders for “Marketing,” “Personal Projects,” or “Presentations.”
- Use Descriptive Names: Instead of generic file names, give your images clear, descriptive names. This makes it easier to find them later. For instance, instead of "image1.jpg," use "2024_Marketing_Campaign_Image.jpg."
- Utilize Tags: If your system allows it, tagging images can help with quick searches. You could tag by project name, color scheme, or type of content.
- Regularly Clean Up: Periodically review and delete images you no longer need. This keeps your folders uncluttered and easier to navigate.
- Backup Your Images: Always have a backup of important images. You can use cloud storage or an external hard drive for extra safety.
Maintaining a well structured image library to navigate whenever one needs to find anything quickly can be done by following these simple tips.
Troubleshooting Common Issues When Saving Images
It is not always smooth sailing when downloading pictures from Google Slides. Some of the problems that you may face involve:
- Image Doesn't Save: If you try to save an image and nothing happens, ensure you are right-clicking on the image correctly. Try refreshing the page or restarting your browser.
- Low-Quality Images: If the saved image appears blurry or pixelated, ensure you are using the right format and saving it at the highest resolution possible. Check your presentation settings for quality options.
- Images Not Downloading: Sometimes, images may not download due to browser issues. Try using a different browser or clearing your cache and cookies.
- Missing Images: If you can't find the saved images, double-check your download location. Sometimes, files might be saved in a different folder than expected. Use your computer’s search feature to locate them.
- File Format Issues: If an image doesn't open correctly, it might be saved in an unsupported format. Try opening it with different software or converting it to a common format like JPEG or PNG.
There’re numerous alternatives available for screenshots, so it may be easier to just google screen capture or use the ones built-in on your operating system. However, if you find yourself stuck with one of these problems when saving images from Google Slides remember the following several suggestions.
Exploring Alternative Methods to Save Images
Now and then, it may not be very convenient to save images straight from Google Slides especially if you are having technical issues or you need more flexibility. Luckily enough, there are a number of other ways that you can save images easily. We will go through some of these methods and see how they can ease the whole process:
- Using Snipping Tool or Screenshot: If the built-in saving options aren't working, you can always use the Snipping Tool (Windows) or Screenshot feature (Mac). This allows you to capture the exact part of the screen you want, including images. Simply open the tool, select the area, and save the captured image.
- Exporting Slides as Images: Google Slides allows you to export entire slides as images. Click on “File,” then “Download,” and choose “PNG image” or “JPEG image.” This will save the whole slide as an image file, including all elements within it.
- Using Google Keep: As mentioned before, you can save images directly to Google Keep. This is particularly useful for quick access and organizing visual assets.
- Copying to Google Docs: You can also copy images from your Google Slides and paste them into a Google Docs file. From there, you can download the document as a PDF or Word file, which will include the images.
- Third-Party Tools: There are many third-party screenshot and image-saving tools available. Tools like Lightshot or Greenshot can help you capture images easily and save them in various formats.
Having various backup methods for your images as per your requirements and choices will be useful at times.
Frequently Asked Questions
A lot of inquiries are made regarding how to save pictures using Google Slides and below are some of those questions answered:
- Can I save images directly from Google Slides? Yes, you can save images directly by right-clicking and choosing the save option. If that doesn't work, try alternative methods like screenshots.
- What image formats can I save in? You can save images as JPEG, PNG, or even GIF formats, depending on your needs.
- Will saving images affect their quality? It depends on the format and method you use. PNG is best for maintaining quality, while JPEG may compress the image slightly.
- What should I do if images are not saving? If images aren't saving, try refreshing your browser, checking your internet connection, or using a different browser.
- How can I organize my saved images? Create folders based on themes or projects, use descriptive file names, and consider using tags for easier searching.
The Basics of Saving Images from Google Slides. This FAQ will answer your basic questions, as well as clear up any doubts that you might have.
Conclusion and Final Thoughts
The process of saving images from Google Slides is simple if you know the options. There are built-in features or various alternative methods to use but a good approach means everything. Ensure that you select an appropriate image format according your requirements and keep your saved images such that they can be easily found.
It is also prudent to know frequent problems and their solvers. In this way, you will be able to use Google Slides images smoothly by adhering to these tips and applying the methods explained. Cheers to good saves!

 admin
admin


