Sublimation tumblers are a popular choice for personalized gifts and promotional items. They are made from materials that allow dyes to penetrate and bond with the surface, resulting in vibrant, long-lasting images. This printing technique is perfect for tumblers because it creates a smooth finish that feels like part of the material, not just a sticker. The beauty of sublimation lies in its ability to produce high-quality images that won’t peel or fade, making them ideal for daily use.
Moreover, sublimation tumblers have gained traction in the crafting community, especially among those who enjoy DIY projects. Understanding the importance of sublimation tumblers is crucial if you're looking to create custom designs. They can serve as a canvas for your creativity, allowing you to express personal styles or brand identities. With the right images and designs, you can make tumblers that stand out in any crowd.
Choosing the Right Image Dimensions for Tumblers
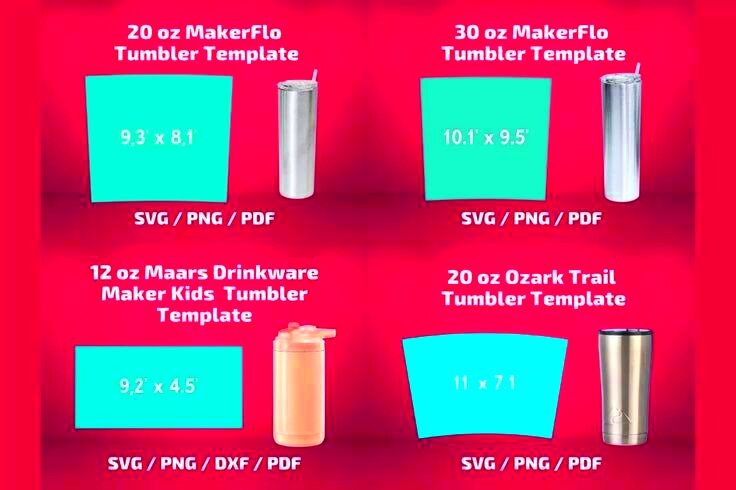
When it comes to sublimation printing, the size of your image matters. The right dimensions ensure that your design fits perfectly on the tumbler without any awkward cropping. Generally, the recommended image size for tumblers is:
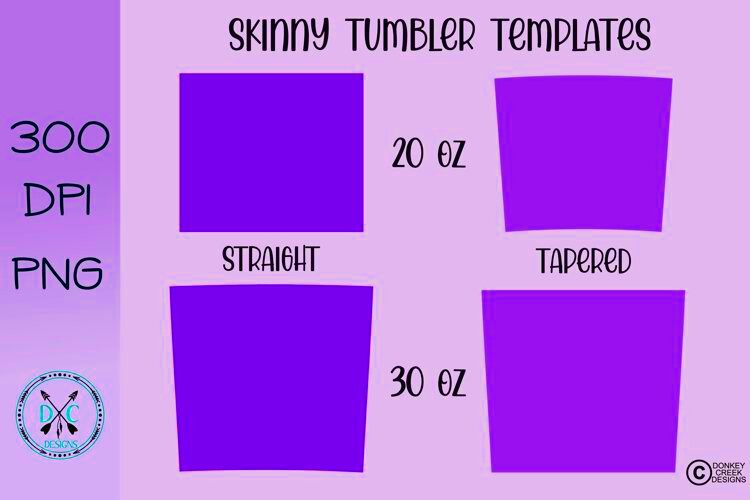
- 20 oz tumbler: 9.3 inches wide by 8.2 inches high
- 30 oz tumbler: 10.5 inches wide by 9.4 inches high
These dimensions can vary slightly based on the tumbler's shape and brand. Always check the specific measurements of the tumbler you’re using before finalizing your image size. Using the wrong dimensions can lead to disappointing results, such as blurry images or poor color saturation.
Also Read This: Steps to Remove Color from an Image for a Clean Look
Preparing Your Images for Sublimation Printing
Preparing your images properly is a key step in ensuring high-quality prints. Here are some essential tips to get your images ready for sublimation:
- File Format: Use PNG or JPEG files for the best results.
- Color Mode: Make sure your image is in RGB color mode since sublimation printers use this mode for color accuracy.
- Image Quality: Always use high-resolution images (300 DPI or higher) to maintain clarity when printed.
After preparing your images, it’s important to use design software, like Adobe Illustrator or CorelDRAW, to adjust and position your design correctly. This software allows you to resize your image to fit the tumbler’s dimensions accurately. Additionally, consider adding a bleed area of about 0.125 inches around your design. This extra space helps ensure that the entire image prints without any white edges.
By following these steps, you can effectively prepare your images and enhance the overall quality of your sublimation tumblers.
Also Read This: How to Change Eye Color in Photoshop CS6
Adjusting Image Resolution for Clear Prints
Getting the right image resolution is crucial for producing clear and vibrant prints on sublimation tumblers. When you use a low-resolution image, it can turn out pixelated or blurry, which is far from ideal for a product meant to showcase your designs. Generally, the recommended resolution for sublimation printing is 300 DPI (dots per inch). This high resolution helps ensure that your images maintain their quality even after printing.
To adjust the resolution of your images, follow these simple steps:
- Check the Current DPI: Open your image in software like Adobe Photoshop and check its current DPI settings.
- Resize if Necessary: If your image is below 300 DPI, increase the resolution. Be cautious, though; simply increasing the DPI without resizing the image can lead to a loss of quality.
- Resample Your Image: If you need to change the DPI, choose the resampling option to maintain image quality. This helps preserve details while adjusting the size.
Keep in mind that some images may not upscale well due to their original size and detail. It’s always best to start with high-quality images to ensure the best possible print outcome. By carefully adjusting your image resolution, you can achieve stunning sublimation tumblers that look professional and vibrant.
Also Read This: Ultimate Guide to Sending a Telegram Message Today
Utilizing Design Software for Image Sizing
Design software plays a vital role in preparing your images for sublimation tumblers. Using the right tools can make the process of resizing and editing your images much easier and more efficient. Programs like Adobe Illustrator, Photoshop, or free alternatives like GIMP provide various features that can help you get your designs just right.
Here’s how to utilize design software effectively:
- Create a New Document: Start by creating a new document with the dimensions that match your tumbler's size. This ensures your design fits perfectly.
- Import Your Image: Bring your image into the workspace. You can then use the resize tool to adjust its dimensions without losing quality.
- Add Guidelines: Use guidelines to mark important areas, such as the edges of the tumbler, to avoid cutting off any crucial parts of your design.
- Save in the Right Format: Once your image is sized correctly, save it in a PNG or JPEG format for the best results during sublimation.
Learning how to navigate these software programs can significantly improve your design workflow. The more comfortable you become with these tools, the easier it will be to create stunning, high-quality images for your sublimation tumblers.
Also Read This: Learn How to Use Dailymotion to MP4 Converter Online for Free
Common Mistakes to Avoid When Sizing Images
When it comes to sublimation printing, avoiding common mistakes is key to achieving great results. Many people overlook certain aspects of image sizing that can lead to less-than-perfect prints. Here are some pitfalls to watch out for:
- Ignoring Aspect Ratios: Always maintain the correct aspect ratio of your images. Distorting your design can lead to stretched or squished prints.
- Choosing Low-Resolution Images: Using images with low DPI can cause your prints to appear blurry or pixelated. Always aim for 300 DPI.
- Not Accounting for Bleed: Failing to include a bleed area can result in unwanted white edges. Always add extra space around your design.
- Skipping Test Prints: Never skip test prints! They can help you catch sizing issues before committing to the final product.
- Overlooking Color Settings: Ensure your image is in RGB mode, as sublimation printers rely on this color setting for accurate prints.
By being aware of these common mistakes and taking steps to avoid them, you can improve the quality of your sublimation tumbler designs. Remember, preparation is key, and the more attention you pay to detail, the better your final product will be!
Also Read This: How to Download Fonts from Behance for Your Projects
Testing Your Images Before Printing
Testing your images before the final print is a crucial step in the sublimation process. It helps you catch any mistakes or issues with your design, ensuring that your final product looks exactly how you envision it. This step can save you time, materials, and frustration down the line.
Here are some effective ways to test your images:
- Print a Mockup: Create a mockup of your tumbler design using design software. This will give you a visual representation of how your final product will look.
- Use a Test Print: Print your design on regular paper first. This helps you assess color accuracy and layout without wasting sublimation materials.
- Check Color Calibration: Make sure your printer is calibrated correctly. Print a color chart and compare it with your screen to ensure accuracy.
- Assess Size and Fit: After printing your test design, measure it against your tumbler to ensure it fits perfectly.
Taking the time to test your images can make all the difference in achieving a high-quality sublimation tumbler. By catching any mistakes early, you’ll be able to enjoy the creative process and produce beautiful, professional-looking products every time.
Also Read This: How to Add an Image in Dreamweaver
FAQs About Sizing Images for Sublimation Tumblers
It’s normal to have questions when it comes to sizing images for sublimation tumblers. Let’s address some common inquiries that can help you navigate this process more easily.
- What is the ideal resolution for sublimation images?
The ideal resolution is 300 DPI to ensure clarity and quality in your prints. - Can I use any image format for sublimation?
PNG and JPEG are the best formats to use for sublimation printing due to their quality and compatibility. - How do I know the right size for my tumbler design?
Check the specific dimensions of the tumbler you’re using and design your image accordingly. - What’s the purpose of a bleed area?
A bleed area helps to avoid any unwanted white edges on your design by providing extra space around the image. - Should I always test my designs?
Yes! Testing your designs helps you catch any potential issues before you commit to the final print.
By addressing these common questions, you can feel more confident in your ability to size images for sublimation tumblers successfully.
Conclusion on Sizing Images for Tumblers
In conclusion, sizing images for sublimation tumblers is an essential step that can significantly impact the final product. From understanding the importance of proper dimensions to adjusting resolutions and avoiding common mistakes, every detail matters. By taking the time to prepare your images correctly and testing them before printing, you’ll ensure that your designs look vibrant and professional.
Remember to:
- Choose high-resolution images
- Maintain aspect ratios
- Incorporate a bleed area
- Utilize design software effectively
With these tips and strategies in mind, you’re well on your way to creating stunning sublimation tumblers that showcase your unique style. Happy designing!
 admin
admin


