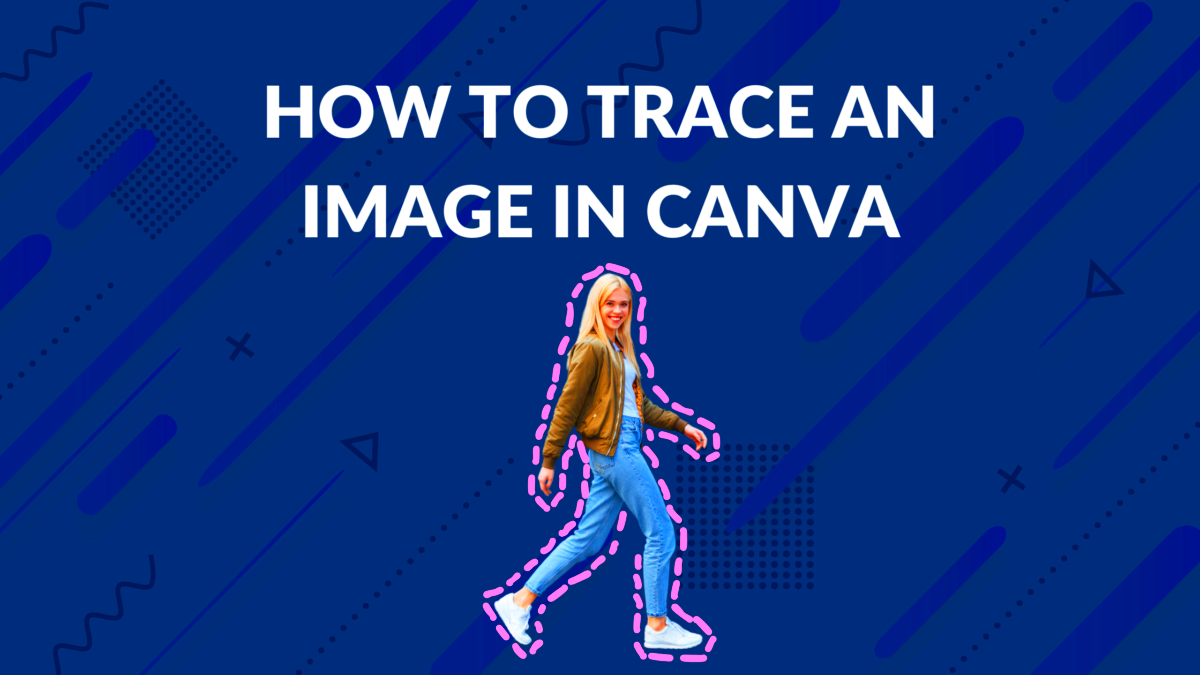
Canva is a fantastic design tool that allows users to create stunning visuals, and one of its standout features is the image tracing tool. This feature helps you transform ordinary images into simplified graphics, perfect for logos, icons, or other design elements. Whether you’re a beginner or have some experience, tracing images in Canva can enhance your design projects significantly. In this tutorial, we will walk you through the entire process, making it easy and enjoyable.
Understanding the Basics of Image Tracing
Image tracing is the process of converting a raster image (like a photo) into a vector graphic. Vector graphics are made up of paths defined by mathematical equations, making them scalable without losing quality. Here’s a simple breakdown of why image tracing is useful:
- Scalability: You can resize vector images without distortion.
- Editability: Traced images can be modified easily.
- Clean lines: Tracing produces cleaner and more defined edges.
Canva’s tracing tool allows you to create vector-style images from your chosen pictures, enabling greater flexibility in your designs. Understanding how tracing works will help you utilize this feature effectively in your projects.
Also Read This: How to Add Visit My Website Button on LinkedIn Best Practices for Profile Optimization
Accessing the Tracing Tool in Canva
Getting started with the tracing tool in Canva is simple. Just follow these steps:
- Log into your Canva account: Open your web browser and sign in.
- Create a new design: Click on the "Create a design" button and choose the type of project you want.
- Upload your image: On the left panel, click on "Uploads" and select the image you want to trace.
- Select the image: Once uploaded, click on the image to add it to your design canvas.
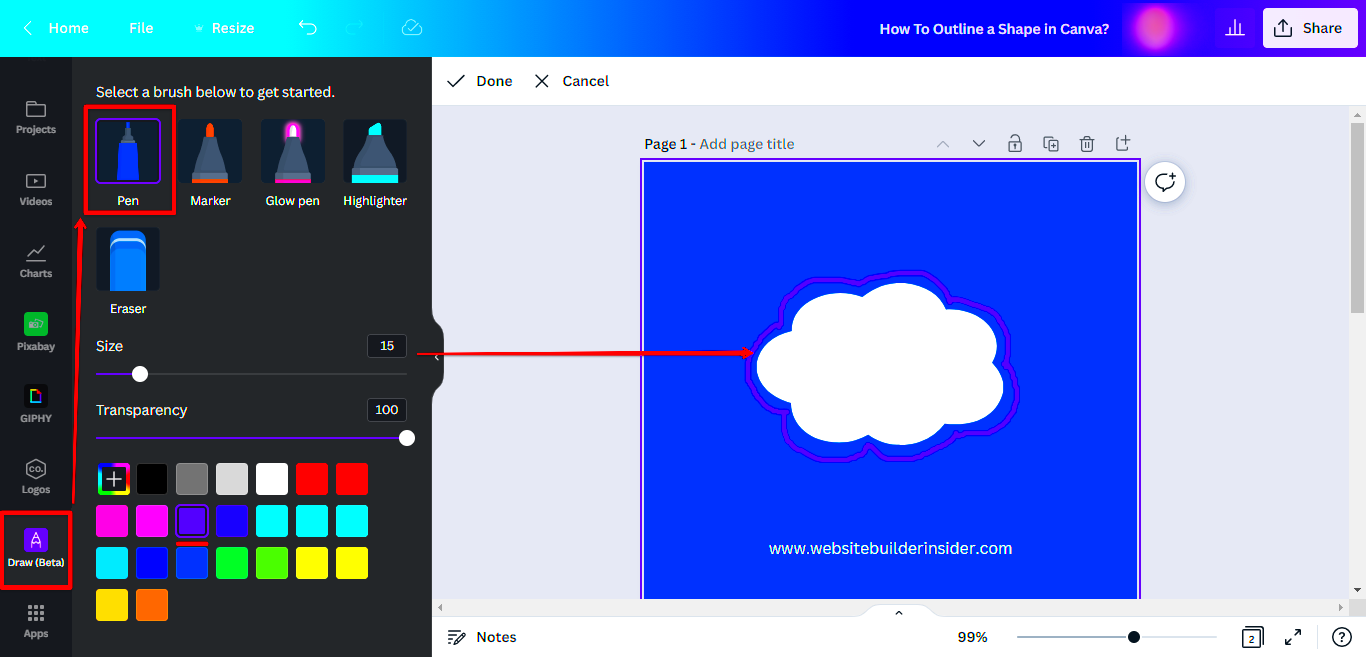
- Access the effects menu: With the image selected, click on the "Edit image" option on the toolbar.
- Find the tracing option: Scroll down to locate the "Background Remover" or "Effects" section, where you’ll find tracing tools.
Once you access the tracing tool, you can start customizing your traced image to match your design vision. Happy tracing!
Also Read This: Effective Ways to Reduce Image File Size on iPhone
Choosing the Right Image for Tracing
Choosing the right image for tracing is crucial for achieving great results in Canva. Not all images work well when traced, so it’s essential to consider a few key factors. Start with images that have clear lines and distinct shapes. Here are some tips to help you select the perfect image:
- High Contrast: Images with strong contrasts between colors help create cleaner traces. For instance, a black silhouette on a white background is ideal.
- Simple Designs: Less complex images are easier to trace. Look for logos, icons, or illustrations rather than detailed photographs.
- Clear Subjects: Choose images where the subject is easily recognizable. Avoid cluttered backgrounds that may complicate the tracing process.
- Size Matters: Larger images generally provide better detail when traced. Make sure the image resolution is high enough to maintain clarity.
By carefully selecting your image, you set the stage for a successful tracing experience. Think about what you want to achieve and let that guide your choice!
Also Read This: Guide to Uploading Your Photos to Getty Images and Joining as a Contributor
Step-by-Step Guide to Tracing an Image
Now that you’ve chosen your image, let’s dive into the step-by-step process of tracing it in Canva. Follow these simple instructions:
- Upload your image: Start by uploading your selected image to your Canva design.
- Place the image: Drag the uploaded image onto your design canvas.
- Click on the image: Select the image to activate the editing options.
- Access the effects: Click on the "Edit image" button located on the toolbar above.
- Select Background Remover: Use the "Background Remover" feature to eliminate the background, focusing on your subject.
- Adjust the trace settings: Fine-tune settings like smoothness and detail to get the desired effect. This is where you can make your traced image pop!
- Finalize and export: Once you’re happy with the tracing, click on "Download" to save your work in the desired format.
Tracing can be a fun and creative process, so don’t hesitate to experiment with different images and settings!
Also Read This: Single and Searching: IMDb’s Take on “How to Be Single” – Exploring the Film’s IMDb Page
Tips for Enhancing Traced Images
After tracing your image, you might want to enhance it further to make it truly stand out. Here are some handy tips to elevate your traced designs:
- Adjust Colors: Use Canva's color tools to change or enhance colors in your traced image. Experimenting with different color palettes can bring your design to life.
- Add Shadows: Create depth by adding shadows or highlights. This gives a three-dimensional feel to your flat designs.
- Incorporate Text: Sometimes, pairing your traced image with text can create a powerful message. Consider adding a catchy slogan or title.
- Utilize Layers: Play with layering different traced images or shapes. Overlapping can create unique visual effects.
- Use Filters: Apply filters to your traced image for a different artistic look. Filters can drastically change the mood and tone.
By following these tips, you can take your traced images from good to great! Remember, creativity has no limits, so let your imagination run wild!
Also Read This: The Perfect Size for Your YouTube Banner Design Tips and Recommendations
Common Issues and How to Fix Them
While tracing images in Canva can be a smooth process, you might encounter some common issues along the way. Understanding these problems and how to fix them can save you a lot of time and frustration. Here are a few issues you might face:
- Unclear Traces: If your traced image lacks clarity, it might be due to a low-quality source image. To fix this, use a higher resolution image or one with better contrast.
- Details Lost: Sometimes, intricate details can be lost during tracing. Adjust the "Detail" settings in the tracing tool to increase the amount of detail retained.
- Background Still Visible: If the background remains after tracing, make sure to use the "Background Remover" tool effectively. This tool helps isolate your subject for a cleaner look.
- Color Issues: If the colors don't look right, try adjusting them in the "Edit image" menu. You can tweak brightness, contrast, and saturation to achieve the desired look.
- Overly Complicated Traces: If your image has too many details, it may look cluttered once traced. Simplifying your source image or reducing the detail settings can help.
By knowing these common pitfalls and their solutions, you can enhance your tracing experience and achieve great results in Canva!
Also Read This: Pre-Wedding Photoshoot: A Complete Guide for Beginner Photographers
Frequently Asked Questions about Image Tracing in Canva
Image tracing can bring up a lot of questions, especially if you're new to it. Here are some frequently asked questions that might help clear things up:
- What types of images are best for tracing? Images with clear lines, high contrast, and simple designs work best for tracing.
- Can I trace photos? Yes, but keep in mind that detailed photos may result in a cluttered trace. It’s better to use illustrations or logos.
- Is there a limit to how many images I can trace? There’s no limit! You can trace as many images as you like in your Canva designs.
- Will tracing an image make it a vector graphic? Yes, tracing converts your image into a vector-style graphic, allowing for resizing without quality loss.
- Can I edit a traced image after creating it? Absolutely! Once traced, you can adjust colors, add effects, and modify the design as needed.
These FAQs should help ease your concerns and encourage you to dive deeper into tracing with Canva!
Conclusion on Tracing Images in Canva
Tracing images in Canva is a valuable skill that can enhance your design projects. Whether you’re creating logos, icons, or custom graphics, the tracing tool offers a simple yet powerful way to turn ordinary images into stunning visuals. Remember to choose the right images, follow the step-by-step tracing process, and take advantage of enhancement tips to make your designs shine.
While you might encounter a few bumps along the way, knowing how to troubleshoot common issues will keep you on track. With practice, you'll become more confident and creative in your design journey.
So, grab your images and start tracing! Your creative possibilities are endless with Canva.
 admin
admin


