Pixelation is an image editing technique that creates a blocky effect by replacing groups of pixels with a single color. This method can add a unique style to your artwork or provide a level of abstraction that can be quite appealing. Pixelation is often used in various applications, including:
- Artistic designs to create a retro look
- Protecting identities in photos by blurring faces
- Creating interesting backgrounds for digital projects
- Enhancing images for games or animations
This effect can help emphasize certain elements while downplaying others, making it a useful tool for both professional and personal projects. Whether you're aiming for a nostalgic feel or simply want to obscure details, understanding how to pixelate images can significantly broaden your creative toolbox.
Getting Started with Krita for Pixelation
Krita is a powerful, open-source digital painting program that offers a wide range of tools for image manipulation. To begin pixelating your images in Krita, you'll first need to ensure you have it installed on your computer. Follow these steps:
- Visit the Krita website to download the software.
- Install Krita by following the prompts on your screen.
- Once installed, open Krita and familiarize yourself with the interface.
With Krita, you’ll find various features that make pixelation easy and effective. This software is perfect for artists, designers, and anyone interested in digital art. Let's dive into how to open and edit your images!
Also Read This: Explore How to Upload Photos to Shutterstock
Opening Your Image in Krita

Now that you have Krita up and running, it’s time to open the image you want to pixelate. Here’s how you can do it:
- Launch Krita on your device.
- Click on File in the top menu.
- Select Open from the dropdown menu.
- Browse your files to locate the image you wish to pixelate.
- Once you find it, click Open.
Your image will now appear in the Krita workspace. Take a moment to familiarize yourself with its layout. You’ll see your image in the center, while various tools and options are displayed on the sides. This setup allows for easy access to all the tools you need to enhance your
Also Read This: Tracing an Image on Procreate: A Step-by-Step Guide
Applying the Pixelation Effect
Now that your image is open in Krita, it’s time to apply the pixelation effect. This step is where the magic happens, and it’s easier than you might think! Follow these simple instructions:
- Navigate to the top menu and select Filters.
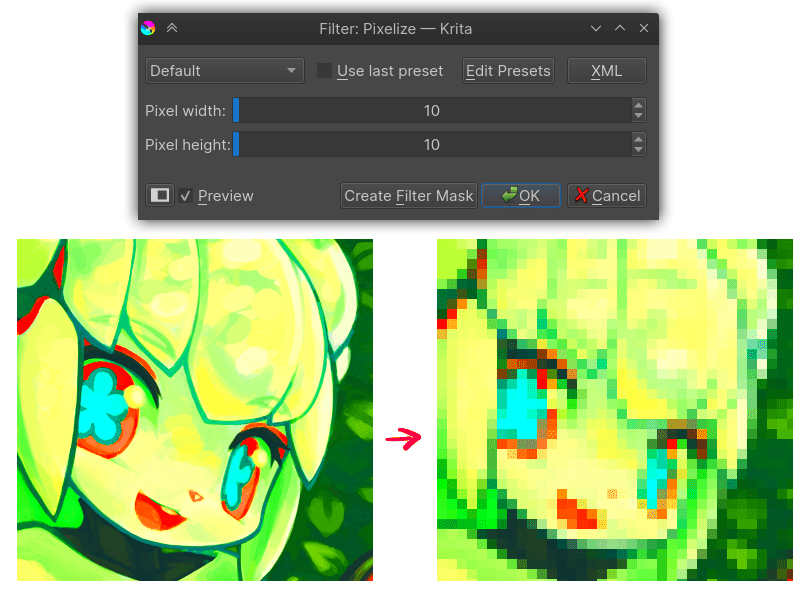
- From the dropdown, hover over Adjust and then click on Pixelize.
Once you click on Pixelize, a dialog box will appear with various options for adjusting the effect. You'll notice that your image starts to take on a blocky, pixelated look, which can be quite fun to see in real-time. Don’t worry if it’s not perfect at first; you can tweak it in the next steps!
The pixelation effect is a great way to transform any image, whether it’s a photo of friends, a scenic view, or even abstract art. Play around with the effect until you find a look that suits your needs, and get ready to dive deeper into customizing it!
Also Read This: Create Stunning AI Wall Art with This Simple Tool
Adjusting the Pixelation Settings
With the pixelation effect applied, it’s time to fine-tune the settings to get the desired look. Adjusting these settings can drastically change the appearance of your image, so let’s go over how to do it:
- Block Size: This setting controls the size of the blocks in your pixelated image. A smaller block size will create a finer pixelation effect, while a larger block size will produce a more abstract look. Use the slider to find your preferred size.
- Preview: Always keep an eye on the preview window to see how the adjustments affect your image in real-time. This feature is handy for making quick decisions.
- Reset: If you feel like you’ve gone too far with your adjustments, there’s a reset option that lets you start fresh.
Experiment with different combinations of settings until you find the pixelation level that best fits your project. Remember, there’s no right or wrong way to pixelate an image—just have fun with it!
Also Read This: How to Download Adobe Photoshop 7.0 from Dailymotion
Previewing Your Changes
After adjusting the pixelation settings, it’s essential to preview your changes to see how your image looks. Krita makes this easy with its built-in preview feature:
- In the pixelation dialog box, look for the Preview area, typically located on the right side.
- Make sure the checkbox for Preview is checked. This will allow you to see real-time updates as you adjust the settings.
- Move the sliders for block size or other settings, and watch how your image changes instantly.
If you're happy with the look, great! If not, don’t hesitate to tweak the settings further. This preview function is an excellent way to experiment without making permanent changes right away. It’s all about getting the pixelated effect that speaks to you. Once you're satisfied with your image, you can proceed to save it and show off your new creation!
Also Read This: How to Add Pinterest Icons to Behance Integrating Social Media Links into Your Portfolio
Saving Your Pixelated Image
Once you've achieved the perfect pixelation effect on your image, the final step is to save your work. This part is crucial to ensure you don’t lose any of your creative efforts. Here’s how to save your pixelated masterpiece in Krita:
- Click on File in the top menu bar.
- Select Save As to choose a new file name or format.
- In the dialog box, you can select your preferred file format. Krita supports various formats, including:
- KRA: Krita's native format, perfect for preserving layers and other project details.
- PNG: A great choice for images with transparency and high quality.
- JPEG: Ideal for photographs but may lose some quality due to compression.
Always make sure to save your work frequently, especially if you're making several adjustments. This practice can help you avoid losing progress in case of unexpected software issues. Now, your pixelated image is ready to be shared, printed, or used in your projects!
Also Read This: How to Upload a Video on Dailymotion for Beginners
Frequently Asked Questions about Pixelation in Krita
As you explore the world of pixelation in Krita, you may have some questions. Here are a few common inquiries to help clarify the process:
- Can I revert the pixelation effect after applying it?
Once you apply the pixelation effect and save the image, it becomes permanent. It's a good idea to save a copy of the original image if you think you may want to revert back later. - Is pixelation the same as blurring?
No, while both techniques obscure details, pixelation creates a blocky effect, while blurring smooths out transitions between pixels. - Can I pixelate only a part of an image?
Yes! You can use selection tools in Krita to select a specific area of the image before applying the pixelation effect. This way, you can keep the rest of the image intact. - What file formats support pixelated images?
Most image formats, including PNG and JPEG, support pixelated images. However, if you want to maintain layers for future edits, save as a KRA file.
Feel free to experiment and reach out for help if you have more questions!
Conclusion on Pixelating Images in Krita
Pixelating images in Krita is a straightforward yet powerful technique that can add a unique flair to your projects. From protecting identities in photos to creating captivating art pieces, pixelation offers a range of creative possibilities. Remember the steps we covered:
- Open your image in Krita.
- Apply the pixelation effect and adjust the settings.
- Preview your changes before saving.
With practice, you'll get more comfortable with the pixelation process and may even develop your own styles and techniques. Don’t be afraid to experiment and have fun! Whether you’re a beginner or a seasoned artist, pixelation can be a valuable tool in your digital art toolbox. Happy pixelating!
 admin
admin


