Have you ever wanted to create a large poster or an eye-catching display but found that your printer just couldn't handle the size? You're not alone! Many people find themselves in a similar situation, whether it’s for school projects, presentations, or just for fun. Printing images across multiple pages allows you to create large visuals without needing specialized equipment.
The process isn’t just cheap but also quite simple if you’ve got some necessary equipment. You may create impressive murals, useful diagrams or even marketing materials for your enterprise. A larger picture could be split into several tiny pieces from which separate prints could be made and all of them would finally get connected into one elaborate pattern. Such a strategy allows you to select any kind of image and transform it into an enlarged version.
Preparing Your Image for Printing
Prior to plunging into the abyss of printing, it is very critical that you prepare your image appropriately. Below are some few steps to be followed to ensure that your image is up for the task:
- Choose a High-Quality Image: Start with a high-resolution image. Low-resolution images will appear pixelated when enlarged.
- Edit the Image: Use an image editing tool to adjust brightness, contrast, and colors to enhance the visual appeal.
- Decide on the Size: Determine how large you want your final print to be. This will guide your splitting and printing process.
When you finish these steps, your image will be set for the next stage of the process.
Also Read This: How to Wrap Text Around an Image Using CSS
Using Canva to Split Your Image
Canva is very good in splitting single images into different pages. You can follow these instructions to learn how to do it.
- Create a Canva Account: If you don’t have one, sign up for free at Canva.com.
- Upload Your Image: Go to the “Uploads” section and drag your image into the workspace.
- Set Up Your Design: Choose a custom size that matches the dimensions you want for each page. You can break the larger image into sections, making sure they fit the size of your printer.
- Split the Image: Use the grid feature or manually crop the image into parts that fit your design.
When you feel the need to make any adjustments to images for design purposes, all you need to do is click “download” and choose the required specifications such as size. With Canva, it’s easy to get distracted on your creative perspective!
Also Read This: A Watermarked Adobe Stock Image Is Placed on a Canvas: How to Remove the Watermark
Downloading Your Split Images from Canva
When you have divided your image into various sections using Canva, the next thing to do is download those images. It is an easy process that will enable you to print out your images shortly. Here’s how:
- Select Your Pages: In Canva, go to the “Download” option. You’ll see a preview of your design with options to select specific pages.
- Choose File Type: Select the format you want for your download. PNG is a great choice for high-quality images, while PDF can be useful if you want to keep the design intact.
- Download Each Page: If you’ve created multiple pages, ensure you download each one. Click on “Download,” and your split images will start downloading to your computer.
Once you have downloaded the images, it is advisable that you check whether they appear as anticipated. You may use your favourite image viewer to open them so as to ascertain that they are of good quality and every part can be seen clearly. Now that everything is prepared, you can proceed to do what comes next in the printing phase!
Also Read This: how to project an image without a projector
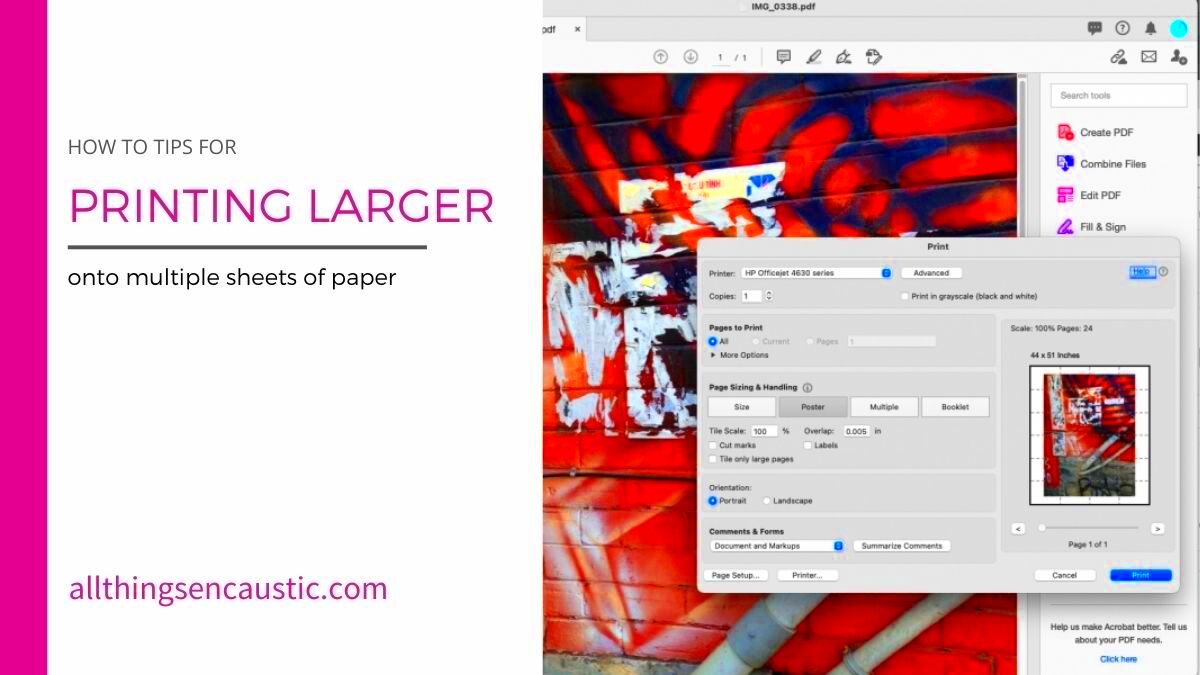
Setting Up Your Printer for Multi-Page Printing
You get the pictures in your PC now lets adjust your printer for printing multiple pages. A professional look can only be attained through a good setup. Here are some simple procedures that you can follow:
- Check Your Printer Settings: Make sure your printer can handle the paper size you’re using. Most standard printers work well with A4 or Letter size paper.
- Load Your Paper: Place the appropriate paper in the printer. If you’re aiming for a more polished look, consider using heavier paper or photo paper.
- Adjust Print Quality Settings: Before printing, go to your printer settings and select high quality. This ensures that your images come out sharp and vibrant.
- Preview Before Printing: Always preview your images to check if they align correctly and that you haven’t missed any parts.
Now, in the event that you have already configured your printer, go ahead and make sure to print the images you want across different sheets without any hitch!
Also Read This: Who is Peanut Hawk on YouTube and What Makes His Content Unique
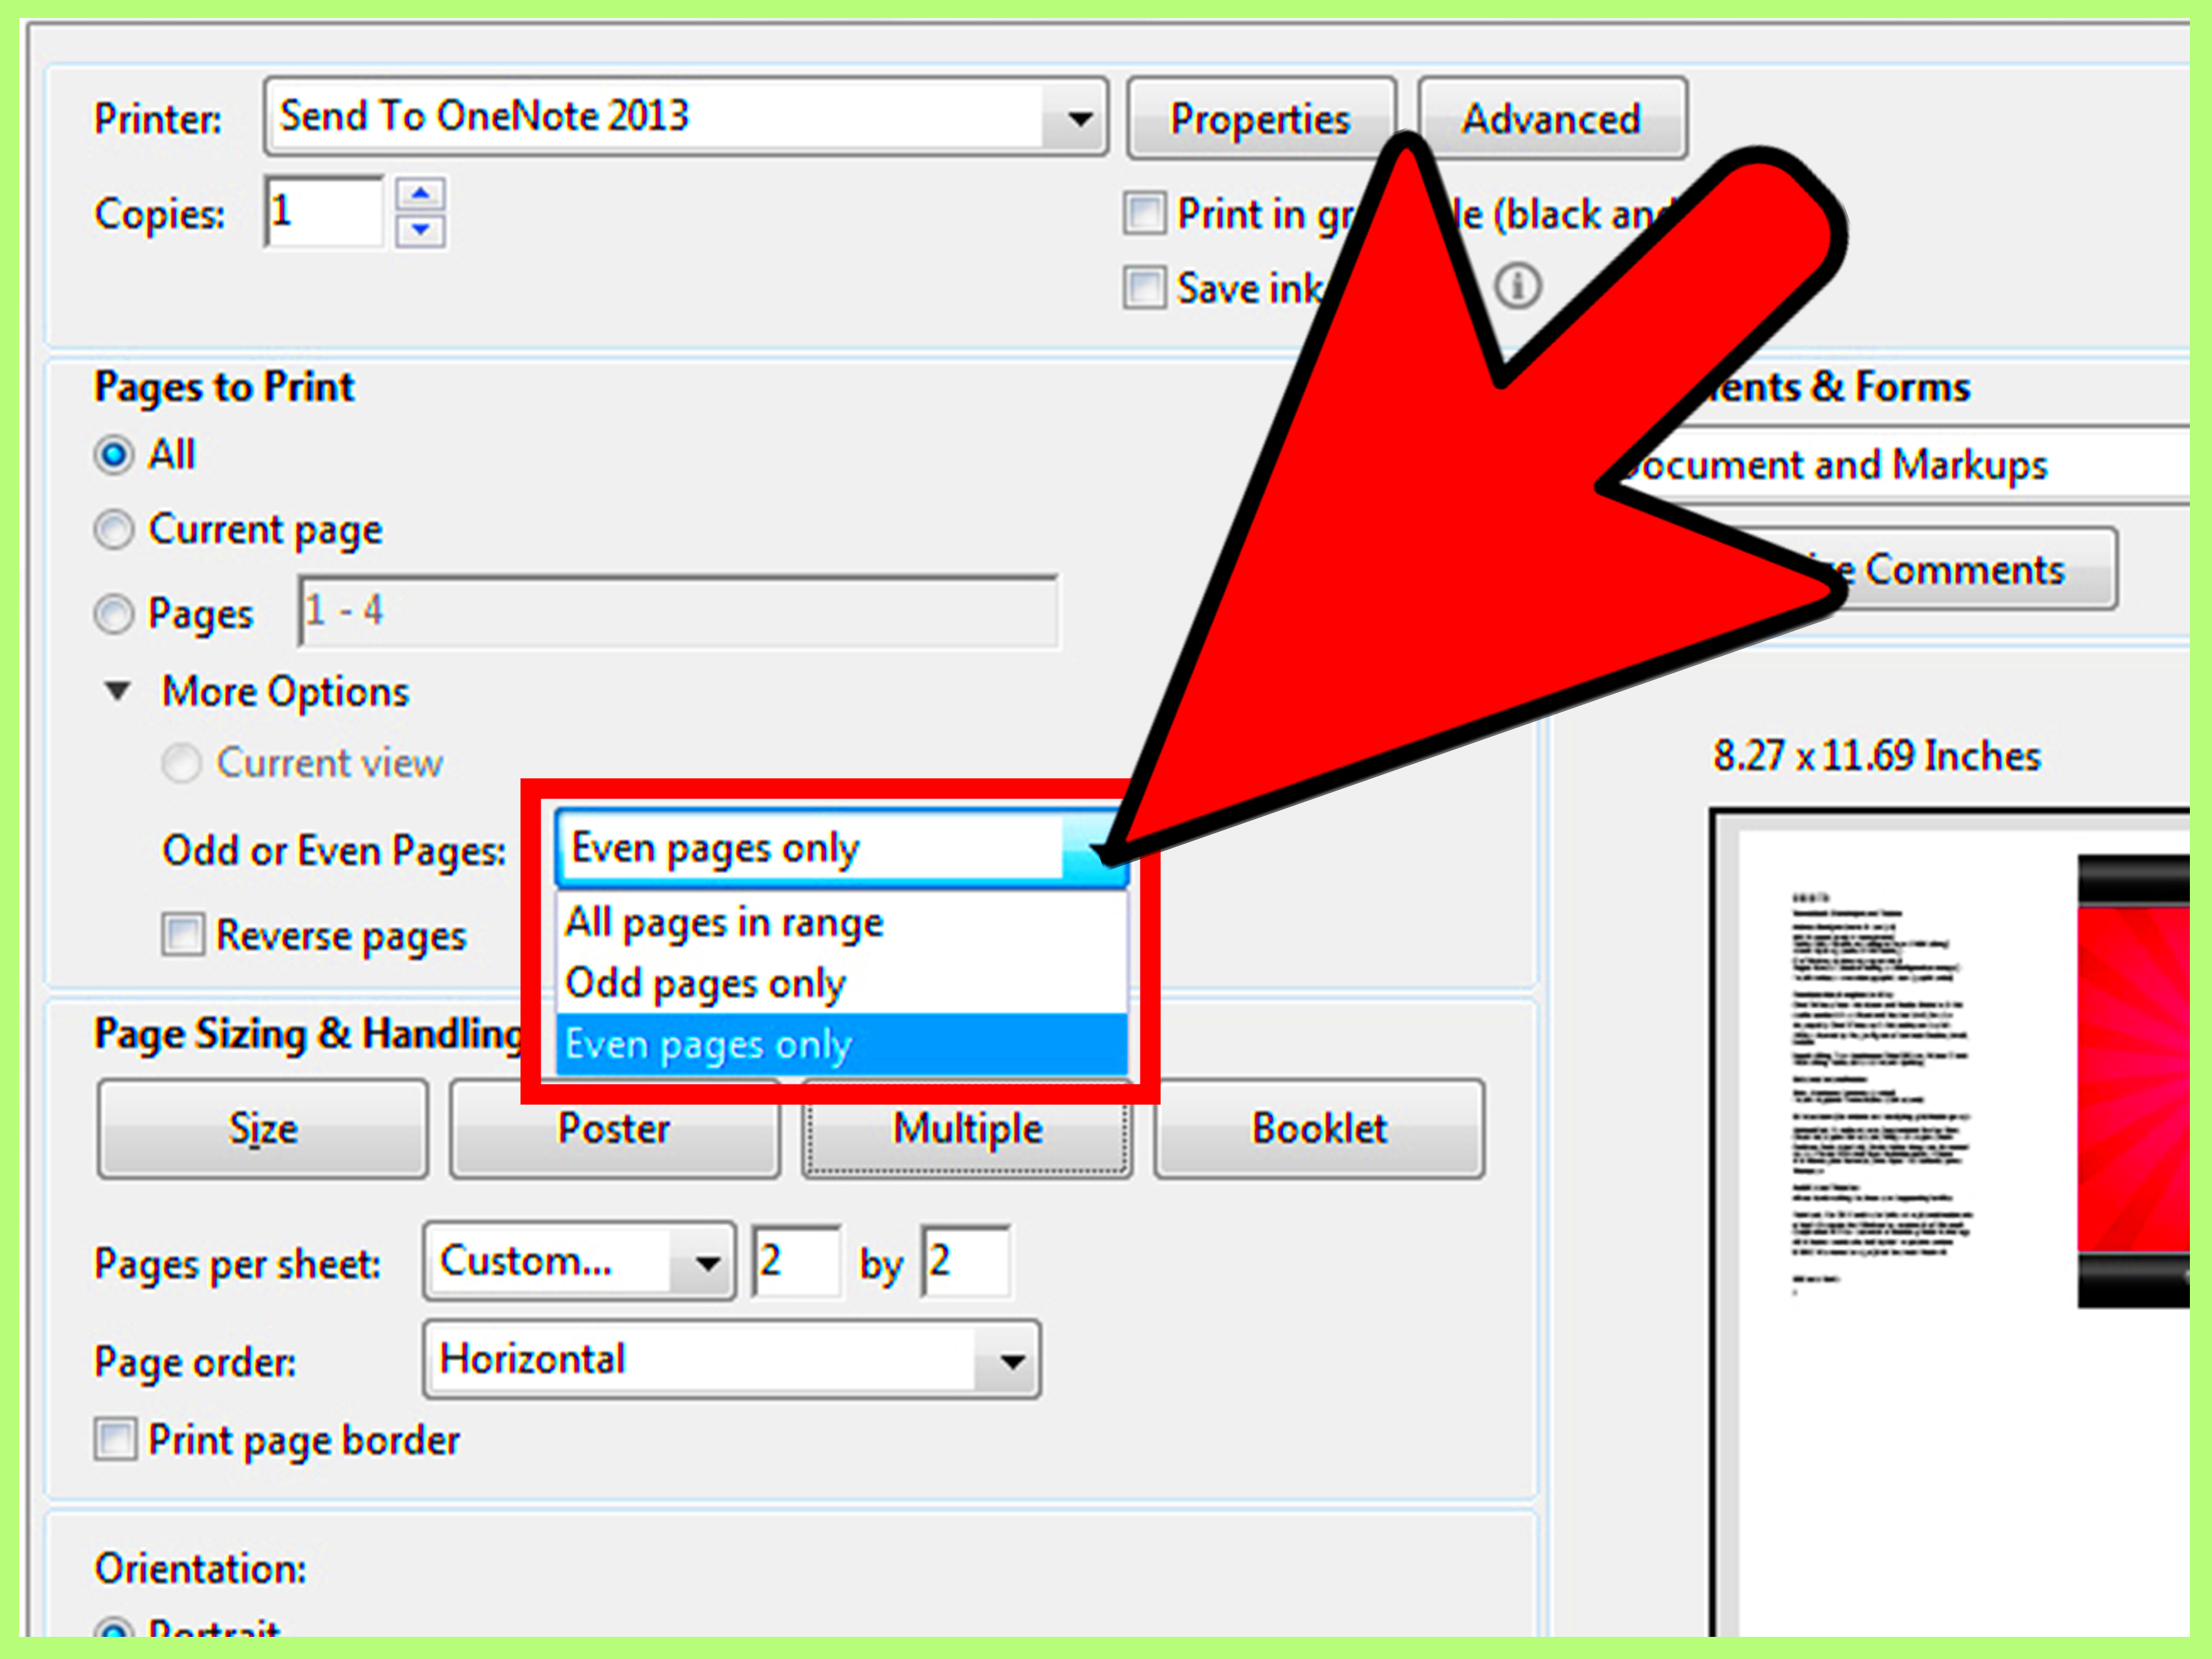
Printing Your Images Across Multiple Pages
Finally, the perfect moment has come for you to devote time on printing your images! Such a moment is thrilling indeed since it provides an opportunity for seeing the manifestation of one’s concept. You should do these things in order to avoid difficulties during this procedure:
- Select Your Images: Go to the folder where you saved your split images. Highlight all the images you want to print.
- Open Print Settings: Right-click and select “Print.” This will open your printer’s dialog box.
- Choose Print Layout: Select the layout option that fits your needs. For multi-page printing, ensure you choose the option that allows you to print all selected images.
- Start Printing: Once everything looks good, click “Print” and watch your images come out page by page.
Subsequent to the printing stage, if it is demanded, diligently separate all edges and afterward piece together the individual bits. Adhesive tape or mucilage may be utilized in joining them up. Take a leap backward and behold what you’ve accomplished! By following these procedures, beautiful prints will be prepared for exhibiting or sharing in no time.
Also Read This: How to Post Images on LinkedIn – Tips for You to Boost Your Engagement
Tips for Achieving a Seamless Look
Farfetched enough, after printing your images onto a number of pages, putting them together in a uniformly designed layout becomes a daunting task. To achieve a well-presented, professional look, simple techniques are available. Follow these steps:
- Align Carefully: When putting the pages together, take your time to align the edges precisely. Use a flat surface and adjust each piece until they fit snugly against each other.
- Use a Cutting Mat: If you need to trim any edges, use a cutting mat and a sharp blade to ensure clean cuts. This prevents any jagged edges that can disrupt the overall look.
- Consider Overlapping: If your image allows, slightly overlap the edges of each page. This technique can help hide any small misalignments and create a more cohesive look.
- Choose the Right Adhesive: Depending on your project, you can use tape, glue, or mounting squares. Make sure whatever you use doesn’t damage your prints.
- Add a Background: To further enhance the final product, consider adding a complementary background. A solid color or pattern can help blend any seams and draw the eye to your image.
As you implement these suggestions, an amazing exhibition that appears like one item is created which will astonish every person who sees it!
Also Read This: Start Earning from Your Photography by Contributing to Getty Images
Frequently Asked Questions
Many individuals have typical inquiries on the printing of images over several pages. The following are certain regularly asked questions intended to assist you:
- Can I use any image for multi-page printing? Yes! As long as the image is high resolution, you can print almost any image.
- What size paper should I use? Standard sizes like A4 or Letter work well, but it depends on the final size you want for your image.
- Is it possible to print in black and white? Absolutely! Just change your printer settings to black and white when printing.
- What if my printer doesn’t support large images? You can still split the image into smaller sections, as mentioned, and print those individually.
- Can I use Canva for other design projects? Yes! Canva is versatile and can be used for various designs, including social media graphics, presentations, and more.
To this end, we trust that these FAQs have addressed some of your worries and simplified the procedure!
Conclusion
Multiple page printings of images can create myriad avenues for creativity. From preparing a big poster for an occasion to putting together a custom-made present or creating an impressive artwork for your house, you could do it all by following this guide. Furthermore, as for tools like Canva, it’s quite easy to get ready and download images while it’s just as simple to set a printer.
Synonyms: Make sure that you take your time while assembling so that everything fits correctly. Do not be afraid to experiment with different styles for the end product. With practice, anyone can become an expert in making beautiful multi-page printed documents which amaze others. For this reason, get ready with your materials, allow your imagination to flow, and start printing right away!
 admin
admin


