When you're designing in Canva, adding images alongside text can make your layout more engaging and professional. However, just placing them together isn’t enough; the key is to wrap text around images effectively. This ensures that the image fits naturally into your design, enhancing the overall visual flow.
Wrapping text around an image means that the text follows the contours of the image, creating a seamless blend between the elements. This technique is especially useful for blog posts, flyers, presentations, or any content where images and text need to coexist without clutter.
It’s a simple process in Canva, but knowing the basic principles can help you create a clean and appealing design. Let’s explore how you can wrap text around an image and make the most of your layout in Canva.
Steps to Wrap Text Around an Image in Canva
Follow these easy steps to wrap text around an image in Canva:
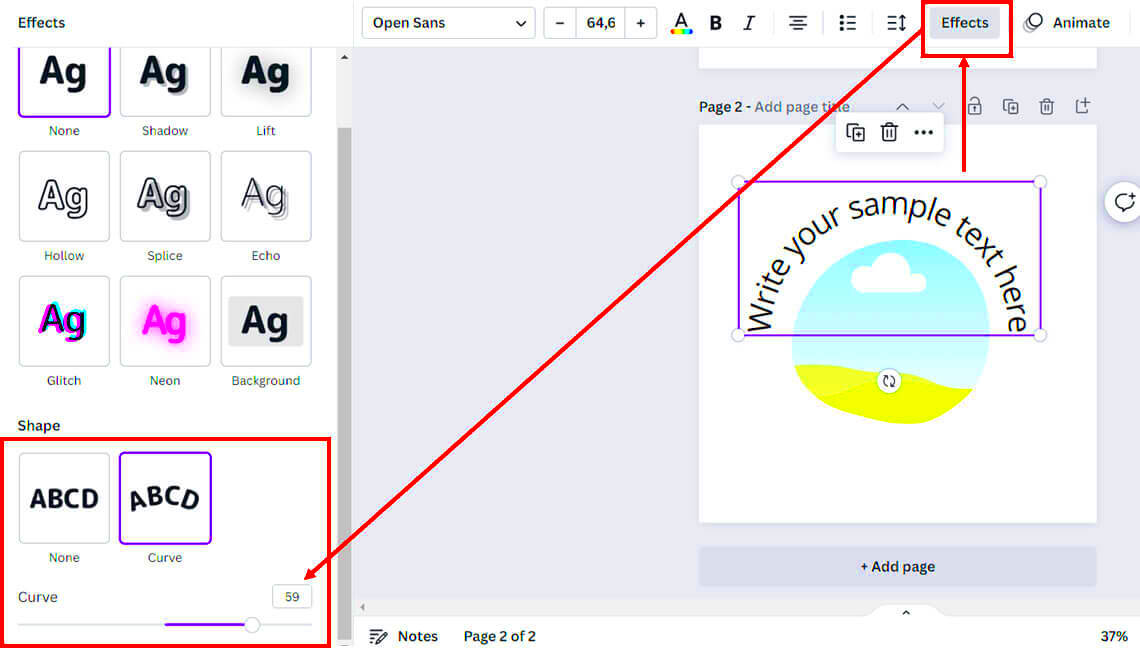
- Select an image: Start by choosing the image you want to use in your design. You can upload one or select from Canva's library of free and premium images.
- Insert text: Add a text box by clicking on the “Text” option in Canva’s toolbar. Type your text in the box, and adjust the font style, size, and color as needed.
- Position the image: Drag your image into place, either next to or within the text area. You can resize and move it around for better alignment.
- Use grids or frames: If you want more control over how the text wraps around the image, consider using Canva’s grid or frame tools. These features allow for better precision in layout.
- Adjust the spacing: Manually adjust the spacing between the image and text by dragging the text box closer or further away from the image. This helps to create the desired effect of text wrapping smoothly around the image.
- Preview and finalize: Once you’re satisfied with the layout, preview your design to ensure everything looks balanced. Then, you’re ready to save or download your design.
Also Read This: How to Save an Image on Google Slides for Use in Other Projects
Customizing Your Text and Image Alignment
After wrapping text around your image, you might want to fine-tune the alignment to make the design more polished. Canva offers several options for customizing text and image alignment.
Here’s how you can adjust alignment for better design:
- Text alignment: Within your text box, you can align the text to the left, center, or right. Canva also allows vertical alignment within the text box, so you can position your text at the top, middle, or bottom of the box.
- Image alignment: Similar to text, images can be aligned within grids or free-floating. You can place the image on the left or right side of the text to create a clean wrap or center the image for a more symmetrical design.
- Use margins and padding: To avoid crowding, you can add extra space around your image using Canva’s margin and padding settings. This creates breathing room for your text and image to coexist more harmoniously.
- Layering and transparency: Canva allows you to layer elements and adjust transparency. You can place the image behind the text or play with opacity levels for a more creative effect.
These customization options give you more control over how your text and image interact, making your design stand out while maintaining clarity and readability.
Also Read This: Status Serenades: Sharing Your Favorite Spotify Song on WhatsApp Status
Using Canva Templates for Easy Text Wrapping
If you're new to Canva or simply looking for a quicker way to wrap text around images, Canva's pre-made templates can be a lifesaver. These templates are designed to help you easily integrate text and images without needing to worry too much about positioning and layout. They’re ideal for beginners or anyone looking to save time while still producing professional-looking designs.
Canva offers a variety of templates specifically geared toward different types of projects, like social media posts, blog graphics, and newsletters. Many of these templates already have text and images arranged in a way that naturally guides you through wrapping text around images.
Here’s how to use Canva templates for easy text wrapping:
- Select a template: Browse Canva’s library by typing keywords like “text and image layout” or choosing a category that fits your project. Templates will appear with different layouts, some of which already incorporate text wrapping techniques.
- Customize the template: After selecting your template, you can replace the placeholder text and images with your own. The design is already structured for you, so all you need to do is tweak it to fit your needs.
- Adjust elements: Even though the layout is predefined, you can move images and text boxes slightly to better fit your content. You may want to resize elements or change colors and fonts to match your branding.
- Final review: Before finalizing, take a moment to ensure that the text wraps cleanly around the image. Templates are helpful, but sometimes a little manual adjustment is needed for the best effect.
Using templates can streamline your workflow and help you achieve professional results without having to start from scratch.
Also Read This: How to Create Stunning Brochures with VectorStock
Best Practices for Text and Image Layout
Getting the right balance between text and images is key to making a visually appealing design. Whether you're designing a flyer, blog post graphic, or social media post, following some best practices ensures that your text and image complement each other, rather than competing for attention.
Here are some best practices for text and image layout:
- Maintain hierarchy: Organize your content so that the most important information stands out. Use larger fonts or bold text for headings and key points, while keeping less important details smaller. This directs the reader's eye through the design naturally.
- Use whitespace effectively: Don’t overcrowd your design. Leaving some space around your text and images gives your layout breathing room, making it easier to read and visually more appealing.
- Contrast between text and image: Make sure there is enough contrast between the text and the image to keep the text legible. For example, if your image has dark areas, use light-colored text, and vice versa.
- Balance the composition: Ensure that your text and images are balanced on the page. For example, if you place an image on the left, try aligning your text to the right to create symmetry or vice versa.
- Consistent fonts and colors: Use fonts and colors that complement your image and overall design theme. Avoid using too many different fonts or colors, which can make the design feel chaotic.
Following these best practices will help you create a clean, readable, and visually appealing design that effectively communicates your message.
Also Read This: How to Create a Stunning Castle Cake With Dailymotion’s Decorating Guide
Common Mistakes to Avoid When Wrapping Text Around an Image
While wrapping text around an image can improve the visual flow of your design, certain mistakes can disrupt the overall layout and readability. Avoiding these common pitfalls will ensure your design looks professional and polished.
Here are some common mistakes to avoid:
- Overlapping text and images: One of the biggest mistakes is allowing text to overlap with important parts of the image, making both the text and image hard to understand. Ensure there is enough space between the text and the image.
- Not enough padding or margins: When text is placed too close to an image, it can look cramped. Adding padding or margins around the image can give the layout more space and make it more readable.
- Inconsistent alignment: Misaligned text and images can make a design look unbalanced. Always check that your text and image are properly aligned, whether they’re centered, left, or right-aligned.
- Poor contrast: If your text is too similar in color to the image behind it, it becomes hard to read. Ensure there’s enough contrast between the text and the image by adjusting colors or adding a background behind the text.
- Using too many elements: Adding too many images or text boxes can make your design feel cluttered. Stick to a clean and simple layout that allows your content to breathe.
Avoiding these mistakes can elevate the overall quality of your design, making it more engaging and easy to read.
Also Read This: Blurring an Image in PowerPoint
FAQs About Wrapping Text Around Images in Canva
When it comes to wrapping text around images in Canva, many users have common questions about the process and how to get the best results. Here are answers to some frequently asked questions that can help you master this technique:
1. Can I wrap text around any image in Canva?
Yes, you can wrap text around any image in Canva, whether it's an image you upload yourself or one from Canva’s extensive image library. You can place text around photos, illustrations, or even graphics that are part of your design.
2. Does Canva automatically wrap text around images?
No, Canva doesn’t have an automatic text-wrapping feature like some other design tools. You’ll need to manually adjust the position of the text and image, or use grids, frames, and alignment tools to create the effect of text wrapping.
3. How do I prevent my text from overlapping the image?
To prevent overlapping, make sure there’s enough space between the text box and the image. You can adjust the text box's position, use margins, or add a transparent background to the text to create a buffer between the text and the image.
4. Can I use frames or grids for text wrapping?
Yes, Canva's frames and grids are useful tools for wrapping text. By placing an image in a frame or grid, you can better control the alignment of your text and make it wrap more naturally around the image.
5. Are there templates in Canva for text wrapping?
Yes, Canva offers various templates that feature text and image combinations where text wrapping is already implemented. These templates can save you time and help you achieve a polished look with minimal effort.
Conclusion: Enhancing Your Design with Text and Image Wrapping in Canva
Wrapping text around images in Canva can greatly enhance your design’s visual appeal, making it more dynamic and engaging. Whether you’re using templates or manually adjusting the layout, mastering this skill can help you create professional and polished designs. With a little practice and attention to detail, you can use text wrapping to elevate any project, from blog graphics to social media posts.
 admin
admin


