One of the important skills today is image resizing. In this digital world, it matters a lot. The knowledge of resizing images is very important for every photographer, graphic designer or anyone else that wants to upload pictures on the internet. You can adjust an image’s size without losing its quality and, therefore, make it suitable for different platforms and uses.
By adapting the image size dimension, you simply transform its height and width respectively hence:
- Optimizing images for faster loading times on websites.
- Fitting images within specific design layouts.
- Reducing file sizes for easier sharing via email or social media.
- Enhancing print quality by adjusting resolution.
Comprehending the fundamentals regarding changing the size of images enables you keep your projects’ aesthetics unchanged as well as sporadic hand formation objectives.
Getting Started with Paint
Microsoft Paint is an efficient yet simple software for basic image editing, including resizing. This is a user-friendly application that comes pre-installed on almost all computers with Windows operating system. Getting started with Paint is quite easy even for those who have never used it before. You can find it by searching for Paint in your Windows search bar.
As soon as you start Paint, you see a simple interface that has different tools available. Here is what to expect:
- Toolbar: Contains tools for drawing, selecting, and editing images.
- Menu: Access options for opening, saving, and printing your images.
- Canvas: The area where your image is displayed and edited.
It is easy to resize images with Paint since it takes only a few steps which makes it ideal for quick editing.
Also Read This: How to Open and Play MOV Files from Depositphotos
Opening Your Image in Paint
Firstly, go to Paint and open the image you want to resize. This procedure is simple and only requires some steps.
- Launch Paint: Click on the Paint icon to open the application.
- Select File: In the upper left corner, click on the "File" menu.
- Open the Image: Choose "Open" from the dropdown menu. A file explorer window will appear.
- Locate Your Image: Navigate to the folder where your image is stored. Select the image you want to resize.
- Click Open: Once you’ve selected the image, click the "Open" button.
Once you have completed the above steps, your picture will now be displayed on the Paint canvas; it is that simple to resize it. That is the beginning of your editing adventure!
Also Read This: Discover How to Get a Shutterstock Image for Free
Steps to Resize Your Image
Now that you have your image open in Paint, let’s get into the steps for resizing it. This process is easy and can be done in just a few clicks. Resizing your image correctly ensures it fits your needs, whether for a social media post, a website, or even printing.
Resizing of image in paint can be done using the following steps:
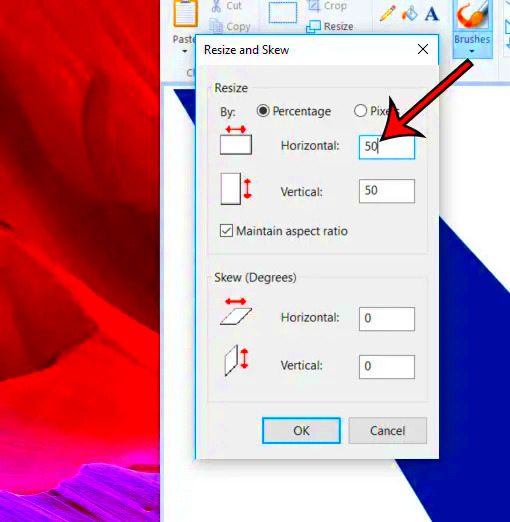
- Select the Resize Tool: Look for the "Home" tab on the toolbar at the top. Click on "Resize," which is usually located in the "Image" group.
- Choose Your Resizing Option: A pop-up window will appear. You can choose to resize by percentage or by pixels. If you want to maintain the aspect ratio (the ratio of width to height), make sure to check the box that says "Maintain aspect ratio."
- Enter New Dimensions: If you selected to resize by pixels, enter your desired width and height. If you're resizing by percentage, simply type in a number to reduce or enlarge the image.
- Preview Your Changes: After entering the new dimensions, you can see how the image looks in the Paint canvas. Make sure it appears as you wish.
- Click OK: If you’re happy with the preview, click "OK" to apply the changes.
And that’s how you do it! This way you’ve adjusted the dimensions of the picture. This process is not complicated and you have gotten another step nearer completion of your project.
Also Read This: how to project an image without a projector
Saving Your Resized Image
The subsequently saving the image comes after changing its size. This is crucial as one would like to retain their modifications while at the same time preserving the “original” file. The good thing is that saving in Paint is simple and fast.
Here are some methods that you can use in order to store your resized image:
- Click on File: In the upper left corner, go back to the "File" menu.
- Select Save As: If you want to keep the original image intact, choose "Save As" to create a new file. This way, you’ll have both the original and the resized version.
- Choose Your File Format: You can save your image in different formats like PNG, JPEG, or BMP. JPEG is great for photos, while PNG is better for images with transparency.
- Name Your File: Enter a name for your resized image. Be sure to choose something that helps you identify it later.
- Choose the Save Location: Select where you want to save the file on your computer, like the Desktop or a specific folder.
- Click Save: Finally, hit the "Save" button, and your resized image is ready for use!
That’s Done! You have successfully saved your image that you resized and you’re free to use it wherever required.
Also Read This: Finding Image URLs on Your iPhone
Tips for Effective Resizing
Image resizing may look easy but; it is not always effective unless one knows several tricks of removing blemishes from the photographs. This guide shall help you transform your basic knowledge into professional craft or enhance what you already know regarding photo resizing processes.
A couple of useful recommendations are presented as follows:
- Maintain Aspect Ratio: Always keep the aspect ratio in mind when resizing. This prevents your image from looking stretched or squished. Checking the "Maintain aspect ratio" box in Paint helps with this.
- Choose the Right Format: Depending on how you plan to use your image, choose the correct file format. JPEG works well for photographs, while PNG is better for graphics with transparent backgrounds.
- Preview Before Saving: Always preview your resized image before saving it. This allows you to see if the quality meets your expectations.
- Keep the Original Image: Always save your original image before resizing. You may want to return to it later, especially if the resized version doesn't meet your needs.
- Use High-Quality Images: Start with high-resolution images when possible. This ensures that even after resizing, your image retains good quality.
Remember these suggestions to improve your picture resizing procedure and attain professional outcomes!
Also Read This: How to Install an App Image on Various Operating Systems
Common Issues When Resizing Images
Though resizing images using Paint is quite simple, a few mistakes are often made by people. Knowing these mistakes can save you a lot of time and frustration in your editing process. Some of the common issues including a long list are highlighted below along with their solutions.
These are examples of widespread challenges you may experience:
- Loss of Quality: When resizing, especially if you’re enlarging an image, you may notice a loss in quality. This can lead to pixelation, where the image looks blurry or grainy. To avoid this, always start with a high-resolution image.
- Incorrect Aspect Ratio: If you forget to maintain the aspect ratio while resizing, your image might look stretched or squished. Make sure to check the "Maintain aspect ratio" option to keep proportions intact.
- File Format Confusion: Not all file formats are equal. Saving an image in the wrong format can affect its quality. For instance, if you save a PNG image as a JPEG, you might lose transparency. Always choose the right format based on your needs.
- Resizing After Edits: If you make edits (like adding text or graphics) after resizing, it can lead to uneven results. It’s best to resize first and then make any additional edits.
- Forgetting to Save: After all your hard work, it’s easy to forget to save your changes. Remember to save your resized image properly to avoid losing your adjustments!
When you remember these problems, then you can optimize the way of resizing your images to yield better results.
Also Read This: Convert OK.RU Videos to MP4 with This Easy Method
FAQs About Resizing Images Using Paint
Having questions about resizing images in Paint? You are not the only one! Many individuals have similar queries. Below are some of the most common questions with answers that could help clear up the process:
- Can I resize images in Paint for free?
- Yes! Microsoft Paint is a free application that comes with Windows, so you can resize images without any cost.
- Will resizing an image affect its quality?
- Resizing can affect quality, especially if you enlarge a small image. Always start with high-resolution images to minimize quality loss.
- How do I maintain the aspect ratio while resizing?
- Check the "Maintain aspect ratio" box when you open the resize tool in Paint. This ensures your image stays proportionate.
- What file formats can I save my resized images in?
- You can save your images in various formats, including JPEG, PNG, and BMP. Choose based on how you plan to use the image.
- Can I undo changes if I make a mistake while resizing?
- Yes! Paint has an undo feature. You can simply click on the "Undo" button or press "Ctrl + Z" to revert your last action.
Address any more inquiries you might have, as you are free to wander around or call for assistance. Image resizing is a lot to comprehend!
Conclusion on Resizing Images
In summary, the ability to resize images is an essential skill that can improve your digital projects, whether they are meant for personal use or for work purposes. The procedure is simple and easy to learn with the availability of tools such as Microsoft Paint. You have been introduced to the critical steps involved in resizing, saving images and solving common problems associated with them. This knowledge will help you deal with pictures like a pro.
Let’s have a brief summary of the contents we discussed:
- Understanding the importance of resizing for various applications.
- Simple steps to resize images using Paint.
- How to save your resized images properly.
- Common issues you might face and how to solve them.
- FAQs to clarify any uncertainties you may have.
Consequently, acknowledging this you’re able to face any image resizing assignment effortlessly. Thus, don’t hesitate to open Paint and begin resizing your pictures like an expert!
 admin
admin


