The phrase image dimensions encompasses the width and height of an image, generally measured in pixels. Pixels are however little squares of color which actually constitute the visual aspect of the
As an illustration, a substantial size may look splendid on your high-resolution display, but it could occupy more space and consume more time in loading than necessary. Conversely, a diminutive image might be quicker to load but become unfocused if made bigger to an extent. Therefore, the most important thing is to hit the sweet spot.
Why Choose 1024 by 576 Pixels?
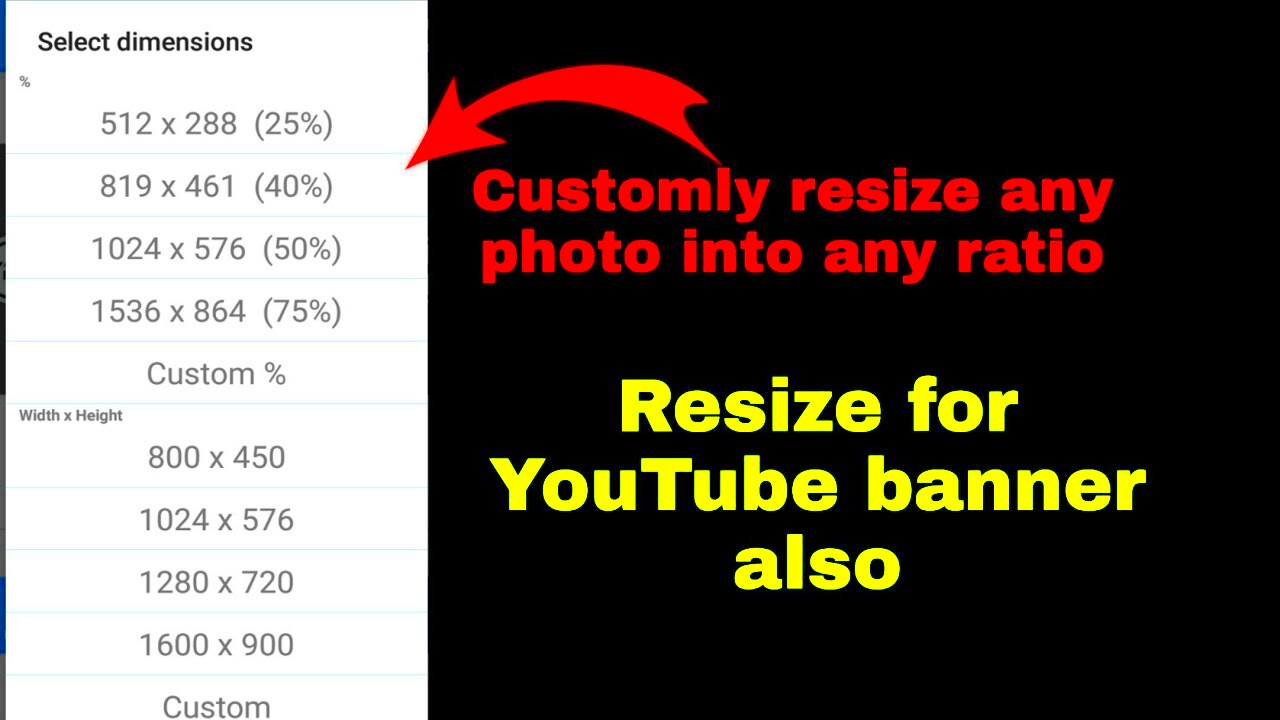
The 1024 by 576 pixels dimension is a popular resolution, especially for videos and images used in modern media. This aspect ratio of 16:9 is ideal for creating visuals that maintain a widescreen format without being too large or too small. Whether you’re designing a banner, creating content for YouTube, or preparing an image for social media, this size works well across many platforms.
1024 by 576 pixels have many advantages, including:
- Versatility: It’s compatible with widescreen displays and works well on most devices, from smartphones to desktop monitors.
- File Size Management: This dimension strikes a balance between quality and file size, helping images load quickly without losing too much detail.
- High Compatibility: Many online tools and platforms support this size, making it easy to upload and use without additional resizing.
Also Read This: Finding Image URLs on Your iPhone
How to Resize Images Online for Free
Resizing images online is simple and doesn't require expensive software. Many free tools allow you to quickly adjust the size of an image to fit specific dimensions, like 1024 by 576 pixels. These tools are user-friendly and accessible, perfect for anyone who isn’t familiar with professional editing software.
To resize your image online, simply follow these steps:
- Choose a free online image resizing tool. Some popular options include ResizeImage.net, PicResize, and Canva.
- Upload the image you want to resize. Most tools allow drag-and-drop functionality, making it quick to get started.
- Select the option to set custom dimensions. Enter 1024 for the width and 576 for the height.
- Ensure the aspect ratio is locked to prevent distortion, and hit the resize button.
- Download the newly resized image to your device.
Croping, compressing and adjusting photo quality if offered by most online tools in addition to image resizing. These extras might assist you in polishing your resized image prior to downloading.
Also Read This: How to Change Background in Adobe Photoshop CS3
Using Image Editing Software to Create 1024 by 576 Pixels Images
If you prefer more control over your image resizing process, using image editing software is a great option. Unlike online tools, software like Photoshop, GIMP, or even simpler programs like Paint, provides more flexibility in terms of precision and quality control. Whether you're working on a PC or a Mac, these programs allow you to adjust images to exact dimensions, such as 1024 by 576 pixels, with ease.
Here is a quick step-by-step guide on how to resize using several much used editing software:
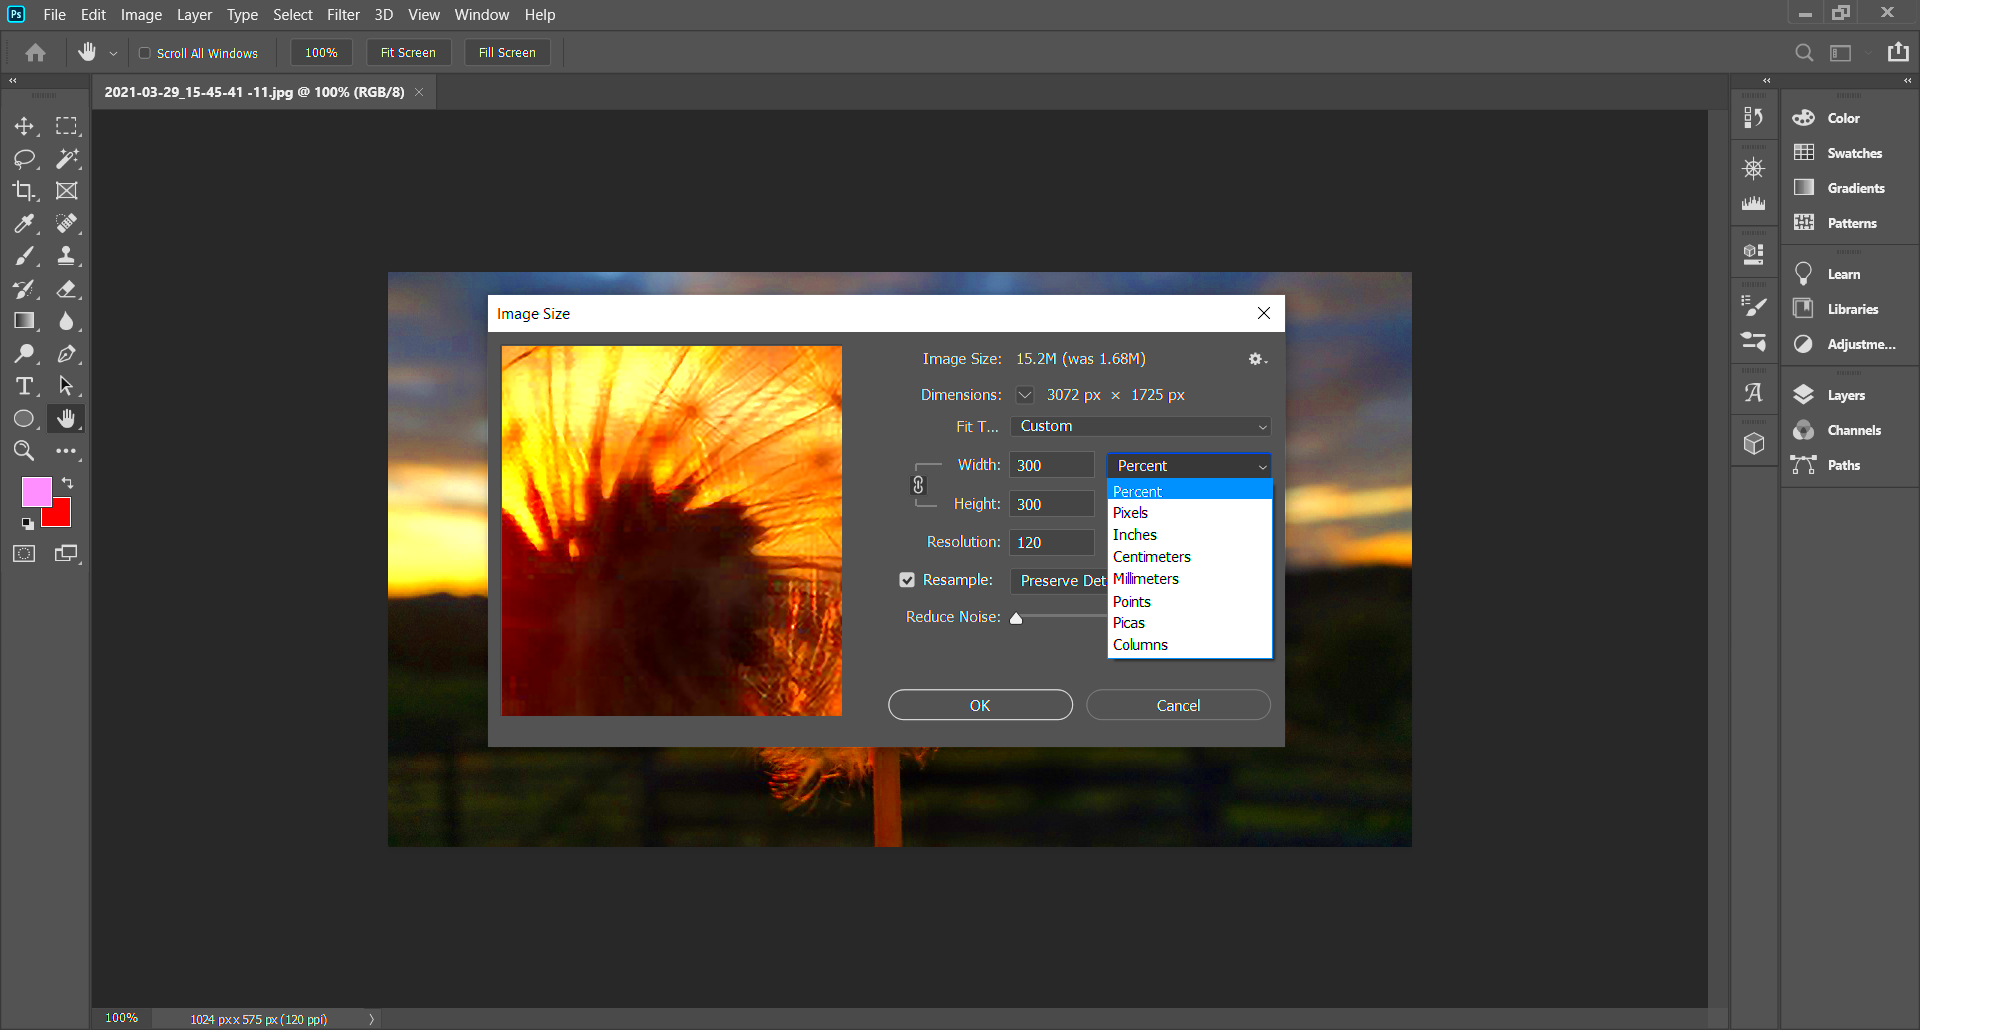
- Photoshop:
- Open the image in Photoshop.
- Go to the top menu and click on Image > Image Size.
- In the dialog box, set the width to 1024 pixels and height to 576 pixels. Ensure the constrain proportions box is checked to avoid distortion.
- Click OK and save your resized image.
- GIMP:
- Open your image in GIMP.
- Click on Image > Scale Image.
- Enter the width as 1024 and the height as 576 in the appropriate fields.
- Press Scale and save your image.
- Microsoft Paint:
- Open the image in Paint.
- Select Resize from the toolbar.
- Choose the Pixels option and enter 1024 for width and 576 for height.
- Click OK and save your image.
These computer programs are really good for both those who are just starting out and those who have been using them for a long time. You can have complete authority on how big or small your image should be, as well as other editing features such as changing its brightness, contrast or cropping it.
Also Read This: Let’s Uncover the Most-Watched Content on Rumble in this Blogpost
Tips for Maintaining Image Quality While Resizing
If you resize an image often times, it can lose its quality according to research findings whereby resizing it up or down by too much leads to degradation in the value of the picture. Regardless of this, tips on making sure that your new picture gets clearer and remains sharp too are found below.
Resize images quality maintaining tips are as follows:
- Start with a high-quality image: The better the resolution of the original image, the better the resized version will look. Always work with the highest resolution available.
- Avoid excessive resizing: Don’t continuously resize an image in different increments. Instead, try to resize it once to the desired dimensions to avoid pixelation and blurring.
- Use the correct interpolation method: When resizing in programs like Photoshop or GIMP, use appropriate interpolation methods like Bicubic Sharper (for reduction) or Bicubic Smoother (for enlargement). This will help maintain image clarity during resizing.
- Check for aspect ratio distortion: Always ensure that the aspect ratio is locked when resizing. This prevents your image from looking stretched or squished.
- Apply sharpening filters: After resizing, a light application of a sharpening filter can help restore some of the lost detail, particularly around edges.
By following these tips, you can maintain good image quality even when resizing to specific dimensions like 1024 by 576 pixels.
Also Read This: Roblox Rhythms: Playing Roblox with a Soundtrack from Spotify
Best Tools for Resizing Images
Several instruments exist for the purpose of modifying image size, from simple online platforms to advanced desktop applications. Some tools are real standout options providing convenience and efficiency depending on whether you need quick sizing or more complicated alternatives.
Some of the finest tools designed for resizing images include:
| Tool | Platform | Best For |
|---|---|---|
| Photoshop | Windows/Mac | Professional-level control and quality |
| GIMP | Windows/Mac/Linux | Free and open-source, with advanced features |
| Canva | Online | Simple, fast resizing with templates |
| ResizeImage.net | Online | Quick resizing without registration |
| PicResize | Online | Resizing and simple edits for free |
| Paint | Windows | Basic resizing and editing |
Every specific instrument acts differently when presented with a problem. There are those tools like Photoshop or GIMP that provide users with advanced editing functionality. There exist other tools such as Canva and ResizeImage.net making it possible for someone desiring to resize their images quickly and simply disregard getting actual software applications installed on their computers.
Also Read This: Exploring the Popular A Closer Look with Seth Meyers on YouTube
Common Mistakes to Avoid When Resizing Images
While it may look like a simple task, resizing images comes with complications- mostly mistakes that lead to substandard photos or additional irritation. To achieve the most favorable outcome in any occasion when an image is scaled down or up, one should take heed of these slip-ups.
In here are the most known errors and ways to avert them:
- Not locking the aspect ratio: Forgetting to lock the aspect ratio when resizing can result in images that are stretched or squished. Always ensure that the option to maintain aspect ratio is checked when resizing.
- Upscaling too much: Enlarging an image too far beyond its original size can lead to pixelation and a noticeable loss of quality. If you need to enlarge an image, try not to scale it up more than 150% of its original size to maintain clarity.
- Resizing repeatedly: Resizing an image multiple times can reduce its quality with each adjustment. It’s best to resize once to the final dimensions you need, rather than doing it in stages.
- Using the wrong file format: Certain formats like JPEG can lose quality when resized and saved repeatedly. Consider using PNG if you plan to resize or edit the image multiple times, as it preserves quality better.
- Neglecting to check resolution: When resizing for print, ensure your image has a high enough resolution (at least 300 DPI). For web use, aim for 72 DPI to keep file sizes manageable without sacrificing quality.
In being careful with these things, you will not only evade the annoyance but also allow your changed pictures to be at their best.
Also Read This: How to Copy a Font from an Image for Text Matching
FAQs About Resizing Images
Questioning the resizing of pictures is something beginners in image editing find themselves doing. Below is a list of frequently asked questions that would help clarify various common worries associated with this topic.
1. Will resizing an image affect its quality?
Resizing an image can definitely influence its quality, more so when it is enlarged. Conversely, reducing the size tends to have a lesser effect; however, excessive size increase may result in pixelation. Moreover, using specialized software that is well-configured can minimize loss of quality.
2. How do I resize an image without losing quality?
Start with a high-quality original image, and avoid excessive resizing. Use image editing software that offers options like Bicubic Sharper for downsizing and Bicubic Smoother for upsizing, which helps preserve details.
3. Can I resize images on my phone?
Yes, there are apps available on both Android and iOS platforms that allow you to resize images. Popular apps include Adobe Photoshop Express and Snapseed. These apps are user-friendly and allow for quick resizing on the go.
4. What is the best file format to use for resizing?
For resizing without quality loss, consider using formats like PNG or TIF. JPEG is more compressed and can lose quality with repeated resizing and saving.
5. Why does my resized image look blurry?
There’s a chance that it is caused by enlarging the image excessively or having an original file of poor quality. Consider applying a sharpening filter after resizing to get better clarity.
Conclusion: Achieving the Perfect Image Size
Getting the perfect image size, whether it's 1024 by 576 pixels or any other dimension, doesn’t have to be complicated. By understanding how image dimensions work and choosing the right tools, you can resize your images efficiently while maintaining their quality.
The first picture should be of high resolution; it is also important that the aspect ratio remains locked so that there will no distortion but instead the picture will remain sharp even after resizing them several times. There are numerous online tools and even professional software such as Photoshop available at your disposal in order to make changes on how your images appear like.
If you have the right method and pay close attention, you can make your images smaller without losing its quality thus making it perfect for its platform and application.
 admin
admin