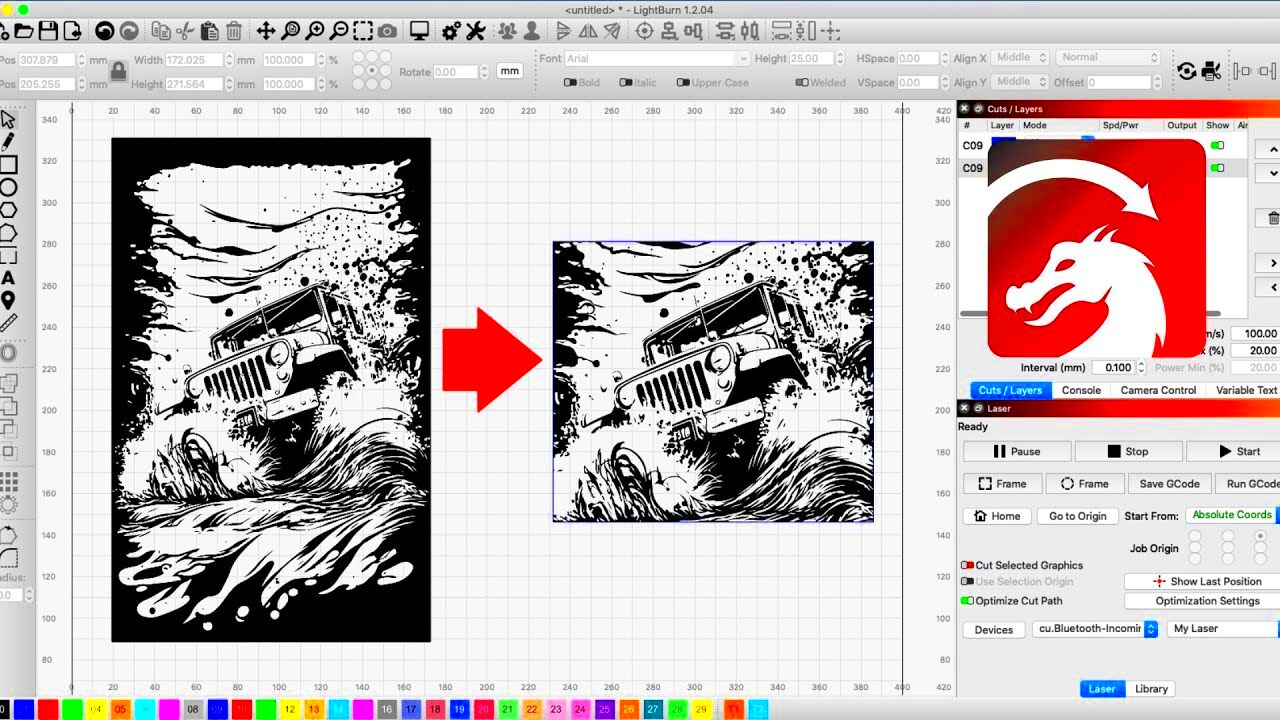
Lightburn is a powerful software designed for laser engraving and cutting. It offers a range of tools that make it easy to work with images, graphics, and designs. Users can create intricate projects, adjust settings, and even manage laser parameters right from this program. Whether you are a beginner or an experienced user, Lightburn provides a user-friendly interface that simplifies complex tasks.
This software supports various file formats, which means you can easily import your favorite images. Its features cater to different aspects of laser operations, such as layout design and material settings. Overall, Lightburn stands out for its versatility and ease of use.
Opening Your Image in Lightburn
To start cropping your image, you first need to open it in Lightburn. Here’s how you can do this:
- Launch Lightburn on your computer.
- Click on the File menu at the top left corner.
- Select Import from the dropdown menu.
- Browse to find the image file you want to open.
- Click Open to load the image into the workspace.
Once the image is opened, you’ll see it displayed in the main workspace. This is where you can start editing and cropping your image.
Also Read This: How to Download YouTube Audio A Guide to Extracting Sound from Videos
Using the Crop Tool in Lightburn
Lightburn includes a handy crop tool that helps you cut down your image to the desired size. Here’s how to use it:
- Select the image you want to crop by clicking on it in the workspace.
- Look for the Crop Tool in the toolbar. It usually looks like a pair of overlapping rectangles.
- Click on the Crop Tool to activate it.
When the Crop Tool is active, you will see a box around your image. You can click and drag the corners or sides of this box to select the area you want to keep. This tool allows for precise cropping, ensuring your final image looks just the way you want it.
Also Read This: How to Download Adobe Stock Images in Different Formats
Selecting the Area to Crop
After activating the Crop Tool in Lightburn, the next step is to select the area you want to keep. This part is crucial because it determines what the final image will look like. Here’s how to select the area:
- Click and drag your mouse to create a selection box around the area you want to retain.
- Adjust the edges of the selection box by clicking and dragging the handles that appear on the corners.
- Make sure to include all the important details you want in the final image.
While selecting, it’s good to keep in mind the aspect ratio of your final image. You can also hold the Shift key while dragging to maintain a square selection if needed. This is especially useful for logos or other designs that require a specific shape.
Once you’re happy with your selection, you can move on to the next step.
Also Read This: Avoiding Overused Stock Photos and Keeping Your Content Fresh with Imago Images
Adjusting Crop Settings
Now that you've selected the area to crop, it’s time to adjust the crop settings. This part helps refine your selection and ensures the image fits your needs. Here’s how to go about it:
- After making your selection, look for the properties panel usually located on the right side of the screen.
- Here, you can adjust settings like:
- X and Y Position: Move your selection box around the image.
- Width and Height: Enter specific dimensions to resize your selection.
- Aspect Ratio: Lock this setting if you want to maintain the proportions while resizing.
These adjustments ensure your cropped image looks just as you envisioned. Experiment with different settings to find what works best for your project.
Also Read This: Here’s the Simplest Way to Download LinkedIn Post With One Click
Previewing Your Cropped Image
Before finalizing your crop, it's a good idea to preview the image. This step helps you confirm that everything looks good and that you haven’t missed any important details. Here’s how to preview:
- After adjusting the crop settings, locate the Preview button, usually found near the crop tool.
- Click the Preview button to see how the cropped image will appear.
In the preview mode, take a close look at:
- Framing: Make sure the important elements are centered and visible.
- Clarity: Check for any distortion or quality loss in the image.
- Color and Brightness: Ensure the colors look as you want them to.
If you’re satisfied with the preview, you can move forward and save your cropped image. If not, you can go back and adjust your selection or settings until you get
Also Read This: Dailymotion and Its Features for Subtitles Closed Captioning and Automatic Transcription
Saving the Cropped Image
Once you’re happy with your cropped image, it’s time to save it. This step is essential to ensure all your hard work doesn’t go to waste. Here’s a simple guide to save your image in Lightburn:
- Click on the File menu in the top-left corner of the window.
- Select Export from the dropdown menu.
- A dialog box will appear asking where you want to save the file.
- Choose your desired location on your computer.
- Enter a name for your file in the File Name field.
- From the Save as Type dropdown, select the desired file format, such as PNG, JPEG, or another supported format.
- Click Save to complete the process.
After saving, it's a good idea to navigate to the saved location and open the file to confirm everything looks perfect. You may want to keep a backup of the original image, just in case you need to make further adjustments later.
Also Read This: Simple Steps to Copy Images into Paint
Frequently Asked Questions
Here are some common questions about cropping images in Lightburn:
- Can I undo my crop? Yes, Lightburn allows you to undo your last action by pressing Ctrl + Z.
- What file formats can I save my image in? Lightburn supports various formats, including PNG, JPEG, and SVG.
- Is it possible to crop multiple images at once? Unfortunately, you need to crop images one at a time in Lightburn.
- Can I adjust the crop after saving? No, once you save the cropped image, it becomes a new file. You would need to re-import the image to crop again.
If you have other questions or run into issues, consider checking online forums or the Lightburn support page for additional help.
Conclusion
Learning how to crop images in Lightburn is a valuable skill for anyone working with laser cutting or engraving. By following these steps, you can easily select, adjust, and save your images, ensuring they meet your project's requirements. Practice makes perfect, so don't hesitate to experiment with different images and settings.
 admin
admin


