In the world of stock pictures, especially on sites such as
Shutterstock, one of the first things you will meet is resolution and size. I recall when I first started working as a photographer trying to understand how to configure my images correctly. It was the most difficult time of my life! Understanding these words is very important for both new and seasoned photographers. Let us clarify this statement.An image’s photo resolution refers to the level of detail it holds. Pixels measure it, and usually a higher resolution means a more distinct and clearer image. Size, however, is basically related to dimensions of an image, mainly expressed either in inches or pixels. Thus, what is their importance? This is because they generally have a great effect on the way our pictures appear when printed or displayed online.Here is a brief summary:
- Resolution: More pixels mean more detail.
- Size: Larger images can be resized without losing quality.
With these ideas in mind, you will be able to identify the features of the images that you needtouse for your project.
Importance of Choosing the Right Resolution
Choosing the right resolution is akin to an event’s ideal outfit selection. For a wedding, you would not choose to go casual, would you? This remains true for images, too. The image quality that you choose differs in appearance depending on contextual factors.With the intention of imparting a life lesson, allow me to narrate a something personal. Once upon a time, I utilized an image of low resolution during one of my presentations assuming it was enough. But when I turned it on the screen, my face was so red from shames! That image was all pixelated and fuzzy which eclipsed all my ideas! What this taught me was that resolution is not merely some technicality but rather a thing for impact.Following are some reasons why resolution is Important:
- Clarity: Higher resolution images are clear and vibrant.
- Versatility: They can be used in various formats without losing quality.
- Professionalism: High-quality images enhance credibility.
To sum up, if you get the right resolution your job becomes beautiful and captivating.
Common Resolutions for Shutterstock Images
In terms of the various resolutions available at
Shutterstock, they cater to different purposes. Understanding how to select the ideal resolution can save you from future difficulties. Below is a summary of the most frequent resolutions found in this site:
| Resolution | Best For |
|---|
| Standard (72 DPI) | Web use, social media posts |
| High (150 DPI) | Basic print materials, flyers |
| Ultra (300 DPI) | Professional prints, posters, magazines |
When choosing resolution, think of how do you need to use your image? For example, if it is meant for a big banner then you will require that ultra-high resolution so as to keep clear. Conversely, it may only demand standard resolution in case of an ordinary social media post.Take into account the particular requirements you’ve got and the desired end product as the key to making a wise decision. It’s all about making sure that your images speak out what you want them to say.
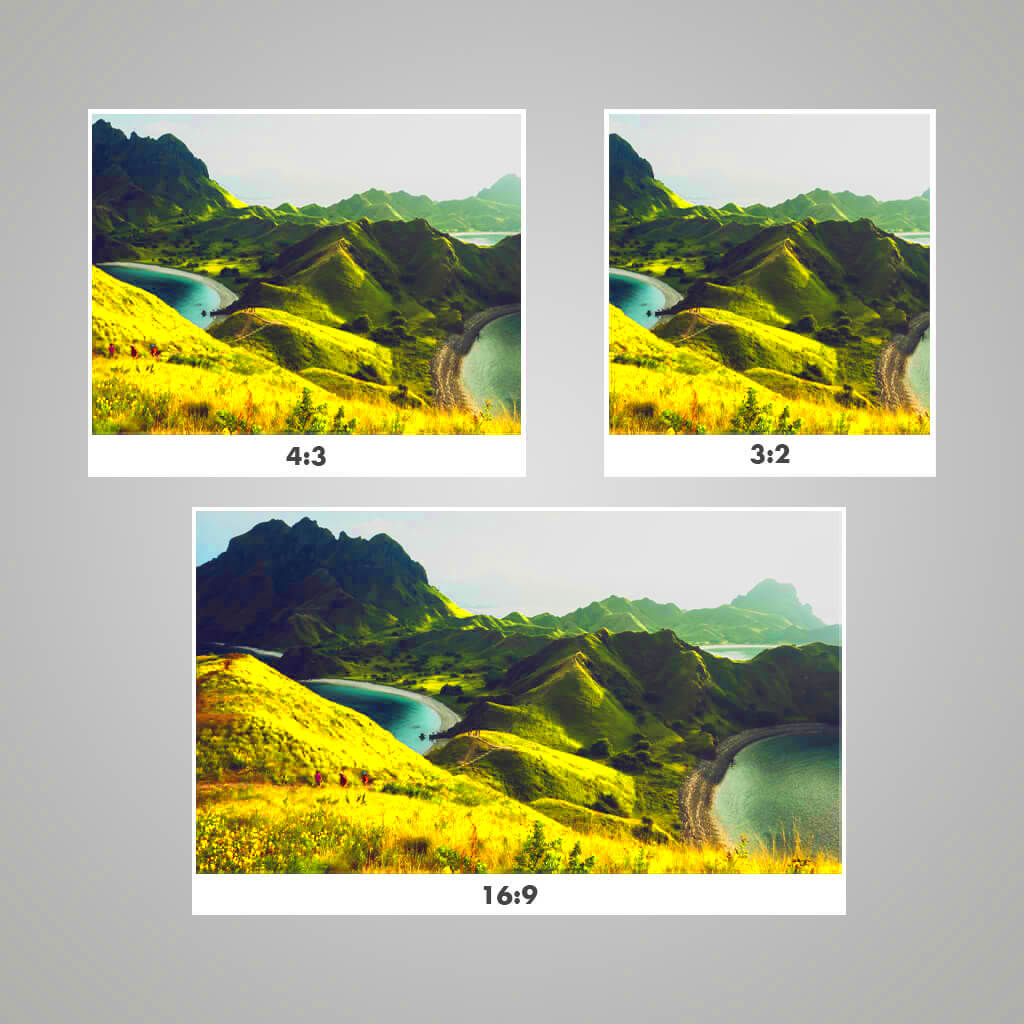
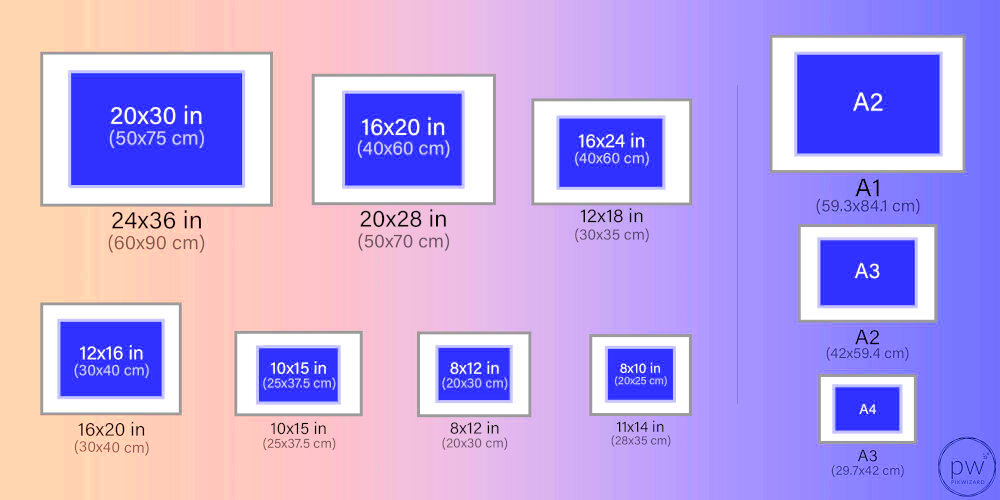
How Image Size Affects Quality

Withal, have you ever brought forth a picture just to perceive that it is blurry and untidy? This taught me an important lesson on image size and quality. Image resolution strongly reflects its clarity and appearance, be it on screen or in print form. It resembles cooking where using the appropriate components in suitable quantities is paramount!An important dimension of an image is its size which is generally described in pixels, thus affecting the sharpness of the image. In most cases larger pictures have more explicit features hence they preserve their quality even as they are resized. However, when an image is small and you attempt to zoom it or upscale it, it will become a pixelated version of itself that looks hazy.Below are essential reminders:
- Small Images: Great for quick online use but can look unprofessional if printed or enlarged.
- Medium Images: Versatile and can be used in various contexts, but might not suffice for high-quality prints.
- Large Images: Ideal for prints and professional work; they maintain quality even when scaled up.
Theoretically, knowing how the size of an image affects its quality in the end will enable you to make choices that are informed and knowledgeable. It’s a calculated balance when clarity and objective meet.
Choosing the Right Format for Your Needs
Due to the fact that images are images, the format may be even more important than the content. There was a time I saved a project in a wrong format in hurry and had compatibility problems later on. It was annoying but I learnt my lesson from it. In this article we will discuss different image formats and when to use them.Here is a brief overview:
| Format | Best For |
|---|
| JPEG | Photography, web use |
| PNG | Images needing transparency |
| GIF | Simple graphics and animations |
| TIFF | High-quality prints |
Selecting an appropriate format is based on particular requirements. For instance, during a web development project one would prefer to go for JPEGs because of the balance they have between quality and size of the files. However, in cases where a logo image requires transparency then it’s better to use PNGs instead.The knowledge of each format’s strengths and weaknesses will enable you to make better decisions regarding your projects, increasing the likelihood that they will be realized as intended.
Tips for Downloading Images from Shutterstock
Despite the vast number of choices available at
Shutterstock, it is important to note that downloading images from it can be one of the most enjoyable things ever done. I can recall when I visited a site full of pictures for my first time without an idea what to click first. This experience resembled walking through a big bazaar – thrilling yet horrifying! Therefore, here are some suggestions that assisted me in making my way easier.First of all, it is always advisable to narrow down your choices using the search filter. This helps you find what you are looking for more easily as you can filter by image type, orientation and even color scheme. Also think about these:
- Check the License: Ensure you understand how you can use the images.
- Preview Images: Always view the image at different resolutions to get a feel for quality.
- Create a Collection: Save images to a collection as you browse. It helps to compare options later.
- Download in the Right Size: Choose a size that fits your project to avoid unnecessary loading times.
In conclusion, don’t hesitate to reconsider your options. A little distance can sometimes clear your head. Enjoy your downloads and let your work shine with the best imagery!
Frequently Asked Questions
When you first start using stock images, you may have some questions. I can’t forget my confusion when I began using
Shutterstock and other such sites. It’s an entire universe of terminologies and choices that can leave one feeling a bit lost at first. In this article, I want to look at some of the most popular questions I’ve come across regarding stock photography throughout the years.
1. What is the difference between resolution and size?
Resolution usually interprets to the image quality that holds in it mostly the power to see though pixels, whereas size stands for the dimension of pictures created. Generally, an image with higher resolution will occupy more space; however, choosing should be done taking personal requirements into consideration.
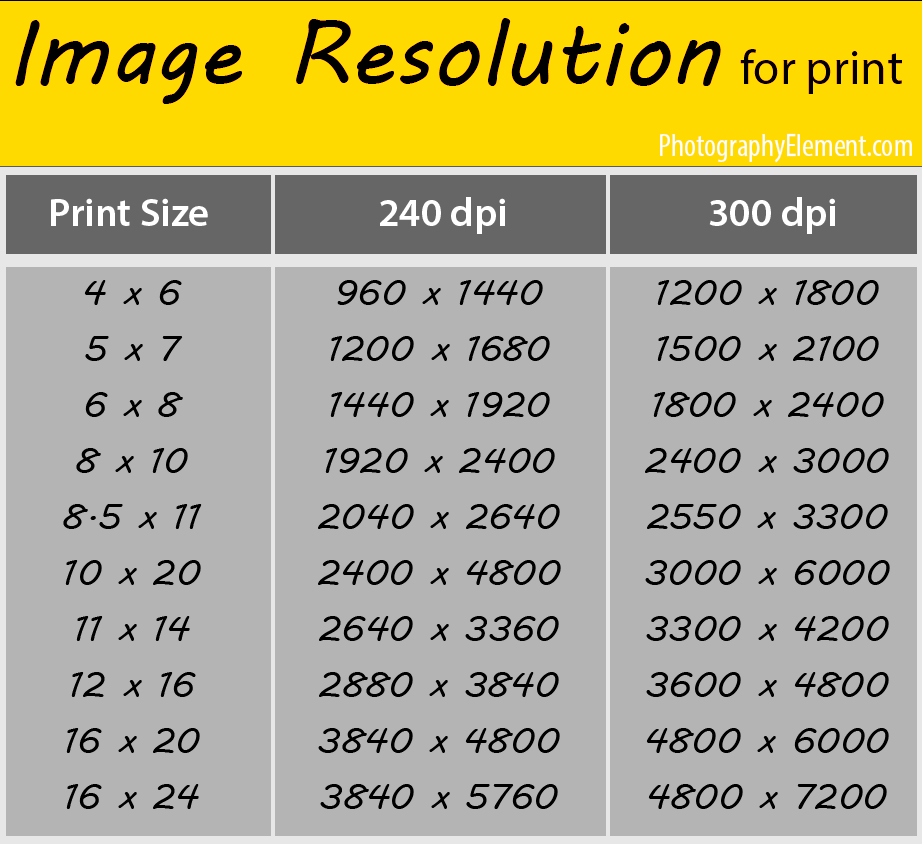
2. How do I know what resolution I need for my project?
In term of final utilization of an image, 72 DPI is generally enough for online usage. On the other hand, when it comes to printed materials, 300 DPI should be chosen so as to provide a clear and sharp appearance.
3. Can I resize images without losing quality?
Okay, the thing is there is a catch to it. You may enlarge an image with low definition but adding too much size will make it appear lumpy. So, if you intend on resizing it a lot then begin with an image that has high resolution.
4. What format should I download my images in?
It depends on what you require! JPEG works well for diverse applications, PNG allows for transparency while TIFFs generate high quality prints. The selection must be made in accordance with the intention behind utilizing the photograph.
5. Is it okay to use stock images for commercial purposes?
Indeed, however, make it a point to read the licensing agreements.
Shutterstock has different licenses and understanding them helps you to use images correctly.
Conclusion
While it may initially seem complicated, stocking the right images is not hard. Hence, one should have knowledge of resolution, size, formats and the best practices when downloading stock photography. This is important because an ideal image may improve your projects and communicate your message well. So go slow, explore the alternatives and make sensible decisions. Have fun creating!
 admin
admin