Have you ever purchased a beautiful image from
Adobe Stock only to realize it's slightly too small for your needs? I can relate to the annoyance of not having the perfect size on hand. Thankfully resizing these images isn't as challenging as it may seem. In this article we'll go over some easy ways to make those images fit seamlessly into your projects without compromising on quality. So let's jump right in and discover how to make your visuals work, for you!
Understanding Adobe Stock Image Licensing
Before diving into resizing your images from
Adobe Stock it's important to understand the fundamentals of image licensing. When you buy an image on
Adobe Stock you obtain a license that grants you permission to use the image within specific boundaries. This license usually encompasses the usage of the image for both personal and commercial endeavors but it may not extend to alterations beyond the standard range.
Here’s a brief overview:- Standard License: Covers most typical uses, including marketing and advertising, but may have size limitations.
- Extended License: Provides more flexibility, allowing for larger prints or more extensive commercial use.
Before enlarging the image you purchased make sure to review the licensing details to confirm that it complies with your intended usage. If you plan to use the image in a manner not included in the standard license consider opting for an extended license. Being aware of these factors will assist you in steering clear of any potential legal issues in the future.
Choosing the Right Image Size for Your Needs
Choosing the right size for your
Adobe Stock image can greatly impact the outcome of your project. Picture this you’re designing a colorful flyer and discover that the image is too small making it look pixelated or fuzzy. I’ve been in that situation before too and it’s wise to think ahead.
Here are a few suggestions to assist you in selecting the appropriate size.- Determine Your Requirements: Consider where and how the image will be used. For print, you'll need a higher resolution compared to web use.
- Check Image Resolution: Images are usually measured in pixels. A higher pixel count means better quality when enlarging.
- Use Quality Tools: Tools like Adobe Photoshop can help you resize images without sacrificing too much quality.
Keep in mind that when it comes to increasing the size of an image, it's important to strike a balance between size and quality. If you intend to enlarge an image it's usually advisable to begin with a larger version. By doing so you can maintain the finer details and achieve a polished and high quality end result.
Using Adobe Photoshop to Enlarge Your Image
Adobe Photoshop is an amazing software that a lot of people use for different image editing jobs. If you need to make an image bigger Photoshop is definitely a great option. I recall the moment I had to enlarge an image for a big poster it felt a little daunting at first. However after some practice I discovered that Photoshop's features work really well.
Here’s a guide on how to make your image bigger in Photoshop.- Open Your Image: Launch Photoshop and open the image you want to enlarge by going to File > Open.
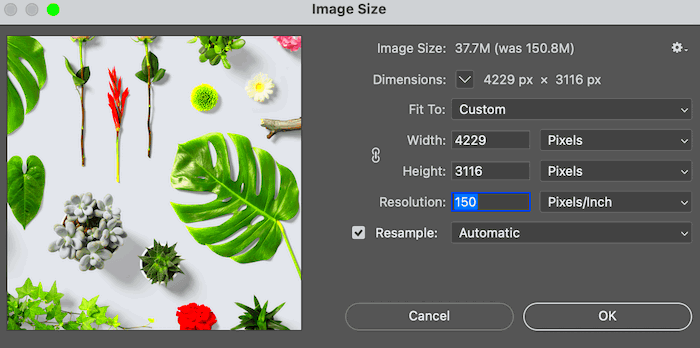
- Access Image Size Settings: Go to Image > Image Size. A dialog box will appear where you can adjust the dimensions.
- Adjust Dimensions: Change the width and height to your desired size. Make sure to check the Resample box to enable Photoshop to add new pixels.
- Choose a Resampling Method: Photoshop offers several resampling methods. Preserve Details is often a good choice for enlarging, as it helps maintain image quality.
- Apply Changes: Click OK to apply the changes. Photoshop will process the image and resize it according to your specifications.
Resizing photos in Photoshop can be pretty easy once you get the hang of it. Just make sure to save your edited picture in a format to achieve the best outcome.
Alternative Tools for Enlarging Stock Images
Photoshop is a popular choice for image editing but there are other tools available too. Throughout my experience I've tried out different options for resizing images, each with its own set of features. If Photoshop doesn't suit your preferences or you're seeking a more straightforward approach here are some alternatives that might catch your interest.
- GIMP: A free and open-source alternative to Photoshop. It’s a powerful tool for basic image enlarging tasks and offers various resampling options.
- Pixlr: An online image editor that’s easy to use. It provides basic resizing functions without the need to install any software.
- AI-based Tools: Websites like Upscaler and Deep Image use artificial intelligence to enlarge images while preserving details.
Trying out these tools can be an enjoyable way to discover what suits you best. Each tool has its own advantages, so feel free to experiment with a few and see which one aligns with your requirements.
Tips for Maintaining Image Quality
Making sure your picture stays sharp and clear when you blow it up can be quite a balancing act. I’ve encountered my fair share of fuzzy or distorted photos and through some experimentation I’ve learned a handful of tricks that can really help.
Here are a few suggestions to maintain the crispness of your visuals- Start with High Resolution: The higher the original resolution, the better the result after enlargement. If possible, always opt for the highest resolution available.
- Avoid Excessive Enlarging: Every time you resize an image, some quality is lost. Try to avoid enlarging an image too much. It’s better to start with a larger file if you anticipate needing a bigger size.
- Use Quality Resampling Methods: In tools like Photoshop, choosing the right resampling method (like Preserve Details) can help retain more details.
- Sharpen After Resizing: Sometimes, images lose sharpness after resizing. Applying a subtle sharpening filter can help restore some of the lost detail.
- Check and Adjust Manually: After resizing, review the image closely. Sometimes, manual touch-ups might be needed to fix any imperfections.
These suggestions can assist you in obtaining outcomes when it comes to resizing images making sure they appear as sharp and polished as you can.
Common Issues and How to Avoid Them
Upscaling stock photos can be a bit tricky. I recall my initial attempt to enlarge an image for a big canvas print and it turned out pixelated and fuzzy. It was a valuable lesson though I’ve since figured out ways to handle these typical challenges. Here are some issues you may run into and tips on how to steer clear of them.
- Pixelation: This occurs when an image is enlarged beyond its resolution limit. To avoid this, start with the highest resolution available. Resampling tools can help, but they can only do so much.
- Blurriness: Enlarging an image can sometimes make it look soft or out of focus. To counter this, apply a sharpening filter after resizing to bring back some of the lost clarity.
- Loss of Detail: Important details may become less clear when you enlarge an image. Using advanced tools like Photoshop and choosing the right resampling method can help preserve details.
- Color Mismatch: Sometimes, colors can shift during resizing. Make sure your color profiles are consistent, and check the image in different lighting conditions to ensure it looks right.
By being aware of these challenges and using the appropriate strategies you can greatly enhance the quality of your upscaled images and steer clear of typical mistakes.
Additional Resources for Adobe Stock Users
As someone who uses
Adobe Stock having the resources at your disposal can enhance your experience and boost your productivity. Throughout my journey I’ve come across various tools and communities that offer support and creativity. Here are a few resources that could prove beneficial.
- Adobe Stock Help Center: The official help center offers tutorials, FAQs, and troubleshooting tips. It’s a great starting point for any questions you might have.
- Adobe Creative Cloud Community: Join forums and discussion groups where you can connect with other Adobe users. Sharing experiences and solutions can be incredibly beneficial.
- Online Tutorials: Websites like Lynda.com and Udemy offer courses on Adobe Stock and Photoshop, helping you make the most of your tools.
- Stock Image Blogs: Follow blogs that focus on stock images and graphic design. They often share tips and tricks that can help you get the most out of Adobe Stock.
By making use of these tools you can improve your efficiency and find your way through any obstacles you may encounter as an
Adobe Stock user.
Frequently Asked Questions
If you are working with images and adjusting their size you may have some queries. I’ve gathered a list of questions that are commonly asked to help clarify things for you.
Can I enlarge any Adobe Stock image?
- Yes, you can enlarge Adobe Stock images, but the quality will depend on the original resolution. Starting with a high-resolution image is crucial.
Will enlarging an image affect its quality?
- Enlarging an image can affect its quality. Using proper resizing techniques and tools can help maintain as much detail as possible.
What tools are best for enlarging images?
- Adobe Photoshop is highly recommended, but other tools like GIMP, Pixlr, and AI-based enlargers can also be effective.
How can I avoid pixelation when enlarging images?
- To avoid pixelation, start with the highest resolution available and use advanced resampling methods to preserve details.
Is there a way to fix a blurry image after enlarging it?
- Yes, applying a sharpening filter in tools like Photoshop can help restore some of the clarity lost during enlargement.
These responses aim to tackle the worries regarding increasing the size of Adobe Stock images. If you have inquiries dont hesitate to check out more resources or contact the Adobe support team for assistance.
Conclusion
Scaling up images from Adobe Stock doesn't have to be overwhelming. With a grasp of licensing and the selection of tools and methods you now possess a strong basis to seamlessly integrate your visuals into any endeavor. Having gone through the procedure myself I've discovered that a blend of patience and strategy can yield remarkable results.Whether you're working in Photoshop or venturing into alternatives don't forget to kick things off with images and employ appropriate resizing techniques to uphold quality. By implementing these suggestions you'll discover that enriching your stock images can be both uncomplicated and fulfilling. Enjoy the editing process!
 admin
admin