When I made the choice to showcase my pictures on
Shutterstock I was both thrilled and anxious.
Shutterstock is like an ocean filled with countless artists sharing their creations in the hope of reaching a broader audience. Whether you’re a seasoned photographer or just someone who enjoys freezing moments in time
Understanding Shutterstock's Image Requirements
 Shutterstock
 has established rules to ensure that images uphold quality standards and are appropriate for their platform. Familiarizing yourself with these criteria can help you avoid wasting time and feeling frustrated.
Resolution: Shutterstock requires images to be high resolution, ideally 4 megapixels or more. This ensures that your photos are clear and can be used in various sizes without losing quality.
File Format: The preferred file formats are JPEG and TIFF. Make sure your images are in these formats to avoid upload issues.
Content Restrictions: Avoid images with watermarks, logos, or any identifiable brands. Also,
Shutterstock does not accept images with explicit content or anything that could be deemed offensive.
Composition: Your images should be well-composed and in focus.
Shutterstock appreciates photos with creative and original compositions that stand out from the rest.
Preparing Your Images for Upload
Preparing your pictures for Shutterstock requires some important steps. I recall the first time I got my images ready it seemed like a careful process but the effort pays off.
Editing: Before uploading, edit your photos to enhance their quality. Adjust brightness, contrast, and color balance to make your images look their best. Software like Adobe Lightroom or Photoshop can be very helpful here.
Metadata: Add relevant keywords and descriptions to your images. This metadata helps in making your photos more discoverable to potential buyers. Think about what people might search for and use those keywords.
File Size: Ensure your images are compressed without losing quality. Large file sizes can be cumbersome for upload and may not meet Shutterstock's limits.
Backup: Always keep a backup of your images. It’s a good practice to save your original files separately, so you can make future edits if needed.
By completing these steps, you'll be well prepared to confidently upload your images, assured that they align with Shutterstock's standards and are positioned for success.
Step-by-Step Guide to Uploading Images
Submitting your pictures to Shutterstock might seem challenging at first, but it’s actually pretty easy once you understand the ropes. I remember my first time uploading feeling a bit overwhelmed by the whole thing, but now it’s like second nature to me. So here’s a quick guide to make the process smoother for you.
1. Sign In: First, you need to log in to your Shutterstock contributor account. If you don’t have one, you’ll need to create it and wait for approval.
2. Go to the Upload Section: Once logged in, navigate to the “Upload” section. You can usually find this in your dashboard or under the contributor menu.
3. Select Your Images: Click on the “Upload” button and select the images you want to submit from your computer. Shutterstock allows bulk uploads, so you can add multiple files at once.
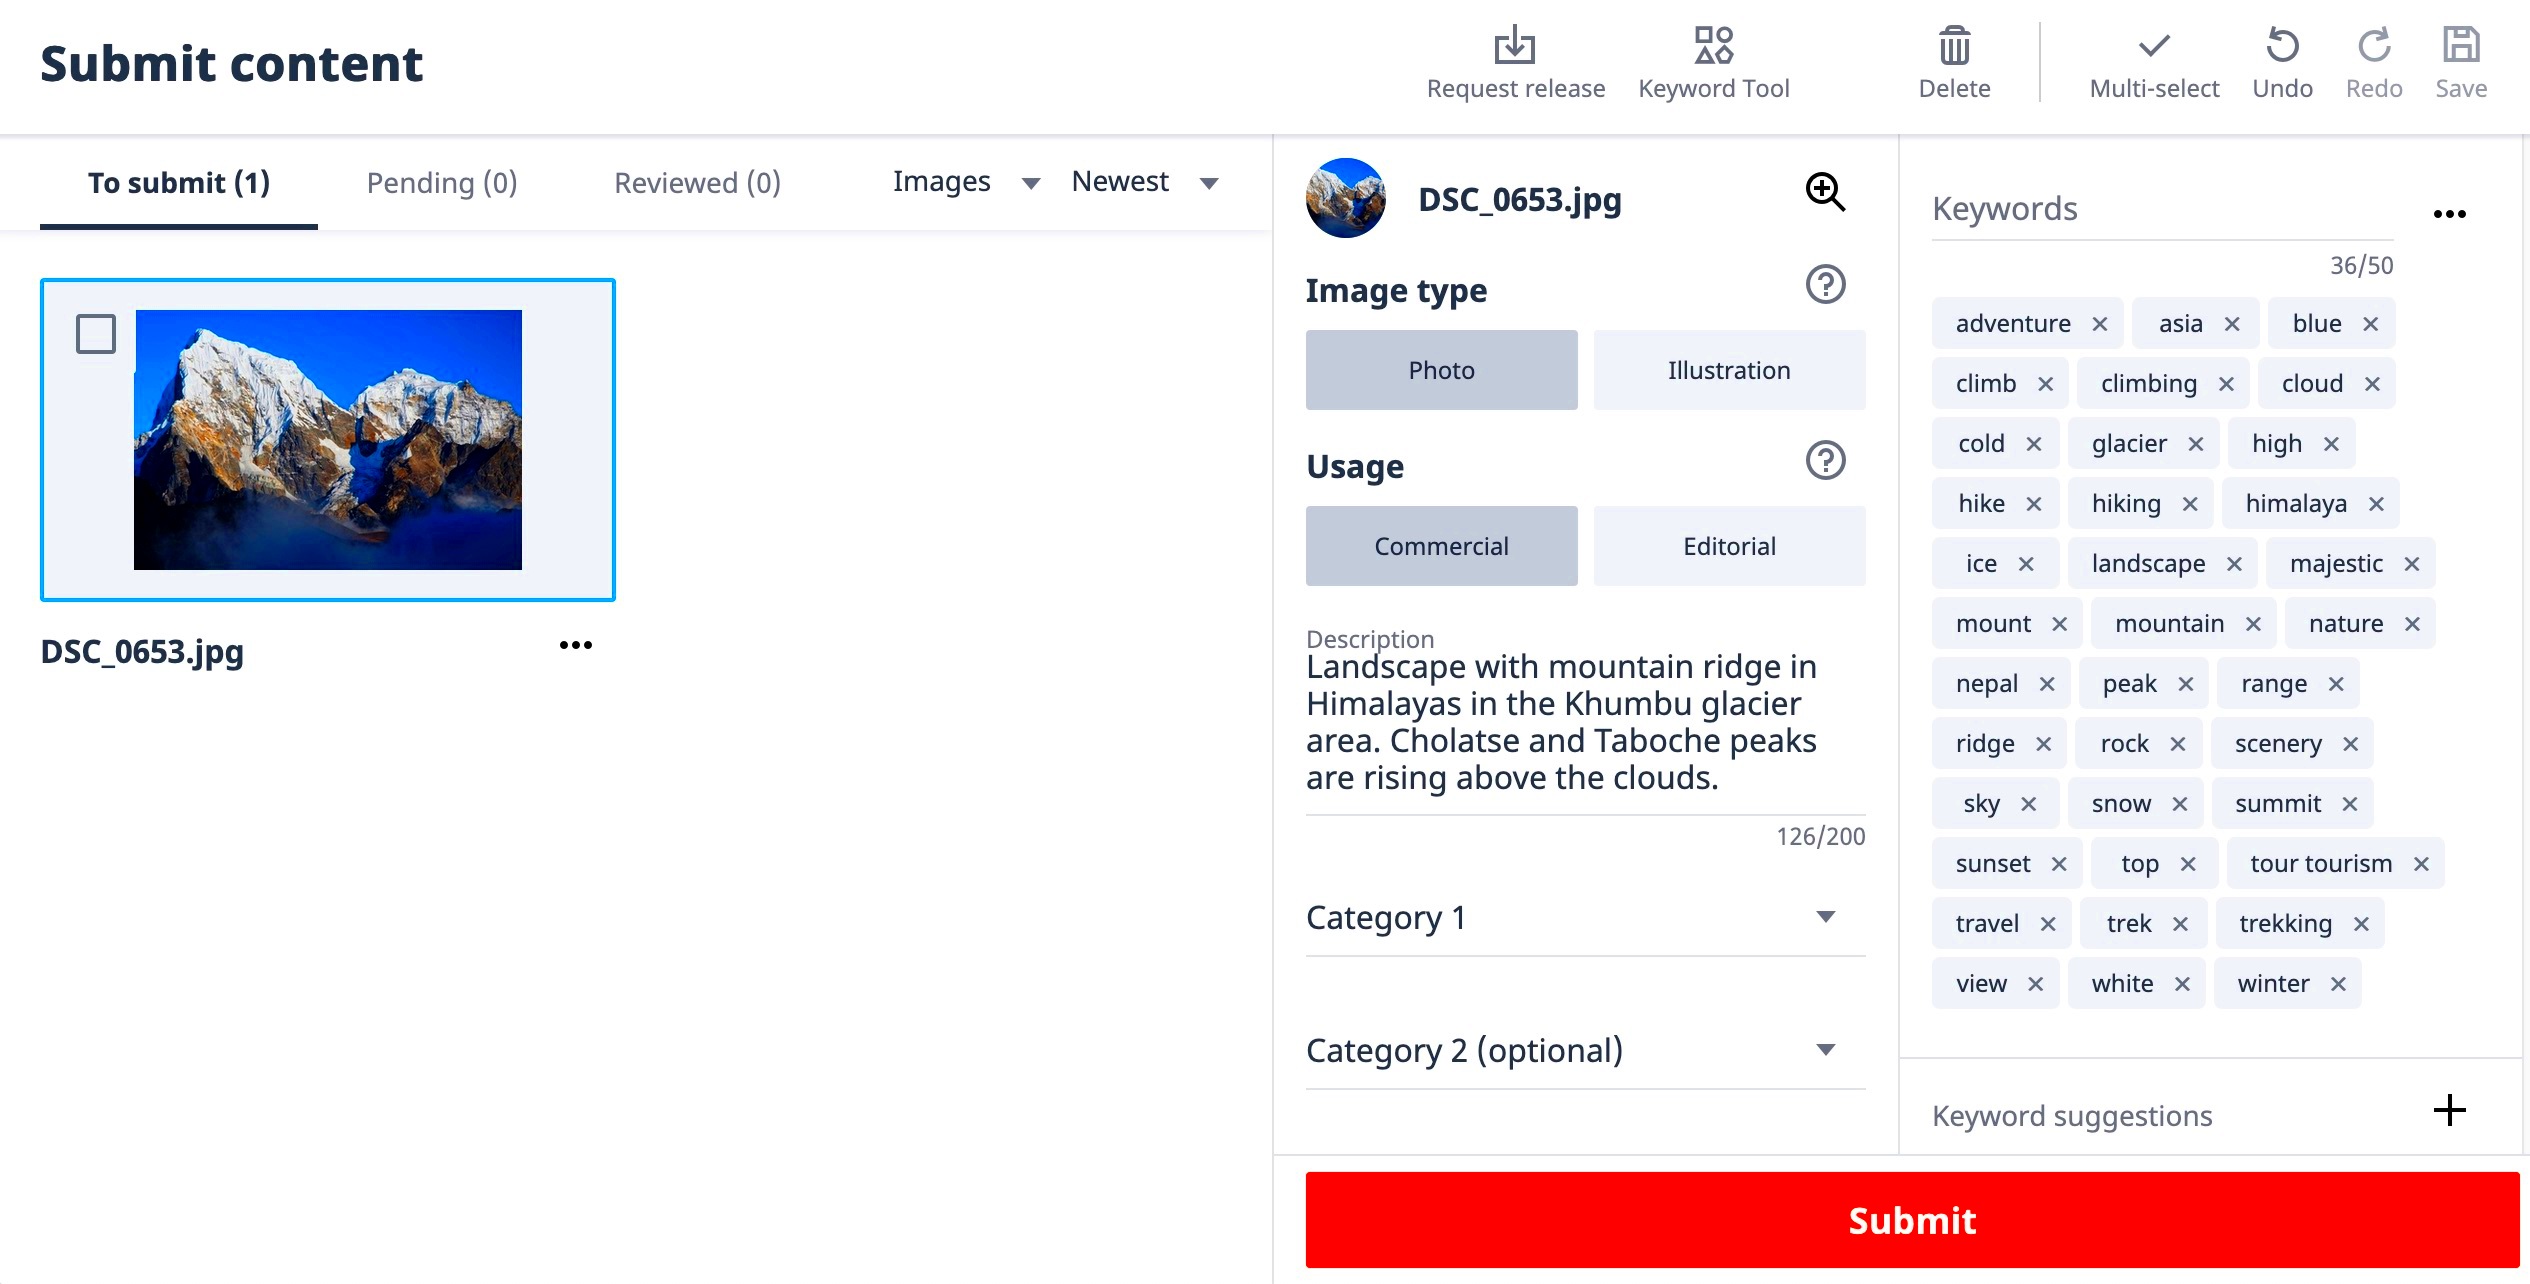
4. Add Metadata: For each image, add a title, description, and keywords. This helps buyers find your images. Be specific and relevant with your keywords to improve visibility.
5. Submit for Review: After adding the metadata, submit your images for review. Shutterstock’s team will check your submissions to ensure they meet their quality standards.
6. Monitor Your Uploads: Keep an eye on the status of your uploads. Shutterstock will notify you once your images are approved or if there are any issues.
Keep in mind that the benefits of uploading your content. As you get the hang of it you’ll simplify the workflow and enhance your overall experience with Shutterstock.
Managing Your Uploaded Images
Keeping your images in order on Shutterstock is essential to maintain a tidy portfolio and boost your sales. When I first got started I found it useful to create a method for handling my uploads. Here are some tips to help you stay organized with your collection.
1. Categorize Your Images: Use categories and tags to organize your images. This helps buyers find what they’re looking for and keeps your portfolio neat.
2. Update Metadata: Regularly review and update the metadata of your images. Adding new keywords or changing descriptions can help in attracting more buyers.
3. Track Performance: Shutterstock provides analytics to track how your images are performing. Pay attention to which images are popular and use this insight to guide future uploads.
4. Manage Your Rights: Ensure that all images comply with Shutterstock’s guidelines and that you have the appropriate model releases if necessary. This avoids legal issues and keeps your account in good standing.
5. Review and Refresh: Periodically go through your portfolio and remove images that aren’t performing well or don’t fit your current style. Freshening up your collection can attract new buyers.
Taking care of your pictures can boost your visibility and drive more sales. So make sure to put in the effort to keep your collection looking its best.
Common Issues and Troubleshooting
Despite having everything in place you may run into some challenges when it comes to uploading images to Shutterstock. Based on my experience resolving these issues can spare you a considerable amount of time and frustration. Here’s a helpful guide to assist you in addressing problems:
1. Upload Failures: If your images fail to upload, check the file size and format. Ensure they meet Shutterstock’s requirements. Sometimes, internet connectivity issues can also cause upload problems.
2. Rejection of Images: If your images are rejected, review the feedback provided by Shutterstock. Common reasons include poor image quality, incorrect metadata, or content violations. Adjust your images accordingly and resubmit.
3. Metadata Issues: Inaccurate or missing metadata can hinder your images from being found. Double-check your titles, descriptions, and keywords to ensure they’re accurate and comprehensive.
4. Account Issues: If you’re having trouble with your account, such as login issues or payment problems, contact Shutterstock’s support team for assistance. They’re generally responsive and helpful.
5. Technical Problems: Sometimes, technical glitches can occur. Clear your browser cache, try a different browser, or restart your computer to resolve these issues.
By tackling these issues head on you can enhance your experience and stay on course with your Shutterstock journey. Keep in mind that every problem comes with a resolution and determination is crucial.
Tips for Successful Image Uploads
Starting the process of submitting photos to Shutterstock can be an exciting yet daunting experience. Throughout my journey I have gathered some insights that have helped streamline the process and enhance its rewards. If you’re looking to make your visuals unique and appealing to potential buyers here are some suggestions to keep in mind.
1. Focus on Quality: Always prioritize the quality of your images. Clear, sharp, and well-composed photos are more likely to catch a buyer’s eye. Spend time perfecting your shots and editing them to enhance their appeal.
2. Research Trends: Keep an eye on current trends in stock photography. This can guide you in creating images that are in demand. For instance, during festival seasons, vibrant and thematic images often perform well.
3. Use Relevant Keywords: Accurate and relevant keywords can significantly improve the discoverability of your images. Think like a buyer—what terms might they use to search for your type of image?
4. Maintain Consistency: A consistent style and theme across your portfolio can help establish your brand. Buyers who appreciate your unique approach might return for more.
5. Test Different Shots: Don’t hesitate to experiment with different styles, subjects, and compositions. You might discover a niche that you excel in and that buyers love.
6. Keep Up with Guidelines: Regularly review Shutterstock’s submission guidelines as they can change. Staying updated ensures that your uploads always meet their standards.
Keep in mind that being patient and persistent is crucial. By following these suggestions you can improve your odds of achieving success and maximize your time on Shutterstock.
Conclusion: Getting Started with Shutterstock
Starting off with Shutterstock can be overwhelming, like diving into a sea of possibilities. I recall my own experience, filled with a mix of thrill and doubt as I explored the platform for the first time. However with every move I made I grew more assured and clear about what I wanted to do.
Embrace the Process: Don’t rush the process. Take your time to understand Shutterstock’s requirements, prepare your images, and familiarize yourself with the platform’s features.
Stay Persistent: Success on Shutterstock doesn’t come overnight. Be prepared for some trial and error, and keep refining your approach based on feedback and performance.
Engage and Learn: Engage with the Shutterstock community. Join forums, participate in discussions, and learn from the experiences of other contributors. It’s a great way to stay motivated and informed.
By committing yourself and taking initiative you can navigate Shutterstock successfully and transform your love for photography into a fulfilling endeavor. So go ahead and dive in start uploading and embark on your journey!
FAQ About Uploading Images to Shutterstock
1. What file formats are accepted by Shutterstock?
Shutterstock accepts JPEG and TIFF formats. Ensure your images are in one of these formats to avoid upload issues.
2. How do I know if my image has been approved?
Shutterstock will notify you via email once your images have been reviewed. You can also check the status in your contributor dashboard.
3. Can I upload images with watermarks or logos?
No, Shutterstock does not accept images with watermarks, logos, or identifiable brand marks. All images should be clean and free of such elements.
4. What should I do if my image gets rejected?
If your image is rejected, review the feedback provided by Shutterstock. Common reasons include poor quality or incorrect metadata. Make the necessary adjustments and resubmit.
5. How long does it take for images to get reviewed?
Review times can vary, but typically it takes a few days. You can monitor the progress through your contributor dashboard.
6. Can I delete or edit images after uploading?
Yes, you can delete or edit images through your Shutterstock contributor dashboard. Make sure to review your portfolio regularly and make updates as needed.
These frequently asked questions address issues, but feel free to contact Shutterstock's support team if you have inquiries. They are ready to assist you in achieving success!
 admin
admin


