Benefits of Uploading Photos to Shutterstock
Sharing your images on
Shutterstock can lead to opportunities you might not have considered. Here are a few reasons why I think it’s worth exploring.
- Global Exposure: Imagine your photo being used in an advertisement in New York or a blog post in Tokyo. The platform provides global visibility to your work.
- Monetization: It’s exciting to earn money every time someone licenses your photo. It's not immediate riches, but over time, those earnings can add up.
- Portfolio Building: You get to create a professional portfolio that can act as your online gallery. This can be a solid way to show your work to potential clients.
- Community and Learning: When you upload to Shutterstock, you become part of a community of photographers. You learn from their work, understand trends, and grow creatively.
I still vividly recall the moment I sold a photograph for the first time. It wasn’t solely about the financial aspect; it was an affirmation of my abilities. Sharing my work on
Shutterstock feels akin to revealing a part of yourself and witnessing its journey is truly thrilling.
Preparing Your Photos for Shutterstock
Before you hit that upload button, there's a bit of work to tackle.
Shutterstock has specific rules you must adhere to, but believe me, it's all about ensuring the quality of your creations.
1. Image Quality: The first and foremost requirement is quality. Make sure your photos are high resolution, free from noise, and well-composed. I remember, I once uploaded an image with a bit of blur, thinking it wouldn’t be noticeable—but it got rejected. Lesson learned!
2. Correct Dimensions and Formats: Shutterstock accepts JPEG images in an RGB color space, and the minimum size requirement is 4 MP. If you’re a beginner, this may sound a bit technical, but with time, you’ll get the hang of it.
3. Keywords and Titles: Choosing the right keywords is crucial because it’s how people will find your photos. Think about what people might search for when they need your image. I usually ask myself, “If I were searching for this, what words would I use?”
4. Model Releases: If your photo includes recognizable faces, you’ll need a model release form. It’s like getting permission from the person in your photo, and
Shutterstock takes this very seriously.Preparing everything might feel like a challenge initially but it's worth the effort considering the lasting advantages. I've noticed that as I upload more content the workflow gets easier and it even contributes to enhancing your photography skills over time.
Step-by-Step Guide to Uploading Photos to Shutterstock
When I made the choice to share my pictures on Shutterstock I braced myself for a challenge. To my surprise it turned out to be smoother than I had anticipated. If you're new to this let me guide you through the process step by step like a friend showing you the way.
Step 1: Sign Up for an Account
The first step is creating a contributor account on Shutterstock. It’s a fairly straightforward process, requiring your basic details. I remember being excited just signing up, thinking of all the places my photos could go.
Step 2: Get Your Photos Ready
Before uploading, make sure your photos meet the technical requirements. The images should be high-quality and at least 4 MP in size. Check for noise, blur, and proper lighting—Shutterstock doesn’t compromise on quality, and neither should we!
Step 3: Upload Your Photos
Once your account is set up, head to the upload section. You can drag and drop your photos or select them manually. When I first uploaded a batch, I felt a mix of nervousness and excitement. It was like sending my kids off to their first day of school!
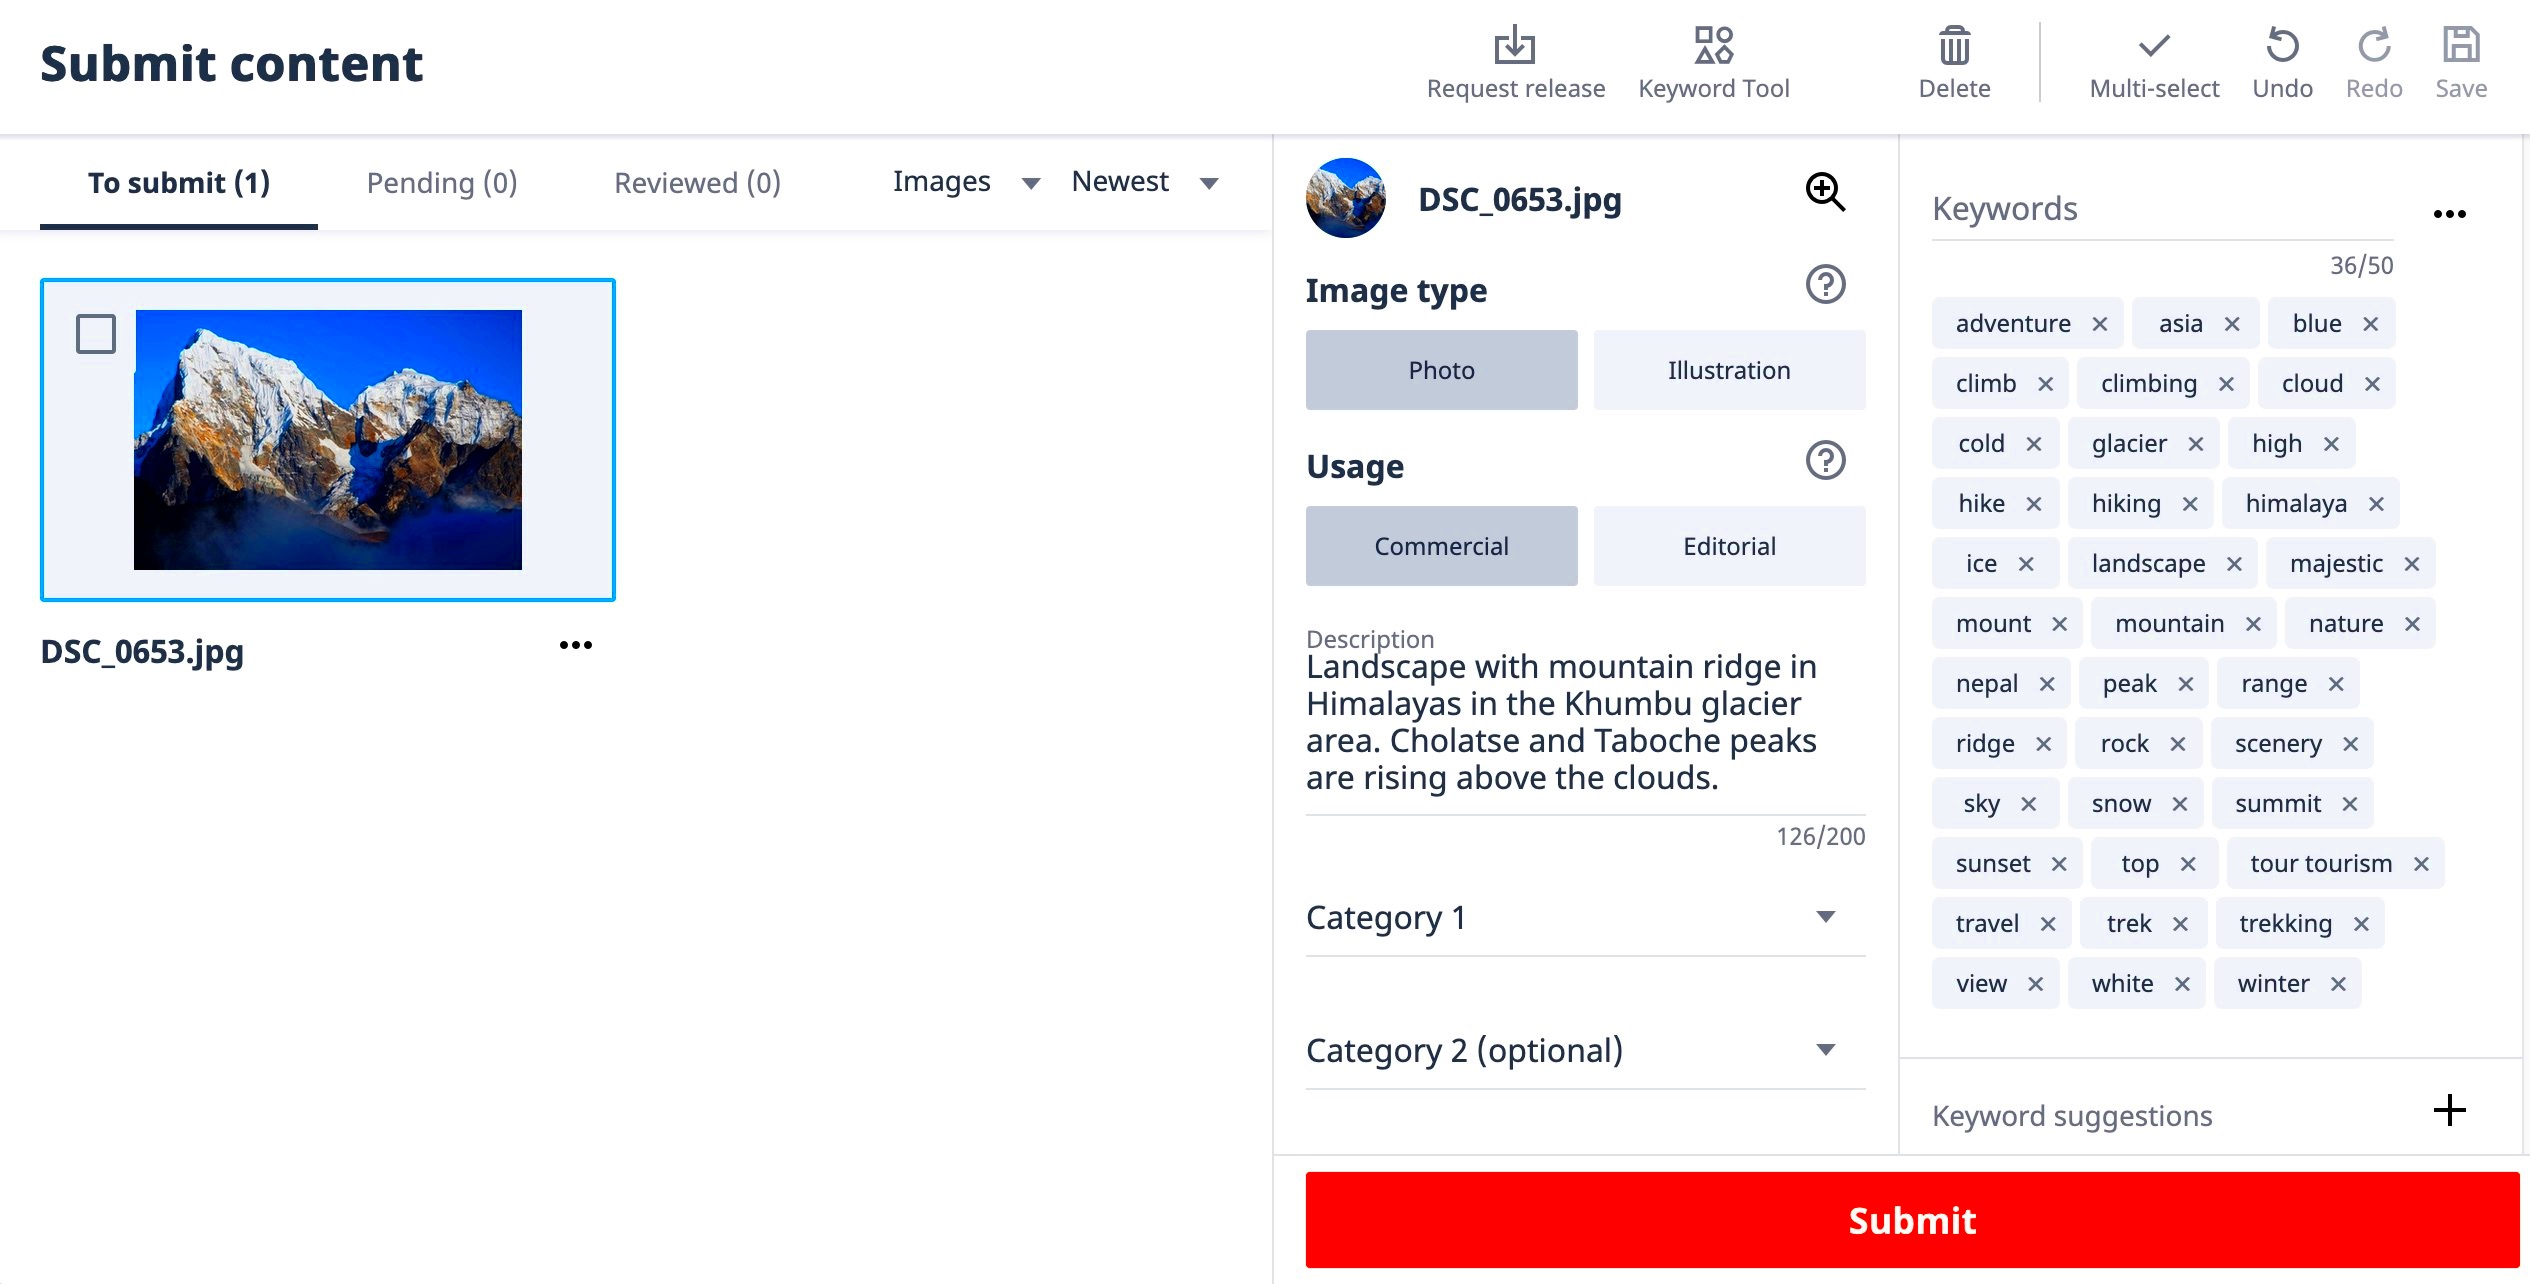
Step 4: Add Titles and Keywords
After uploading, you’ll need to add a descriptive title and relevant keywords. These help people find your photos. Think of words that you would use if you were searching for that specific image. I spend a lot of time on this because it really makes a difference in visibility.
Step 5: Submit for Review
Once you’re happy with the details, submit your photos for review. Shutterstock’s team checks each image for quality and adherence to their guidelines. Don’t worry if your photos don’t get accepted the first time—it happened to me too. Just learn from it and try again.
Understanding Shutterstock's Guidelines and Requirements
Shutterstock has its own set of guidelines in place for a purpose. These rules help uphold a standard that benefits both buyers and contributors. When I first joined I didn’t grasp the significance of these protocols but believe me they are worth taking seriously.
1. Image Quality: Shutterstock demands high-quality images. That means no noise, no graininess, and no technical issues like lens flare or overexposure. I once uploaded a photo that was slightly grainy in the background, thinking it wouldn’t matter—but it got rejected. Lesson learned!
2. Legal Requirements: If your photo features recognizable people or private properties, you need to have the necessary releases. This includes model release forms for people and property release forms for private properties. I learned this the hard way when one of my favorite candid shots was turned down because I hadn’t obtained permission from the person in the image.
3. Editorial vs Commercial: Not every photo can be used commercially. For example, photos of public events or landmarks often need to be categorized as editorial. These photos can still be used, but only for specific purposes like news articles. I didn’t know this distinction at first and uploaded everything under “commercial” – oops!
4. File Format: Shutterstock only accepts JPEGs. The minimum image resolution is 4 MP, and the maximum file size is 50 MB. This is something you’ll get used to with time, but in the beginning, it’s worth double-checking each upload.Adhering to Shutterstock’s guidelines might feel like an effort initially but they help maintain a level of professionalism in your images. The more you upload the more it becomes instinctive. Eventually I came to value these rules as they encouraged me to enhance the quality of my creations.
Tips for Maximizing Your Photo Earnings on Shutterstock
When I started sharing my pictures on Shutterstock I assumed that making money would be quick and effortless. However reality proved to be different. With time though I discovered a few strategies that allowed me to boost my income without feeling stressed out. Here are the approaches that were effective for me and could potentially benefit you as well,
1. Upload Consistently: Shutterstock rewards consistency. The more you upload, the more chances you have for people to find your work. I noticed a significant increase in downloads when I started uploading regularly, even if it was just a few photos a week. It’s like watering a plant—it grows with time and care.
2. Focus on Popular Niches: Some categories are in higher demand than others. For instance, travel, food, and business-related images tend to perform well. But don’t just chase trends—try blending your passion with these popular topics. I enjoy street photography, and by adding a business context, my photos found a niche audience.
3. Optimize Your Keywords: Think of keywords as the bridge between your photos and potential buyers. Use specific, detailed keywords that describe the scene, colors, emotions, and even the mood of your photos. It took me some time to master keywording, but once I did, my visibility improved dramatically.
4. Offer Diversity: Don’t just stick to one type of photo. Shutterstock has a wide user base looking for different things. By offering a variety of images, you increase the chances of your work being found. I began with landscape shots but later included portraits, architecture, and abstract images. This variety broadened my appeal.
5. Pay Attention to Trends: Keep an eye on global events and seasonal trends. Holidays, festivals, and cultural moments often demand fresh, timely content. Last year, I uploaded a few images related to Diwali, and they got multiple downloads during the festive season. Timing is everything!Boosting your income on Shutterstock isn't just a matter of seeking instant results. It's more about being thoughtful maintaining a steady approach and continuously honing your skills. Through perseverance I discovered that my earnings increased gradually over time and that's truly a rewarding experience.
Common Mistakes to Avoid When Uploading Photos
When you begin sharing images on Shutterstock, it’s natural to feel a rush of excitement. I certainly did! However in my enthusiasm I stumbled upon some missteps that could have been prevented. So let me share the insights I gained through experience.
1. Ignoring Shutterstock’s Guidelines: I’ve been guilty of not reading the rules carefully. Shutterstock has specific guidelines, especially around image quality, format, and subject matter. Uploading a photo that doesn’t meet these requirements will only lead to rejection. I remember the frustration of seeing several of my early photos rejected simply because I hadn’t paid attention to the file size or resolution. It’s like doing all the hard work only to find out you’ve missed the fine print!
2. Over-editing Your Photos: When I first started, I believed that adding heavy filters or making dramatic edits would make my photos stand out. Unfortunately, over-processed images often get rejected. Shutterstock prefers natural and realistic photos that buyers can use for various purposes. I learned to keep my editing subtle—sometimes less really is more.
3. Using Vague Keywords: In the beginning, I didn’t realize how important keywords are. Simply tagging my photos with “sunset” or “city” wasn’t enough to make them discoverable. Specific and descriptive keywords like “evening sunset over Mumbai skyline” helped my photos reach the right audience. A few extra minutes spent thinking about keywords can make a big difference.
4. Uploading without Model or Property Releases: This is a common pitfall. If your photos have recognizable people or private properties, you need to submit a release form. I once lost out on a great shot because I didn’t have the proper documentation. It’s a small step, but an important one if you want your photos approved.Steering clear of these blunders can help you save time, sidestep annoyance and boost the likelihood of your pictures being accepted and selling successfully.
FAQ: Frequently Asked Questions about Uploading to Shutterstock
When I first began sharing my work on Shutterstock, I was flooded with queries swirling in my head. Allow me to tackle a few of the frequently asked questions that you may also be pondering.
1. How long does it take for photos to get approved?
In my experience, it usually takes anywhere from 1 to 3 days for Shutterstock to review and approve photos. Sometimes it’s quicker, and sometimes it takes a little longer depending on the volume of submissions.
2. What happens if my photos are rejected?
Don’t be discouraged if your photos get rejected. I’ve had my fair share of rejections! Shutterstock always provides feedback on why a photo wasn’t accepted. Use that feedback to improve your future submissions. It’s all part of the learning process.
3. Can I re-upload a rejected photo?
Yes, you can, but only after making the necessary improvements. Make sure to address the issues mentioned in the rejection feedback before submitting the photo again. It’s about improving, not giving up!
4. Is there a limit to how many photos I can upload?
There’s no specific limit to how many photos you can upload, but Shutterstock encourages quality over quantity. I try to upload smaller batches of high-quality photos rather than overwhelming the system with too many at once.
5. How much can I earn from Shutterstock?
Earnings depend on how often your photos are downloaded. Shutterstock pays contributors based on the number of licenses sold. While it won’t make you a millionaire overnight, regular uploads and strategic keywords can lead to steady income over time.While these frequently asked questions address the essentials you'll gain deeper insights by actively using the platform. Feel free to try things out and fine tune your approach as you go.
Conclusion: Start Sharing Your Work with Shutterstock
There you go a helpful resource to kick off your journey with Shutterstock along with some personal anecdotes from my own experiences. When I initially submitted my pictures I was uncertain about what would come of it. However over time I witnessed my creations being utilized by individuals and businesses across the globe. It's both a humbling and exhilarating experience!Posting your creations on Shutterstock isn't solely an opportunity to make some cash. It's an avenue to showcase your talent connect with like minded individuals and evolve as a photographer. Of course you might face setbacks, make errors and experience moments of annoyance along the way. However ultimately it's all rewarding when you witness your hard work transform into something real.Whether you’re in it for the joy, the love of it or as a side gig sharing your photos on Shutterstock can lead to opportunities you never thought possible. So why hold back? Embrace the moment and begin showcasing your talent to the globe. Believe me it’s an adventure you won’t look back on with regret.
 admin
admin