Introduction
Ever found yourself in a situation where you just needed a break from
Facebook, or maybe you wanted to shift your focus elsewhere? I’ve been there too. Sometimes, taking a step back from managing a
Facebook Page becomes necessary, whether it’s for personal reasons, a rebranding effort, or simply to cut down on digital clutter. If you’re feeling overwhelmed or just need to pause your page’s activity without completely erasing it, unpublishing could be your best bet. In this guide, we’ll walk you through why and how to unpublish a
Why Would You Want to Unpublish a Facebook Page?

Unpublishing a
Facebook Page can be a strategic move for various reasons. Here are a few scenarios where it might make sense:
- Rebranding: Maybe you’re changing the direction of your business or project and need time to update your content and strategy.
- Temporary Pause: If you’re taking a break from social media or need to focus on other priorities, unpublishing keeps your page intact without the need to delete it.
- Privacy Concerns: Perhaps you’re facing issues with privacy or security and want to halt page activity until things are sorted.
- Quality Over Quantity: If you’ve realized that your page isn’t meeting your standards or you need to reassess its content, unpublishing gives you time to make improvements.
In my own experience, unpublishing helped me step away from a page that was no longer aligned with my goals, allowing me to return with a refreshed perspective and a clearer vision.
Understanding the Difference Between Unpublishing and Deleting

It’s important to distinguish between
unpublishing and
deleting a
Facebook Page. Here’s a quick breakdown:
| Action | Unpublishing | Deleting |
|---|
| Page Status | Visible only to page admins | Completely removed from Facebook |
| Data Retention | All content and data remain | All content and data are lost |
| Reversibility | Can be republished later | Cannot be restored once deleted |
| Visibility | Not visible to the public | Completely disappears |
Unpublishing is like hitting the pause button, whereas deleting is like shutting down the entire system. Unpublishing gives you the flexibility to come back and resume where you left off, without losing any of your hard-earned content or data. I once had a page that was unimportant at the time but later proved to be a valuable resource, all thanks to choosing to unpublish instead of delete.
Steps to Unpublish Your Facebook Page
So, you’ve decided that unpublishing your
Facebook Page is the way to go. It’s a pretty straightforward process, but if you’ve never done it before, it can be a bit confusing. I remember feeling a bit lost the first time I unpublishing my page, so here’s a step-by-step guide to make it easier for you:
- Log In: Start by logging into your Facebook account and navigating to the page you want to unpublish. You need to be an admin to make these changes.
- Access Page Settings: Click on Settings in the top right corner of your page. This will take you to a menu with various options.
- Find the General Tab: In the left-hand menu, select General. This tab contains most of the page settings you’ll need to modify.
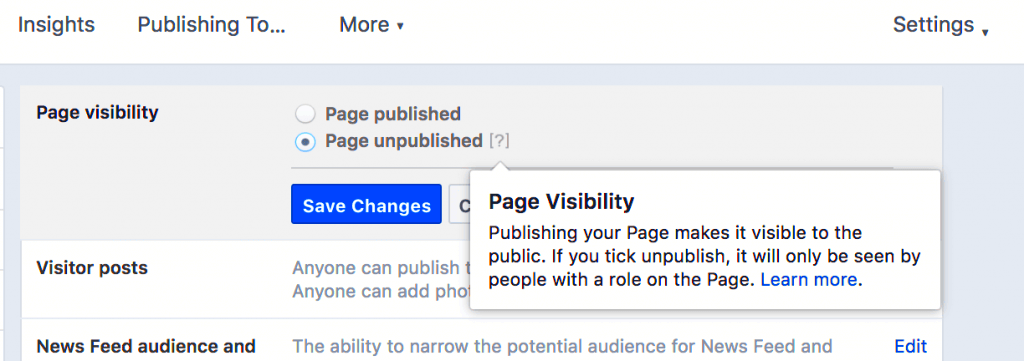
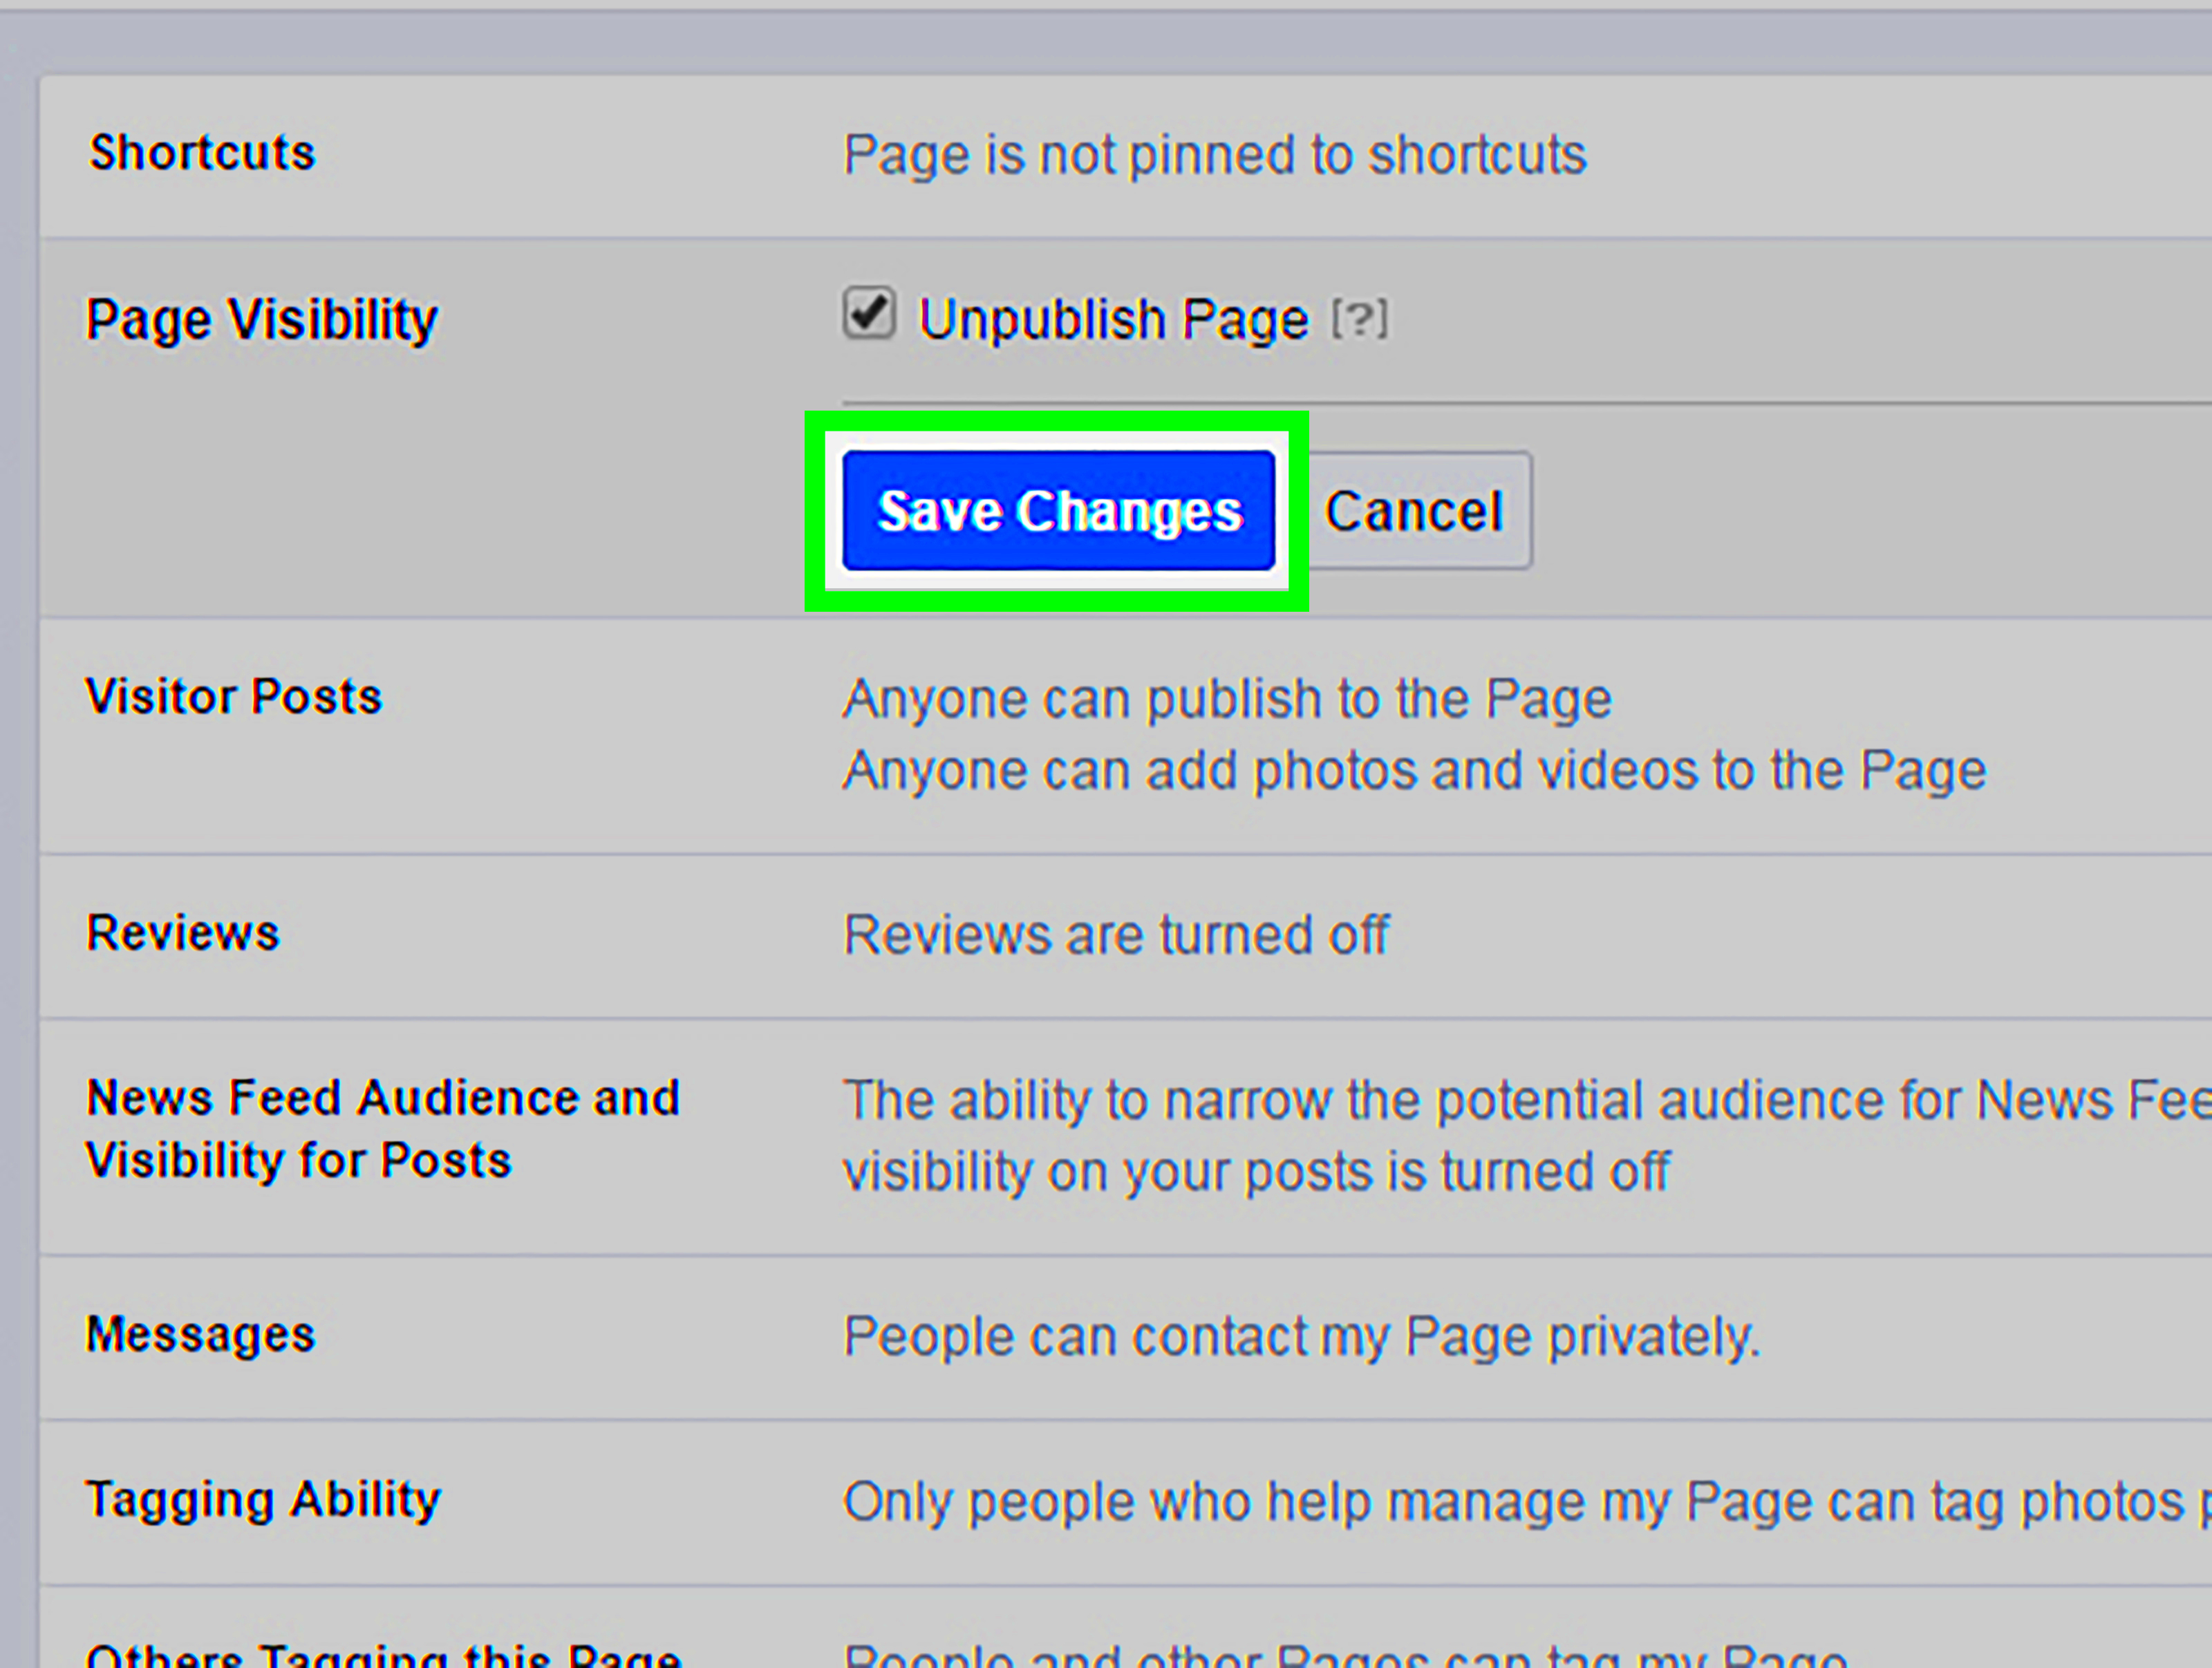
- Page Visibility: Look for the section labeled Page Visibility. Here, you’ll see an option that says Page published. Click on Edit next to this option.
- Unpublish the Page: Select the option that says Page unpublished, and then click Save Changes.
And that’s it! Your page is now unpublished and will only be visible to you and other admins. I once unpublishing a page because I needed time to regroup and plan a new strategy. It was a relief to know that everything was still there, waiting for me when I was ready to return.
What Happens When You Unpublish a Page?
Unpublishing your
Facebook Page triggers several changes that are important to understand. It’s like putting your page on a temporary vacation. Here’s what happens:
- Visibility: Your page will no longer be visible to the public. Only admins can see the page and its content.
- Content Retention: All posts, photos, and other content remain intact. Nothing is deleted, so when you’re ready to republish, everything will be as you left it.
- Engagement: No new likes, comments, or messages will come through while the page is unpublished. It’s essentially on hold.
- Search: Your page won’t appear in Facebook searches or be accessible via direct links by the general public.
I once put a page on hold while reworking its design and content. It was comforting to know that none of the original content was lost and that I could pick up right where I left off without having to start from scratch.
How to Re-Publish Your Facebook Page
When you’re ready to bring your page back to life, republishing is a breeze. Here’s how you can do it:
- Log In: As before, start by logging into Facebook and navigating to the page you wish to republish.
- Access Page Settings: Click on Settings in the top right corner of your page.
- Go to General: Select General from the left-hand menu.
- Page Visibility: Locate the Page Visibility section. You’ll see that the page is currently unpublished.
- Publish the Page: Click on Edit and then select Page published. Click Save Changes to make your page live again.
Republishing is just as simple as unpublishing. I’ve found that it’s a great way to ease back into social media when you’re ready. With everything in place and no data lost, you can hit the ground running with your fresh new strategy.
Common Issues and Troubleshooting
Even the simplest tasks can sometimes hit a snag. Unpublishing a Facebook Page is no different. You might run into a few bumps along the way, so here’s a rundown of common issues and how to handle them:
- Cannot Find the Settings Option: Sometimes, the settings you need might not be where you expect them. Make sure you’re logged in as an admin. If the options are still missing, try refreshing the page or using a different browser.
- Page Not Unpublishing: If you followed the steps but the page remains visible, double-check that you’ve clicked Save Changes after selecting Page unpublished. Sometimes a missed click can be the culprit.
- Errors During Publishing: If you encounter errors when trying to republish, it might be a glitch. Ensure your browser is up-to-date and try clearing your cache. If problems persist, Facebook’s help center is a good place to check for current issues.
- Content Still Accessible: If content seems visible despite unpublishing, verify your settings under the Page Visibility section. Occasionally, cached versions might show old data, but refreshing should solve it.
When I first unpublishing a page, I faced some confusion with the settings. Taking a deep breath and going through each step slowly helped me spot the issue. It’s always a good idea to reach out to Facebook support if you’re stuck—sometimes, a quick chat with their team can clear things up.
Best Practices for Managing Your Facebook Page
Managing a Facebook Page can be a rewarding but demanding task. Here are some best practices I’ve learned along the way that can help keep your page engaging and effective:
- Regular Updates: Keep your page lively with regular posts and updates. Consistency helps maintain your audience’s interest and keeps your page active in Facebook’s algorithms.
- Engage with Your Audience: Don’t just post content—interact with your followers. Respond to comments, answer questions, and engage in conversations. It makes your page feel more personal and relatable.
- Monitor Insights: Use Facebook Insights to track how your content is performing. This data can guide your strategy, helping you understand what resonates with your audience.
- Quality Content: Prioritize quality over quantity. Share content that’s valuable and relevant to your audience. Well-crafted posts, images, and videos can make a significant impact.
- Stay Updated: Facebook often updates its features and algorithms. Staying informed about these changes can help you adapt your strategies accordingly.
In my own experience, engaging with followers and keeping content relevant made a huge difference in my page’s success. It’s about creating a space where your audience feels valued and connected.
FAQ
Q: Can I still edit my page while it’s unpublished?
A: Yes, you can still make changes to your page’s content and settings while it’s unpublished. Only the public won’t be able to see the updates.
Q: How long can my page remain unpublished?
A: There’s no time limit for how long you can keep your page unpublished. It remains in this state until you choose to republish it.
Q: Will I lose any data if I unpublish my page?
A: No, unpublishing does not delete any data. Your posts, photos, and other content will be preserved and accessible when you republish.
Q: Can I unpublish a page if I’m not the admin?
A: No, only admins have the ability to unpublish a page. If you need to unpublish a page and aren’t an admin, you’ll need to request access from someone who is.
Q: How do I know if my page is successfully unpublished?
A: When a page is unpublished, it will not be visible to the public. You can verify this by checking your page’s visibility settings or asking someone who isn’t an admin to try and access the page.
Conclusion
Unpublishing a Facebook Page can be a smart move when you need a break or are planning a transformation. It’s like putting your page on a temporary shelf, allowing you to step away without losing everything you’ve built. Whether you're rebranding, managing privacy concerns, or just needing some time off, unpublishing gives you a valuable pause without permanent consequences.From my own experience, unpublishing has been a lifesaver during times of change. It allowed me to regroup and return with fresh ideas and a renewed focus. The beauty of this feature is that you don’t have to say goodbye to your hard work; you simply take a break and come back when you're ready.Remember, managing a Facebook Page is a journey, not a sprint. Use the unpublishing feature wisely to ensure your page remains a vibrant and engaging space when you’re ready to return. If you hit any bumps along the way, don’t hesitate to reach out for help or consult Facebook’s support resources. Embrace the flexibility of unpublishing as part of your page management strategy and keep moving forward with confidence.
 Unpublishing a Facebook Page can be a strategic move for various reasons. Here are a few scenarios where it might make sense:
 It’s important to distinguish between unpublishing and deleting a Facebook Page. Here’s a quick breakdown:
 admin
admin


