Image Inversion: Flipping an Image in Microsoft Word
By: HD Stock Images
July 26, 2024
721
Image inversion, also known as color inversion or negative image effect, is a process that alters the colors of an image to create a reversed color scheme. This technique flips the colors so that each color is replaced by its complementary color. For example, white becomes black, and red becomes cyan. This effect can be used for a variety of creative and practical purposes, from enhancing visibility to creating artistic designs.
Here’s a detailed look at what image inversion entails:
Color Reversal: Image inversion reverses all the colors in the image. Light colors become dark, and dark colors become light. This transformation creates a "negative" effect similar to old photographic negatives.
Complementary Colors: Each color in the image is swapped for its complementary color. Complementary colors are pairs of colors that, when combined, cancel each other out to produce a grayscale color, such as black and white. The table below shows common color pairs and their inversions:
Original Color
Inverted Color
Red
Cyan
Green
Magenta
Blue
Yellow
White
Black
Black
White
Image inversion can be applied to various types of images, including photos, graphics, and illustrations. Here are some common uses for image inversion:
Artistic Effects: Creating visually striking effects for creative projects and designs.
Accessibility: Enhancing visibility for users with visual impairments by providing a high-contrast view of the image.
Highlighting Details: Revealing hidden details or enhancing features in images.
Document Design: Adding a unique look to documents, presentations, or marketing materials.
In Microsoft Word, this feature is particularly useful for creating unique visual effects or improving the accessibility of your documents. With just a few simple steps, you can transform your images to achieve the desired look or function.
How to Flip an Image in Microsoft Word
Flipping an image in Microsoft Word is a straightforward process that allows you to mirror the image either horizontally or vertically. This can be useful for creating symmetrical designs, correcting the orientation of images, or simply achieving a different visual effect. Follow these steps to flip an image in Word:
Steps to Flip an Image Horizontally or Vertically
To flip an image in Microsoft Word, follow these steps:
Open Your Document: Launch Microsoft Word and open the document that contains the image you want to flip.
Select the Image: Click on the image to select it. You should see small squares or handles appear around the edges of the image.
Access the Format Tab: Go to the Format tab on the ribbon at the top of the screen. If you don't see this tab, make sure the image is selected.
Find the Rotate Option: In the Format tab, look for the Rotate button in the Arrange group. This button often looks like a circular arrow.
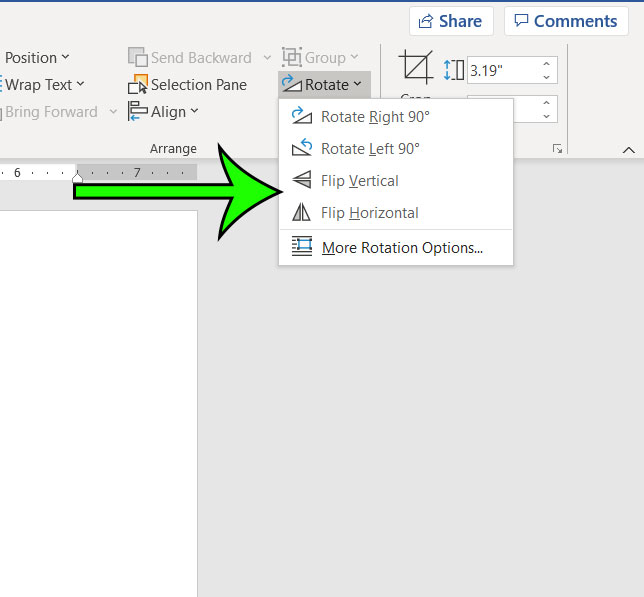
Choose Flip Options: Click on the Rotate button to reveal a dropdown menu. Here, you will see options for flipping the image:
Flip Horizontal: This flips the image from left to right, creating a mirror image of the original.
Flip Vertical: This flips the image from top to bottom, which can be useful for creating a reflection effect.
Apply the Flip: Select Flip Horizontal or Flip Vertical from the dropdown menu based on your needs. The image will instantly flip according to your choice.
Visual Representation of Image Flipping
Design Layouts: Adjusting images for better layout composition in documents or presentations.
Correcting Image Orientation: Reversing the image orientation to match your document's design.
Creating Symmetry: Achieving symmetrical designs for artistic or graphical purposes.
Experiment with these options to see how flipping can enhance your images and improve your document design.
Steps to Invert Colors of an Image in Microsoft Word
Inverting colors in Microsoft Word is a great way to change the appearance of your images by flipping their color scheme. This process can make images look like negatives, create high-contrast visuals, or simply provide a fresh look for your documents. Follow these steps to invert the colors of an image in Microsoft Word:
How to Invert Colors in Microsoft Word
Here’s a detailed guide on how to invert colors for an image in Microsoft Word:
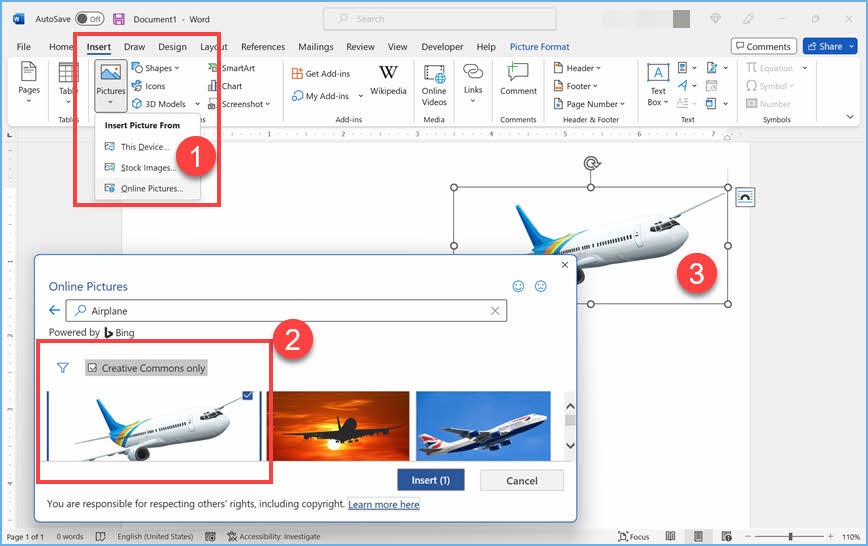
Open Your Document: Start Microsoft Word and open the document that contains the image you want to modify. If you don't have an image yet, you can insert one by going to the Insert tab and selecting Pictures from the available options.
Select the Image: Click on the image to select it. You will see small circles or squares, known as handles, appear around the edges of the image.
Go to the Picture Format Tab: Once the image is selected, the Picture Format tab will appear on the ribbon at the top of the screen. Click on this tab to access image editing tools.
Open the Color Menu: In the Picture Format tab, look for the Color button. This button is usually located in the Adjust group and has a palette icon.
Select Recolor Options: Click the Color button to open a dropdown menu. In this menu, select Recolor to see a list of color adjustment options.
Choose Invert Colors: In the Recolor dropdown menu, look for the Invert Colors option. Click on it to apply the color inversion effect to your image.
Benefits of Inverting Image Colors
Inverting colors can be beneficial in various scenarios. Here are some common uses:
Creating Artistic Effects: Achieve unique and eye-catching visuals for designs and creative projects.
Improving Image Visibility: Enhance contrast to make details stand out, especially in images with low contrast.
Designing for Accessibility: Provide high-contrast visuals that can be easier for visually impaired individuals to distinguish.
Visualizing Data: Better highlight differences in charts or graphs by reversing the color scheme.
Tips for Effective Color Inversion
To make the most out of the color inversion feature, consider these tips:
Preview Changes: Always preview the inverted image to ensure the colors achieve the desired effect.
Adjust Brightness: You might need to adjust brightness and contrast after inverting colors for optimal results.
Combine with Other Effects: Experiment with additional formatting options like brightness and contrast adjustments for enhanced visuals.
By following these steps, you can easily invert colors in Microsoft Word and apply various effects to enhance your images.
Benefits of Flipping and Inverting Images in Microsoft Word
Flipping and inverting images in Microsoft Word are simple yet powerful techniques that can enhance the visual appeal and functionality of your documents. These features are not just for creating unique effects but also serve practical purposes in design and document management. Below are some of the key benefits of using these features, along with practical examples and tips for making the most out of them.
Benefits of Flipping Images
Flipping an image can offer several advantages, including:
Creating Symmetry: Flipping an image horizontally or vertically can help create symmetrical designs. This is particularly useful in graphic design for creating balanced layouts or patterns.
Correcting Image Orientation: If an image is incorrectly oriented, flipping it can correct its direction without needing external image-editing software. This is especially useful for scanned documents or photos taken at odd angles.
Design Versatility: Flipping images can be used to explore different design options. For instance, flipping a logo or an icon might better fit the design of a brochure or presentation.
Creating Reflections: Flipping an image vertically can simulate a reflection effect. This technique is often used in product showcases and promotional materials.
Benefits of Inverting Colors
Inverting colors in an image can offer various advantages, such as:
Highlighting Details: Inverting colors can reveal details that are not visible in the original image. For example, details in dark images become more apparent when colors are inverted.
Enhancing Visibility: Inverted colors can improve visibility for individuals with visual impairments. High-contrast images make text and graphics easier to distinguish.
Artistic Effects: Color inversion creates striking and creative effects that can be used in marketing materials, posters, and social media content. This technique can help make your visuals stand out.
Visual Contrast: Inverted colors can be used to create high-contrast visuals for charts, graphs, and infographics, making data more readable.
Comparison Table of Flipping vs. Inverting Images
Here’s a table summarizing the different uses and effects of flipping and inverting images:
Reverses all colors to their complementary counterparts
Highlighting details, creating artistic effects
Tips for Using Flipping and Inverting Features
To maximize the benefits of flipping and inverting images, consider these tips:
Preview Changes: Always preview your changes to see how they affect the overall look of your document.
Combine with Other Features: Use flipping and inverting in conjunction with other image editing features like cropping or resizing for the best results.
Save Versions: Save different versions of your images before applying effects, so you can compare results or revert to the original if necessary.
Understand the Purpose: Choose the technique that best fits your design needs—whether for aesthetic effects or practical adjustments.
By understanding these benefits and tips, you can effectively use the flipping and color inversion features in Microsoft Word to enhance your documents and achieve your design goals.
Image inversion can be a powerful tool in Microsoft Word for enhancing visuals and creating unique effects. Whether you are using it for artistic purposes, improving accessibility, or refining document designs, knowing how to use this feature effectively can make a significant difference. Here are some practical tips for using the image inversion effect to its fullest potential:
1. Understand the Purpose of Inversion
Before applying the image inversion effect, clarify what you hope to achieve. Different goals may require different approaches. Here are some common purposes:
Artistic Design: Create striking visual effects or artistic transformations for presentations, posters, and social media content.
Highlighting Details: Reveal hidden details in images, which is useful for analyzing black-and-white photos or enhancing image features.
Accessibility: Improve readability and contrast for users with visual impairments by providing a high-contrast view of the image.
Document Aesthetics: Refresh the look of your documents with creative visual elements or unique design features.
2. Preview Changes Before Finalizing
Always preview the inverted image to ensure it meets your expectations. You can do this by:
Using the Undo Feature: Press Ctrl + Z to undo changes and compare the original and inverted images.
Previewing Effects: Toggle between the original and inverted images to see the visual impact before finalizing the changes.
3. Adjust Brightness and Contrast
Inverting colors often affects the brightness and contrast of an image. You may need to make additional adjustments to get the best result:
Increase Brightness: After inverting colors, increase the brightness to avoid overly dark images.
Adjust Contrast: Modify contrast to ensure that the image details are clear and visible.
4. Combine Inversion with Other Effects
Enhance the impact of image inversion by combining it with other effects:
Apply Filters: Use filters to further modify the image’s appearance, such as blurring or sharpening effects.
Overlay Text: Add text or graphics on top of the inverted image to create informative or decorative elements.
5. Save Multiple Versions
Keep different versions of your images to compare results and revert if needed:
Save Before Inverting: Always save a copy of the original image before applying the inversion effect.
Save Different Variants: Create and save several versions of the inverted image to explore different visual options.
6. Understand Image File Types
Different image file types can affect how inversion appears:
File Type
Impact on Inversion
JPEG
Common for photos, but may lose quality with multiple edits.
PNG
Supports higher quality and transparency, ideal for detailed images.
GIF
Limited color range, suitable for simple graphics.
7. Keep Your Audience in Mind
Always consider how your audience will perceive the inverted image:
For Professional Documents: Ensure that the inversion enhances readability and does not detract from the professional appearance of your document.
For Marketing Materials: Use inversion creatively to grab attention and convey the intended message.
By applying these tips, you can use the image inversion feature in Microsoft Word more effectively, whether for personal projects or professional documents.
Common Issues with Image Inversion and How to Fix Them
Image inversion in Microsoft Word can be a powerful tool for enhancing your visuals, but it’s not without its challenges. Understanding these common issues and knowing how to fix them can help you get the most out of this feature. Below, we’ll cover some typical problems you might encounter with image inversion and provide practical solutions to address them.
1. Low-Contrast After Inversion
One of the most common issues is that the image may have low contrast after inversion, making it hard to see details.
Solution: Adjust the Brightness and Contrast settings.
To fix this:
Select the inverted image.
Go to the Picture Format tab.
Click on Corrections in the Adjust group.
Choose the Brightness/Contrast options and make adjustments as needed.
2. Color Artifacts or Unwanted Effects
Sometimes, inversion can introduce color artifacts or unintended visual effects.
Solution: Try using image editing software for more control.
For a more refined result:
Save the image and open it in a dedicated image editor like Photoshop or GIMP.
Apply the inversion effect in the editor and fine-tune the image.
Re-import the edited image into your Word document.
3. Loss of Image Quality
Image inversion can sometimes lead to a noticeable loss of quality, especially with repeated edits.
Solution: Work with high-resolution images and avoid excessive editing.
To maintain image quality:
Use high-resolution images from the start.
Save different versions of the image before applying inversion.
Avoid multiple rounds of inversion or other edits.
4. Inversion Effect Not Applied
If the inversion effect does not appear to be applied, it might be due to incorrect settings or selection issues.
Solution: Reapply the inversion effect and verify image selection.
To fix this:
Click on the image to select it.
Go to the Picture Format tab.
Ensure that the Color dropdown menu is used correctly and select Invert Colors again.
5. Inconsistent Inversion Across Different Platforms
Sometimes, the inversion effect might look different on various devices or platforms.
Solution: Test the document on multiple devices or export as PDF.
To ensure consistency:
Check the document on different devices or browsers.
Export your Word document as a PDF to preserve the inversion effect.
6. Text or Graphics in the Image Aren’t Readable
Inverted colors can make text or graphics in an image difficult to read.
Solution: Adjust text color or enhance readability.
To improve readability:
Select the image and adjust the Brightness and Contrast settings as described above.
If the text is still not readable, consider using a different image or editing the text separately.
Alternatives to Microsoft Word for Image Inversion
While Microsoft Word offers basic image inversion capabilities, there are several other tools and software options available that provide more advanced features and better control for image inversion. If you’re looking for alternatives, here are some effective tools and their features, along with tips on choosing the right one for your needs.
1. Adobe Photoshop
Adobe Photoshop is a professional image editing software that offers advanced features for color manipulation, including image inversion.
Features:
Advanced Color Inversion options through the Invert adjustment layer.
Comprehensive Editing Tools for adjusting brightness, contrast, and more.
Ability to handle high-resolution images without quality loss.
Best For: Professionals who need high-quality image editing and advanced features.
2. GIMP (GNU Image Manipulation Program)
GIMP is a free, open-source image editor that offers many features similar to Adobe Photoshop.
Features:
Simple Color Inversion through the Colors menu.
Rich set of Editing Tools for various image adjustments.
Supports a wide range of image file formats.
Best For: Users looking for a powerful, free alternative to Photoshop.
3. Paint.NET
Paint.NET is a free image and photo editing software for Windows, offering a simpler interface than Photoshop and GIMP.
Features:
Basic Color Inversion through the Adjustments menu.
Easy-to-use Interface for quick edits.
Supports layers, allowing for more advanced edits.
Best For: Users needing basic image editing tools with an intuitive interface.
4. Canva
Canva is an online design tool that offers simple image editing features, including inversion.
Features:
Basic Color Inversion available through Effects options.
Provides Templates and design elements for various projects.
Accessible via Web Browser with a user-friendly interface.
Best For: Users who need quick, online editing solutions for various design needs.
5. Pixlr
Pixlr is a free online photo editor that offers a range of editing features including color inversion.
Features:
Simple Color Inversion through the Adjustments menu.
Offers Basic Editing Tools and filters.
Available as both Web App and Mobile App.
Best For: Users needing a free and straightforward online photo editor.
Comparison Table of Image Inversion Tools
Here is a table comparing the features of these image inversion tools:
Tool
Price
Features
Best For
Adobe Photoshop
Paid
Advanced color inversion, high-resolution editing, professional tools
Professional image editing
GIMP
Free
Comprehensive color inversion, high-resolution support, advanced tools
Free professional image editing
Paint.NET
Free
Basic color inversion, simple interface, layer support
Basic to intermediate image editing
Canva
Free/Paid
Basic color inversion, online design tools, templates
Quick and easy design projects
Pixlr
Free
Simple color inversion, basic editing tools, online access
Free, straightforward photo editing
Choosing the Right Tool for Your Needs
When selecting an alternative to Microsoft Word for image inversion, consider the following:
Budget: Determine if you need a free tool or are willing to invest in a paid solution.
Features: Assess the specific features you need, such as advanced color adjustments or simple image effects.
Ease of Use: Choose a tool based on your familiarity with image editing and the complexity of your tasks.
Platform: Consider if you prefer a web-based application or a desktop software.
By understanding these alternatives and evaluating your specific needs, you can select the best tool for effective image inversion and other editing tasks.
Image inversion is a feature available in Microsoft Word that can be used for various purposes, from creating visual effects to improving accessibility. If you have questions about how to use this feature or are facing issues, the following frequently asked questions (FAQs) should help clarify your doubts and guide you through the process.
1. What is image inversion in Microsoft Word?
Image inversion in Microsoft Word refers to the process of flipping the colors of an image to their complementary counterparts. This technique turns light colors to dark and dark colors to light, which can be used for artistic effects, enhancing details, or improving contrast for accessibility.
2. How do I invert the colors of an image in Microsoft Word?
To invert the colors of an image in Microsoft Word, follow these steps:
Select the image you want to invert.
Go to the Picture Format tab on the ribbon.
Click on the Color dropdown menu.
Choose Invert Colors from the options.
If you don’t see the Invert Colors option, make sure you have the latest version of Microsoft Word or consider using an alternative tool as mentioned in our guide.
3. Can I revert the image to its original colors after inverting?
Yes, you can revert the image to its original colors:
Select the image.
Press Ctrl + Z to undo the inversion.
Alternatively, you can use the Undo button in the Quick Access Toolbar.
4. Why does the inverted image look different from what I expected?
Several factors can affect the appearance of the inverted image:
Brightness and Contrast: You may need to adjust these settings after inversion to achieve the desired look.
Image Quality: Low-resolution images might not handle inversion well, leading to poor visual results.
Color Settings: Ensure that you are viewing the image in a mode that supports color inversion.
5. How can I improve the contrast of an inverted image?
If the contrast of the inverted image is too low, you can improve it by:
Selecting the image and going to the Picture Format tab.
Click on Corrections and adjust the Brightness and Contrast settings as needed.
6. What are some common issues with image inversion in Microsoft Word?
Common issues include:
Low contrast: Adjust brightness and contrast.
Color artifacts: Use dedicated image editors for advanced fixes.
Loss of image quality: Work with high-resolution images and save versions.
Inversion effect not applied: Reapply the effect and verify image selection.
Inconsistent inversion across platforms: Test on multiple devices or export as PDF.
Unreadable text or graphics: Adjust text color or enhance readability.
7. Are there free tools available for image inversion?
Yes, there are several free tools you can use for image inversion:
GIMP: A free, open-source image editor with robust inversion features.
Paint.NET: A free image editor for Windows with basic inversion tools.
Canva: A web-based design tool offering basic image inversion capabilities.
Pixlr: A free online photo editor with simple image inversion options.
8. How can I invert colors on a PDF document?
To invert colors on a PDF document, you will need PDF editing software:
Adobe Acrobat: Use the Enhance Scans feature for color adjustments.
PDF-XChange Editor: Provides options for color inversion in the editing tools.
These FAQs cover the basics of image inversion in Microsoft Word and offer solutions for common problems. If you have other questions or specific issues, refer to the official Microsoft support page or consider reaching out to a tech expert.
Conclusion
Image inversion in Microsoft Word is a versatile feature that can enhance your documents, create striking visual effects, and support accessibility. By understanding how to effectively invert colors and using the available tools, you can significantly improve your image editing skills.
Throughout this guide, we explored various aspects of image inversion, from basic definitions to advanced techniques. We covered:
What Image Inversion Is: A process that flips the colors of an image to create a complementary effect.
How to Flip an Image: Simple steps to mirror your image horizontally or vertically.
Steps to Invert Colors: Detailed instructions for applying and adjusting color inversion in Microsoft Word.
Benefits of Flipping and Inverting Images: How these techniques can be used for artistic purposes, accessibility improvements, and more.
Tips for Effective Image Inversion: Practical advice for making the most out of the inversion feature.
Common Issues and Fixes: Solutions for problems you might encounter when inverting images.
Alternatives to Microsoft Word: Other tools and software for more advanced image inversion features.
FAQ: Answers to common questions about image inversion in Microsoft Word.
By leveraging these insights and techniques, you can enhance the quality and effectiveness of your images in Microsoft Word. Whether you are a student, professional, or hobbyist, mastering image inversion will allow you to explore new creative possibilities and improve the visual impact of your documents.
If you find that Microsoft Word's built-in features are not sufficient for your needs, remember that there are various alternatives available, such as Adobe Photoshop, GIMP, Paint.NET, Canva, and Pixlr. These tools offer advanced options for image editing and can complement your work in Word.
We hope this guide has been helpful in expanding your knowledge of image inversion and providing you with the tools and techniques to enhance your projects. Happy editing!
About Author
admin
Making up design and coding is fun. Nothings bring me more pleasure than making something out of nothing. Even when the results are far from my ideal expectations. I find the whole ceremony of creativity completely enthralling. Stock Photography expert.
 Flipping an image in Microsoft Word is a straightforward process that allows you to mirror the image either horizontally or vertically. This can be useful for creating symmetrical designs, correcting the orientation of images, or simply achieving a different visual effect. Follow these steps to flip an image in Word:
 admin
admin


